Showing posts with label Paint. Show all posts

Friday, March 24, 2017

DIY Barbie:New second floor

Here is the vintage Barbie Victorian Mansion purchased at GoodWill 
for $4.99 in amazing condition, with all working parts, that we have been playing with for a year.

The second floor as originally designed which barely had room for a single bed with its 9"depth. 
The hole in the floor for the elevator which cranks on the knob of the turret took up lots of room.
 When the tub on the left was down, it further cramped the space.

http://oldnewgreenredoblog.blogspot.com

Where are all the Barbie's supposed to sleep-let alone where do their clothes go?


Since the Grand isn't tall enough to reach up and over to use the crank on the elevator,
 I decided to board it over on the second floor. We also extended the wall forward 6 feet in barbie scale (1:6 scale) and 13 Barbie feet to the left side of the existing bedroom.
Who wouldn't want a 600+ sq. foot addition to their bedroom?

http://oldnewgreenredoblog.blogspot.com


Because the Mattel construction's very strong---when the house was opened, it was still sturdy.
 The green thing above is a vanity/tub that swung down and further used up the precious little floor space on the second floor.


http://oldnewgreenredoblog.blogspot.com
]

Here is the elevator on the second floor in the up position. Ramp just really reached far into the room.


http://oldnewgreenredoblog.blogspot.com

To begin the first job was to hack off the fittings for the built-in tub/vanity. 
I used a Dremel circular saw and eventually cleaned this all up, 
leaving the wall in great condition. 
If you are doing any kind of miniature work--a Dremel tool is a must have. 
I'm 69 now and have had 4 of these tools over the years, 
and they have always earned their keep.

http://oldnewgreenredoblog.blogspot.com

The largest paper I had to make a pattern for the new floor was a Hello Kitty coloring book. you can see the jig-jags as it is laid out on a light weight piece of pressboard. We chose this for its smooth surface and thin profile, light enough to be supported on the existing floor with a little help.

http://oldnewgreenredoblog.blogspot.com

More jogs to cut out which I did with the Dremel tools and a small saber saw.  The paper was fitted around all existing parts of the house including the built in pink cabinet. By fitting around the jogs, the floor adds additional stability to the now opened house.

It took several shavings and adjustments for the floor to neatly slide into place.


http://oldnewgreenredoblog.blogspot.com

Sadly the paint did not end up matching the existing green on the house, 
but is a more contemporary country green. Paint will happen later, when I can spray and use plastic paints outside.

http://oldnewgreenredoblog.blogspot.com

Here you can see the jogs (many)that had to be made,  but these also stabilized the house.
The floor is simply set in place without any gluing or screws.


http://oldnewgreenredoblog.blogspot.com

Here is the NEW second floor fitted over the dining room below. A support column made out of a 
dowel on the left supports the closet room, that once held the attached vanity/tub. we may add an edging to the floor to make it blend with the townhouse to the left. It is one step up into the bathroom from one house to the other---not bad for an urban renewal "This OLD DIY Barbie House."


http://oldnewgreenredoblog.blogspot.com

The support column below, appears a shade different then the original beige white column, will REDO that when we have some good weather to spray paint. Maybe I can faux some grooves. The column is attached with velcro dots, at top and bottom. 
Not permanently attaching anything the two houses can still be closed up into boxes.


http://oldnewgreenredoblog.blogspot.com

Now the extended floor forward allows for 2 beds, a 12"long bunk bed 
and a 12" double bunk bed placed over the elevator hole which is now covered. 
Plenty of room for 6 barbies now.

Now where to put clothes for Barbies, in the NEW walk-in closet.

http://oldnewgreenredoblog.blogspot.com

The old wall of the bathroom with the new floor is perfect for a walk-in closet.
Again the floor is slotted around the opened left wall of the house.
Some paint will be used in the future to unify this house with the Barbie Town House to the left.
The convenient walk-in closet is next to the bathroom. 


http://oldnewgreenredoblog.blogspot.com

I made tons of hangers from plastic coated wire, tutorial sometime in the future.

http://oldnewgreenredoblog.blogspot.com

I love the old vintage hangers but they are quite expensive and the new ones are very flimsy.
These are easy for 4 year old hands to work with and can be used for pants and skirts also.

http://oldnewgreenredoblog.blogspot.com

I had intended to build an entire wall closet, but found this OLD wood wardrobe very beat-up at Savers for $1.99, all it needed was a paint REDO--and it fit perfectly as the wall between the closet and the bedroom.
.
http://oldnewgreenredoblog.blogspot.com

Here it is placed perpendicular to the closet wall.

http://oldnewgreenredoblog.blogspot.com

Add some plastic drawers originally from the dollar store. And a walk-in dream closet.
Like most people, we have winter clothes and summer clothes, so I will have 
to switch out the coats and long sleeves for summer dresses.


http://oldnewgreenredoblog.blogspot.com

Here you see the new floor addition in the middle.
 It goes above the dining room, but really doesn't inhibit reaching into the rooms.

http://oldnewgreenredoblog.blogspot.com
Cost for the 600 square foot addition, $7.00 for floor, $3.87 for paint, dowel was scrap $.30 and velcro dots ($.75)

And the REDO bedroom complete with with Old, New, Green, Redo furnishings 
just waiting for another post.

Thanks always for visiting. 
I will try and respond to every comment and answer every question.

All the opinions and photographs in this blog are my own, I have not been paid or reimbursed in anyway for my opinions, posts or any products shown or anywhere I shop.
 Please do not use photos without linking back to this blog without my permission. 
Thank you for your cooperation, Sandi Magle

I will be sharing at these fine Parties!


Sandi


Saturday, December 19, 2015

DIY Barbie House:Moving IN with Vintage


Well this is it, Barbie and Ken's moving week. I have been gone from blogland for a couple days, finishing up the furnishings and getting the plumbers, electrical, and appliances all hooked up. Such a lot of coordination to be done, somethings are still not ready. THIS is a totally OLD< NEW < GREEN>REDO>!

Let's see how Barbie and Chrissy like the new digs. Just listen to where all the furnishings came from!

oldnewgreenredo

DIY Barbie House, almost all moved in.


oldnewgreenredo


Chrissy: I love the rug you got at HL, and this little Goodwill settee is so comfy. And this awesome chest of drawers made from an old jewelry box. Neat paint job, a real REDO on a $3.99 jewelry box from Savers.

Gee, Barbie, what else do we have to do? My feet are killing me.

Barbie: Thanks, Chrissy, and for helping me hang the pictures and setup the bedroom and bath. Well,
 I still have to move clothes in and finish the bedding. There's lots of sewing left here. Don't you just love the pearl $1 'B' from Joann's and that's where I got my $1 green mirror. They're so classy, though.


oldnewgreenredo

Chrissy: Sure is. What's the purple fabric for and are you going to do something with your Michael's headboard?

Barbie: The purple will be padded on the headboard and sewn for a bedskirt, and the pink and stripe will be cool sheets and comforter.

Don't you just love the lamps made from purple umbrella ornaments and wood candlesticks from Walmart and Michael's?

Chrissy: Sure do, can't wait to see the chandeliers you ordered. When are they coming? I love all your IKEA frames too---really an inexpensive, unbreakable for kid's artwork or photos.


oldnewgreenredo

Barbie: Chandeliers are coming on Sunday, and hopefully I will sew the bedding by then. There is room under this custom bed made by Grampa to hide most of my clothes. I have a closet in the bathroom, but it isn't big enough for everything.


oldnewgreenredo

Chrissy: Looking through this cool window---with the Barbie logo design. You are so lucky,  I bet your little girlperson will be so happy to see your new house on Christmas!

Barbie: Oh, I hope so, but we still have to decorate the livingroom tree, wrap presents, bake cookies, and I need to wash up and change clothes for the supper, tonight.

oldnewgreenredo

Chrissy: Let's go see what you have in the closet.  Wow, the bathroom is so big and bright, and I love the window---it matches the window in the bedroom. Love the tub and the tiled planter. Plants will look great in there.

Barbie: I have some hot pink in here, I had to have it somewhere, LOL. I have lots of storage.

oldnewgreenredo

Cabinets by the toilette, and I did find a box of small Christmas trees. The wood cabinets were on sale at Michael's for $1.00 each, I spray painted them and glued them together.

Chrissy: Love the cabinet, and bottle trees are so in now, they look great. Show me your closet.


oldnewgreenredo

Barbie: My closet is FAB! and was a DIY-- REDO of a Mattel Barbie Vending Machine that was broken. I found it at GoodWill for $1.99 full of all these shoes and purses! Now, it has great shelves for towels and stuff. Gramma even made me a clothes hamper and the vending machine part makes a great closet. (And the bathroom window and bedroom window were made from the plastic back---REALLY!)

oldnewgreenredo

Chrissy: I love the hamper and you have all this great storage for towels and sheets. Where's the TP?


oldnewgreenredo

Barbie: I sent Ken out for TP and bread for supper. Speaking of supper, I'm hungry, let's go downstairs and grab a snack.


oldnewgreenredo

Barbie: Good thing we came down...the cupcakes for dessert are ready to come out of the oven.

Chrissy: I love the kitchen, it's so cozy and the dropleaf on the table really works. You have everything you need right there. And so much storage in your cabinets and shelving.

Barbie: Grampa built the cabinets, but the shelf was $1.99 from Savers. It was too big, so he cut it.
I made a great batch of cupcakes, don't you think! My favorite thing is the dishwasher...Never had a DW in the apartment.

oldnewgreenredo

Chrissy: I love your shelves and the stove--- a custom-made stove is awesome. Your Grandpa is so handy!


oldnewgreenredo

Barbie: The Farmer cookbook and all the food stuffs were from goody bags at Savers, or from Gramma's craft stashes. The cute strainer was from Great Grandma, and was an ornament.

Bing! Two more trays of cupcakes, I'm getting hungry for supper! Help me whip up a salad to go with the spaghetti.

oldnewgreenredo

Monday, October 26, 2015

DIY Barbie Doll House: Week#3 Pt.2- Finally COLOR


AT Last
COLOR!

oldnewgreenredo

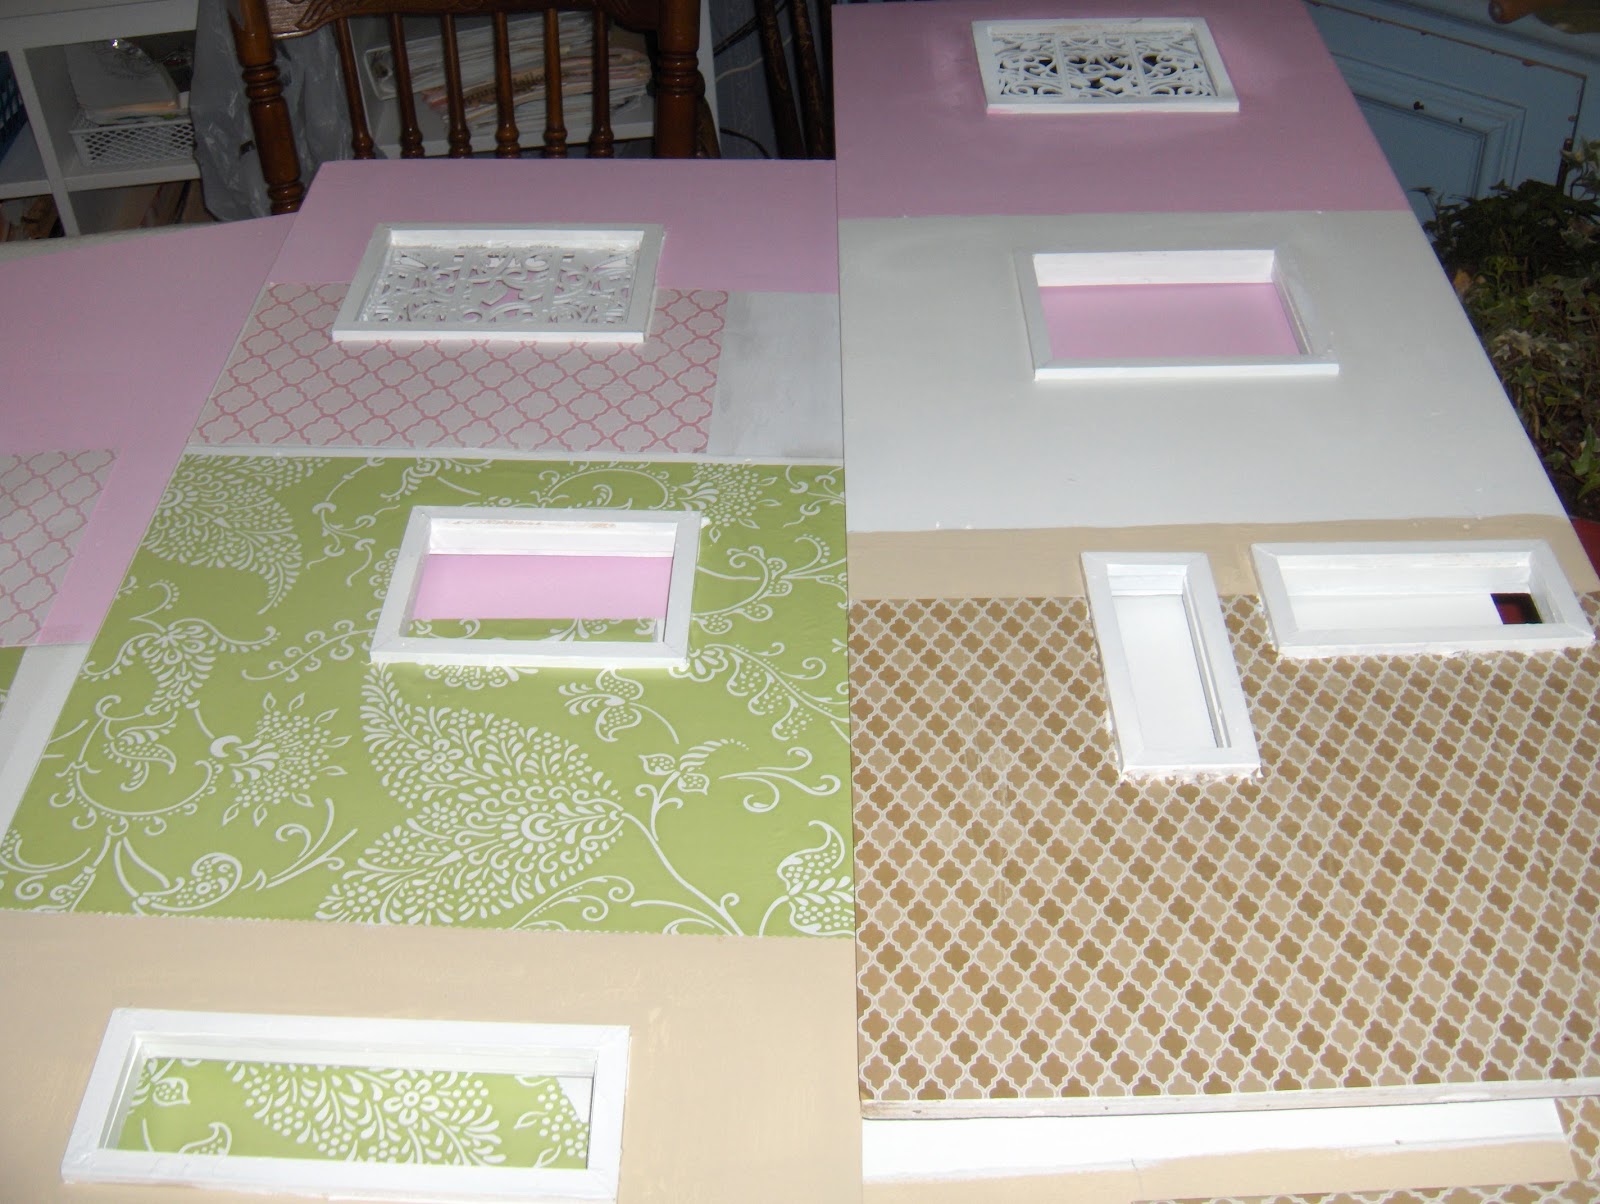
At last color----well, here's planning color first anyway.

Wanting to get away from Barbie magenta/pink and purple in all the furnishings and after consulting my daughter-in-law, we talked about a contemporary look with some fun things in a wider color family. Like a real house, and real people.

But, still using as many materials we already have. We both love green, and I had the green and white contact paper which is perfect for the kitchen. The gray tile which looks blue here, is really gray silver which is perfect as appliances and some furnishings will be stainless steel. The gray/silver tile will run through the living/dining room with white walls and the green and teal blue for furnishings and also on the third floor bedroom and bathroom.

The 'hardwood' flooring, brown bath tiles and beiges are on the bottom floor in Ken's man cave.

Barbie's bathroom/closet and bedroom on the third floor will be pink/white in the bathroom, with the pink tiling, and the other fabrics, purple, pink and stripes for the bedroom in the linens and furniture. With the silver gray floor that should work really well. And there will be green touches here also, there are two shades of green in the striped fabric.


oldnewgreenredo

So here is the tiling which is actually scrapbook paper mod-podged in satin directly onto the walls. I used two coats of modge-podge.  There are still a few bubbles here and there, but almost everything disappeared after drying. I used a foam brush and worked from the center out and then quit. Do NOT over work, the paper will not stand up to it. Actually wrapping paper works better, but finding tile prints is hard.

oldnewgreenredo

You can see the bubbles, but they really did shrink out when it dried.

 Here is the last of the pink tiling paper is laid out on the board with the pink paint.

oldnewgreenredo
Here is the bath/bedroom colors again. I mixed the pink on the upper right from old paints I had. Magenta....lol and white and it was almost close to perfect.
 

oldnewgreenredo

One of Ken's bathroom walls. More bubbles, but they do shrink out!


oldnewgreenredo

All three of his bathroom walls and look how the windows pop. We chose beige for the paint. (This is the trim paint in our family room.) So free. I did have to buy some white satin paint as we did the interior of the shed this Fall, by mixing all our light colored old paints together (GREEN) instead of sending them to landfills.


oldnewgreenredo

Here's that tile wall with all the bubbles, dried. It looks great with the hardwood tiled floor-6 tiles at 89 cents each with a rebate.


oldnewgreenredo

I couldn't resist showing the wall cabinets on top of the green and white contact paper. (I did have to use a spray adhesive as the contact paper I've had for years and wasn't very sticky). So it was pressed down twice. I trimmed with the metal square and a sharp exacto tool.

oldnewgreenredo

I think the colors will work well, the appliances will be stainless steel and all metals will be silver.


oldnewgreenredo


Add the white walls in the living room. I may do an accent wall on the stairway wall, 
to break up the white. 


oldnewgreenredo

Here are the walls with the windows, I need to do touch up but will do that after assembly. As there are many things to do yet, that could mess up the walls. I will use a sponge brrush and just dab paint on.

oldnewgreenredo

We couldn't resist holding up the walls to get the 'room' effect. Working on the pieces flat has saved so much frustration. You just have to measure carefully, but we are putting up baseboards and door trim,  and ceiling cove moldings (which will hide the electrical).

oldnewgreenredo

We laughed when we saw this at first,  on the east walls. Neopolitan icecream, lol.


oldnewgreenredo

Here are the white walls and the fabrics for the living room and dining room. I think the stripes may wander into the kitchen too.


oldnewgreenredo

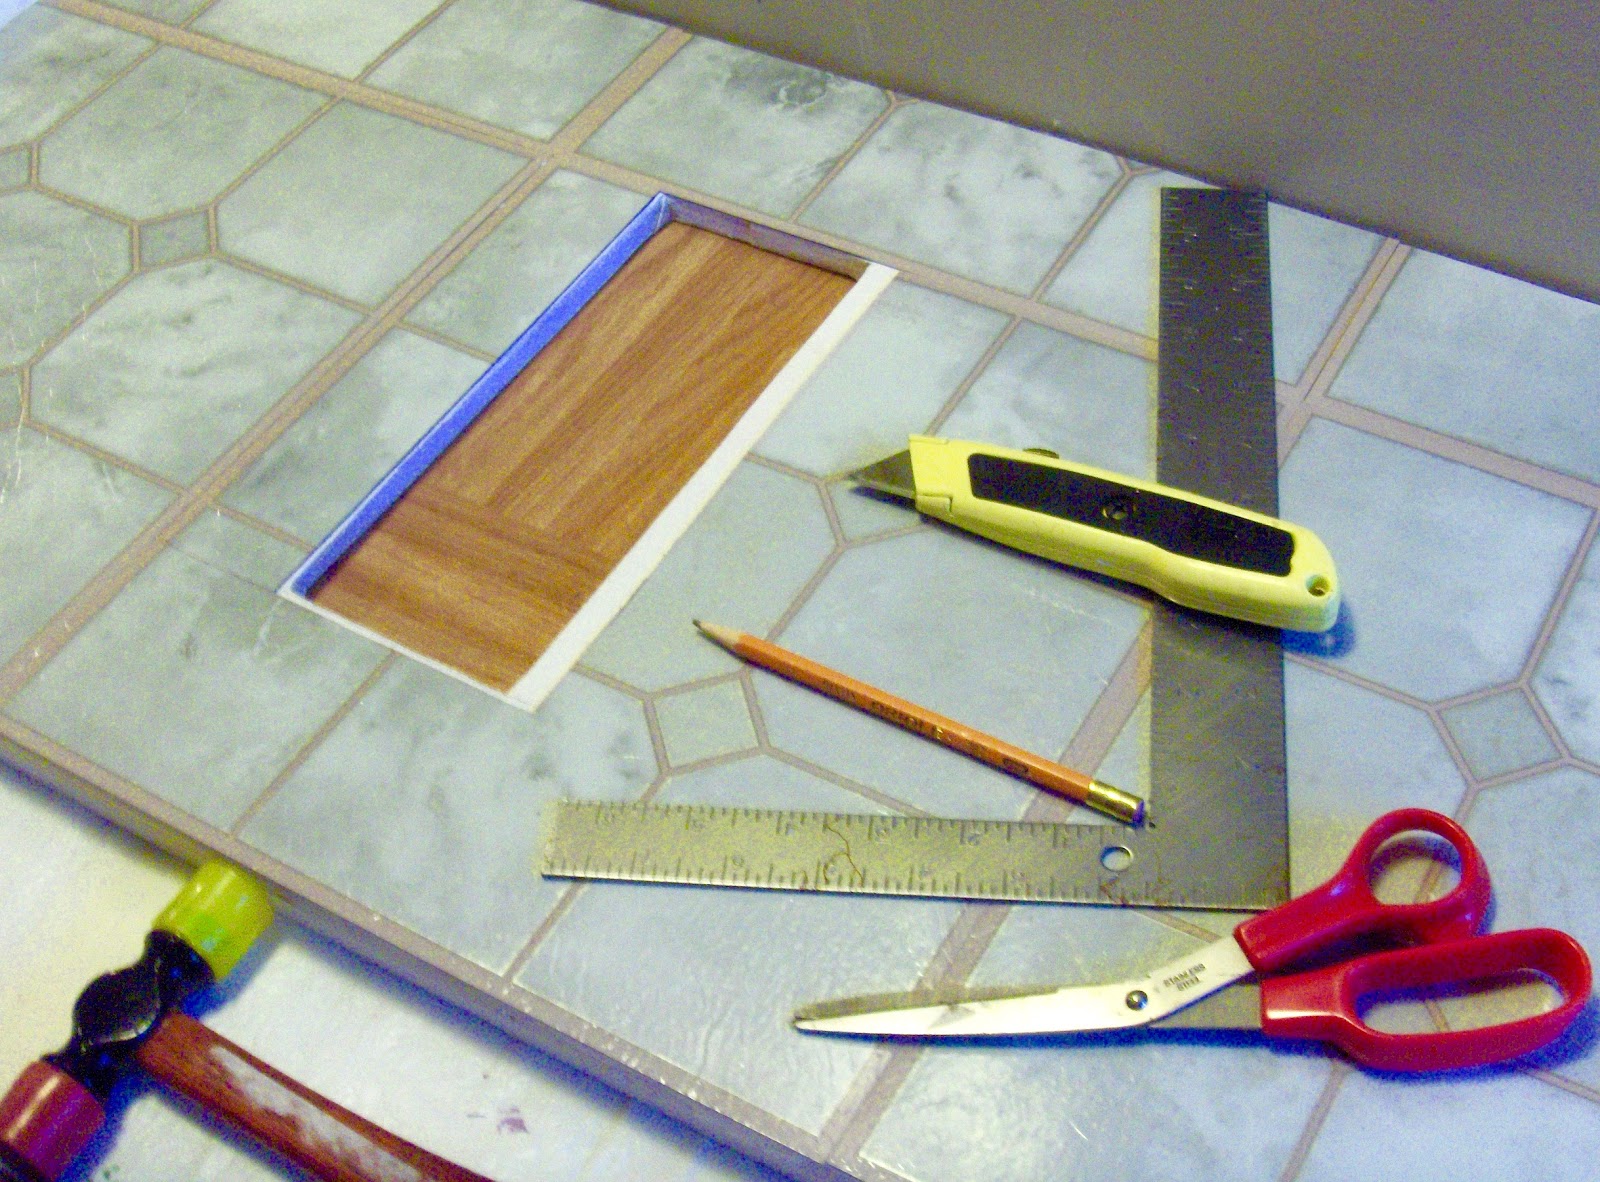
Cutting the floor tiles was way easier than expected. I placed the complete tiles at the front of the edges and worked to the back. I marked with a waterbase marker, and cut with an exacto knife by scoring and bending then another cut. Using a metal straight edge is a must. A rubber mallet is a great tool, I also used a rolling pin to press down the tiles, as we won't be walking on them.


oldnewgreenredo

Really just a few simple tools. The white strip is the woodbase and a wall will go there 1/2" wide. Again these are leftover tiles...so basically free.

oldnewgreenredo

READY to MOVE IN...NOT YET
Next is Week#4
Moldings, Electrical and Wood Trim.
Just like a real house, but WHEN are we going to get to the FUN stuff...????
and then again, the workers aren't union. 
 Plumbing: the toilets are brand new---so there shouldn't be any major problems, but everything else is second-hand or vintage though, or hand made, so there will be lots of DIY posts!


All the opinions and photographs in this blog are my own, I have not been paid or reimbursed in anyway for my opinions, posts or products used. 
Please do not use my photos without linking back to this blog without my permission. 
Thank you for your cooperation, Sandi Magle


Thanks for stopping by and all questions or comments. 


Sandi