Friday, August 28, 2015

REDO-the Three Little Pigs, for the boudoir!

Finally getting at my REDOs

One of the best parts of REDO-ing OLD junk has to be saving it from a landfill and the fun of trying to repurpose into a NEW item and making it go GREEN. 


My original post about my June Junking finds is here, Junking Post.
 I'm still working a few items there; the pedestal table will be an entire post on its own. 

Now to the shelves and cabinet.

FIRST an American saying…"ugly as a sow's ear."
Second, an old Danish saying, "Every sow thinks her little piggy is beautiful."
Well here is a a few sow's ears and three little piggies in all their before and after. 

I confess this first one, the three tiered shelf
sat on my front porch in all of its puke-pink glory for two months. 
Finally hubby said, "When ARE you going to do something with that?"

The problem was not just the color, but its substantial proportions 29" Tall by 25" wide. 
As a metal shelf goes its huge!


I originally planned to paint it dark green or barn red and use it for garden stuff, 
but we didn't really have a large wall space in the sheds or in the garage. 

 So, when it came to painting it, I just began with emptying cans of ivory and white on it---yes, just plain old satin spray paint to cover that pink. I could not fathom brushing it with anything else.

NEXT!


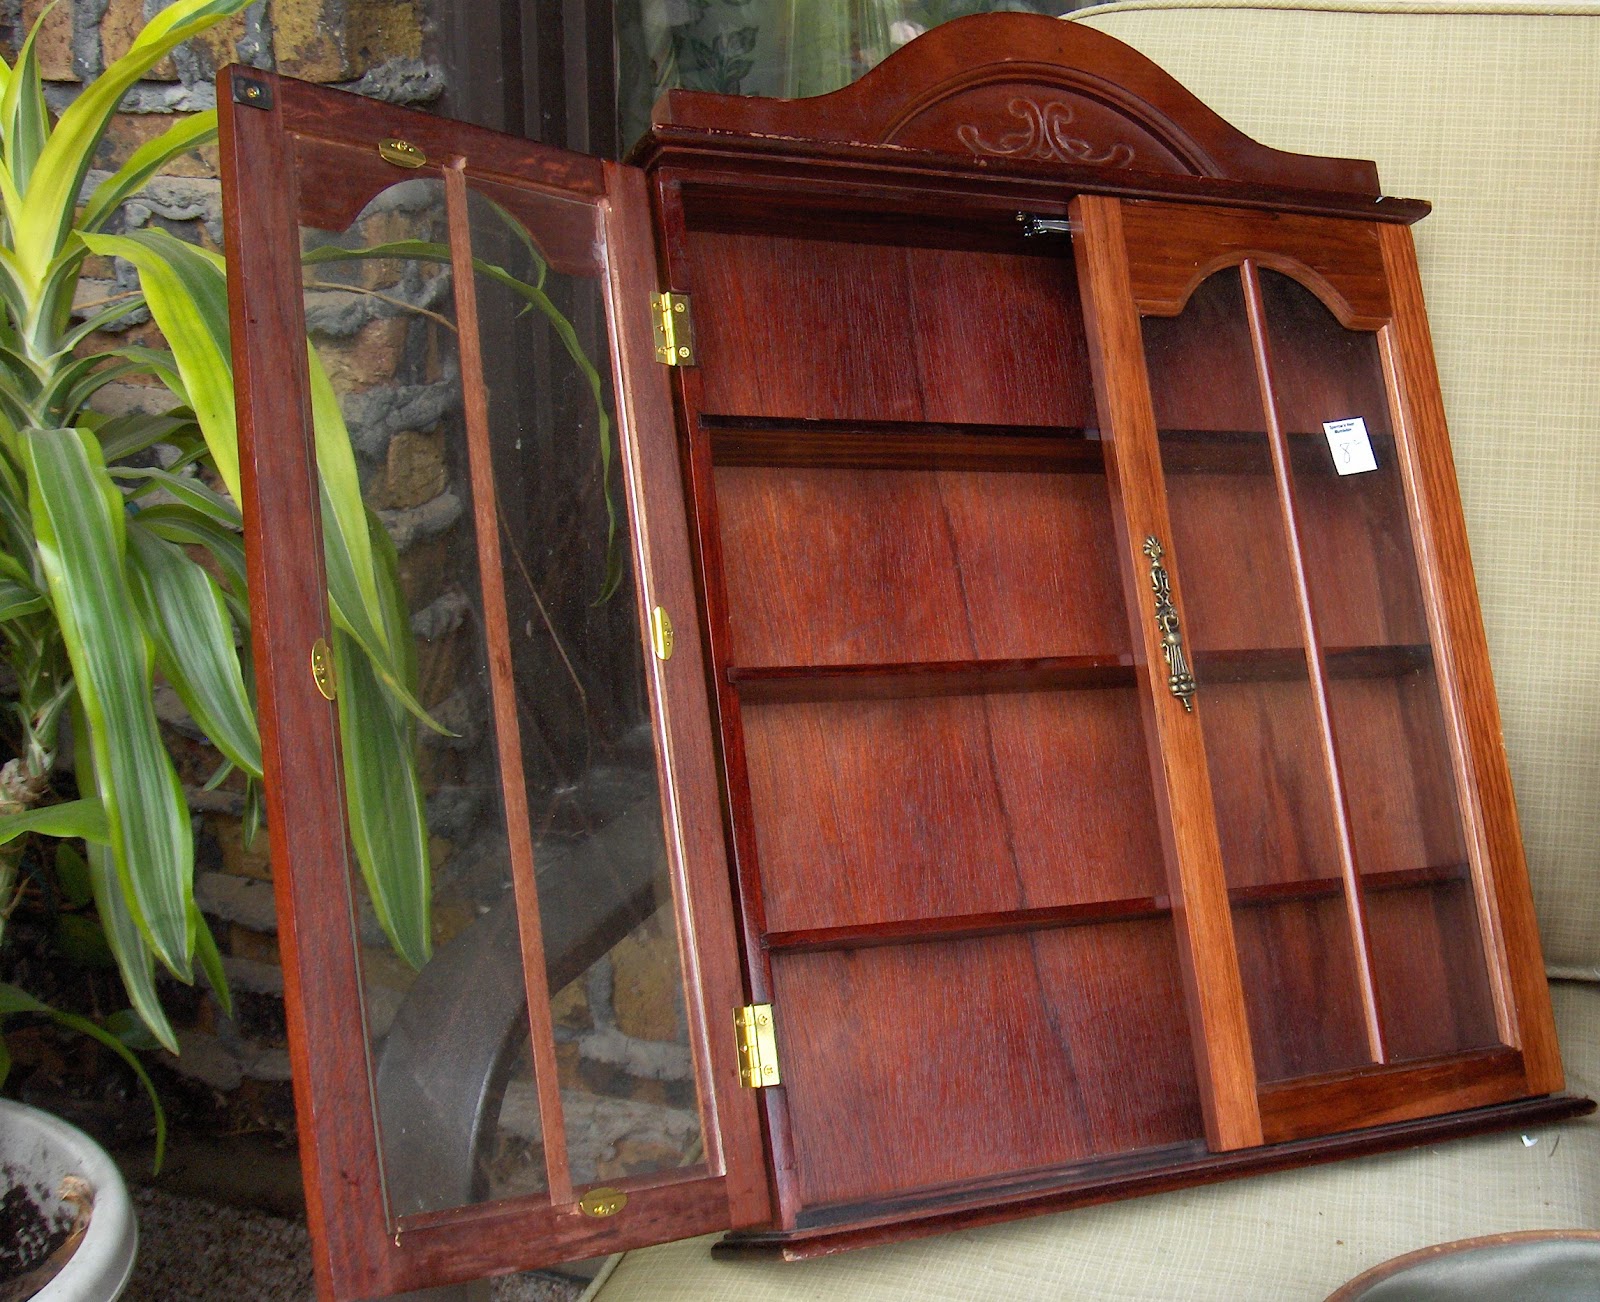
This little cabinet, I got for $4 at a thrift store…shallow shelves and glass windows 
and that awful mahogany cherry stain from the 90's.
 I knew the bleed-through under fresh paint would be hideous.
 What could I use that for?

I thought of the box of nail polish bottles, I had cluttering up my bookshelf. 
But, how to keep them on the shallow shelves? 
I imagined myself knocking an entire row off, while trying to remove one.


Honestly that cherry mahogany is nasty!


NEXT!
The before picture of this one…


Just your standard 50's gold metal bathroom shelf, 
sprayed black, and sprayed sorta white.
Basically ugly, but functional. 

LET'S BEGIN!

The two metal shelves I simply sprayed and sprayed and sprayed, white and ivory. I exclusively use satin paint; durable enough to wash off, and basically has very little shine. 
Sealing, waxing is just not my thing, nor is daubing a million surfaces with a brush. 
A 'do-over' is an easy fix over a sprayed satin base, and perfect for glazing too.


Wow, this looks MUCH better! My little piggy is beautiful. 


I'm staging this outside, because I still have no place to immediately hang this. It may temporarily move to the shipping/quasi craft space. But one can dream!


Lots of shelf space on this piece. 


With some of my favorite kitchen pieces---if I had wall space!


The cool white goes well with my blue and white Copenhagen porcelain
 and my grandmother's blue glass birds.


Maybe when the kitchen is redone, there will be a place for this
 or by the UGLY coffeepot, for my mugs and cups. HMMMM!

NEXT the other sow's ear, a potential jewelry display?


Basically ugly, but functional. 


TIP: I always flip my items over and paint the bottoms first---it avoids drips on the surface that shows.

A lightbulb went off in my HEAD!  NEW IDEA!
Since Grandbaby has taken over my dresser, now all my jewelry is hidden and then I don't' use it!

HOW about this for a REDO!


I'm showing this sitting UPSIDE DOWN---but I am planning on 
hanging it on the wall after the bedroom remodel. 
Then the bottom shelf rim can hold more earrings and give room to hang necklaces on little hooks.
 I'm considering bending the back rim of the bottom shelf forward 
to give more clearance for hanging items.


I'm totally loving this idea, I'm sure I will grab something and walk out the door 
looking gorgeous because of this little REDO piggy project!


I wear clip earrings and vintage jewelry---Now, I can stage for the seasons from my collections. 
This will be my late Summer, going into Fall assortment.
 The towel bar is perfect for keeping bracelets sorted.


Total cost for this project $3 plus paint, and maybe some hooks later. 
Now, I need to look for a vintage frame to NEW pin station! 

NOW the wooden cabinet. And those shallow shelves. 


I cut two pieces of NEW beaded wood molding-Michaels $2.49- to fit. See above the goose girl. 
Pounding and gluing that skinny wood was tricky. Hubby finally started up the compressor and 
 (brad) nail-gunned it. The mahogany wood was so hard that nailing just didn't' work. 


After a light sanding, I painted two coats of white primer and 2 coats of white satin enamel, and stopped. I may glaze this later with dusty blue or add another coat of white and distress. I did not weather the finish--yet, as the jury is still out---on its final destination and finish. 


I re-attached the original hardware..even the magnetic catch 
and filled the shelves with all my nail polish.


And added my grandmother's lavender glass birds, my little goose girl box, and a few bottles. Later to be replaced with my small perfume bottles, and maybe another strip of molding!


And now, no fear of knocking all those bottles off those two shelves with the molding.


See how neatly they are tucked away behind the decorative trim molding. 


Total cost for this cabinet, $6.49 + paint. 
Hubby said, "I really like that!" And, he basically doesn't like anything I do with OLD stuff. 

Thanks for stopping by and I would love to hear from you!

Sandi


Linking to these Fab parties!


All the opinions and photographs in this blog are my own, I have not been paid or reimbursed in anyway for my opinions or posts. Please do not use photos without linking back to this blog without my permission. Thank you for your cooperation, Sandi Magle


Wednesday, August 26, 2015

Redo Old Dresser for New Grandbaby

Grandparents, DIY-REDO furniture project


A sneak peek!

I know this is an OLD project, but we were so excited in 2012 to
 finally become grandparents in our mid-sixties. 


Here's my son, Kurt, and his beautiful wife, Richelle, at a small baby shower we had on our porch. Baby food on breadsticks was the party game---amazing how few items were identified. Some of the following pictures are from old photo scans, so bear with me.

But onward to our REDO PROJECT!

My husband and I are great DIY-ers and I had all this odd-ball furniture left over 
from my walkin-BarberryLane-shop in the garage. 
The kids had no baby furniture picked out, other than a NEW crib from Ikea--
honestly I am not getting reimbursed by Ikea.
 But, it was the smallest crib we could find
 Richelle could reach over, because she is so tiny.

So, we took two of my OLD shop shelving units (they had held sheep's milk soap) 
from my stash and a beat-up old dresser, I think I found for five-dollars 
and proceeded to paint with some grass-GREEN satin enamel and some wooden flowers!


Tiny 89 pound Richelle, next to a shelf.

Now the flowers were from my parent's craft stashes. They supplemented their  
retirement income in the 1970-80's by doing craft shows. 

So, the REDO dresser, shelves, and flowers were also something OLD
just like the expectant Grandparents.


Here's a picture of all the flowers my dad made and my mom painted. 
Cute stuff!
 I wish I had the teddy bear chair, they were adorable.


I picked a palette of quite a few NEW colors of satin acrylic enamels.

 I added a few pre-cut wooden shapes and tweaked their colors, 
all in a garden and bug theme. 
The white bunny was a garden ornament from my parent's craft stash. 
The pieces were all screwed from the back or glued and nailed. 


Colorful and Cute!


My dad, Jerry, and one of his many projects, a custom made rocking horse.
He would have loved working on this project.

Here's the dresser finished, with the installed changing table top added, this was pegged and easily removed. 
The tiny baby we were expecting outgrew it in like 2 months. 
She's very tall now and will be wearing her mom's clothes
 by the time she starts school, lol.

Painting all those knobs was a pain, I swear, 4 coats of craft enamel. I stuck them in styrofoam on their screws to keep them all straight. 

We dragged the three pieces up the stairs, that was the hardest. 


Ready for installation…all three pieces were bolted together for safety.
The color on this photo is closer to the actual, bright, 
clean, kid-friendly paint, and very GREEN color.
Total cost was maybe $20 dollars for paints and the knobs were originals or from my stashes, and $5 for hardware.


Hubby (Grandpa) after installing the last bolt. We finished just in time, baby Jerri was born on 10/11/12 about a week later. 
.

NEW Jerri, named for my Dad, slept soundly surrounded by three generations of ~LOVE~
 in this OLD~~ NEW~~GREEN~~ REDO furniture project.
Phew, I got them all in again!

Linking at these great parties:

As always, thanks for stopping by, 

Sandi


All the opinions and photographs in this blog are my own, I have not been paid or reimbursed in anyway for my opinions or posts. Please do not use photos without linking back to this blog without my permission. Thank you for your cooperation, Sandi Magle

Monday, August 24, 2015

Monday's Wash Day---Old-New-Green-Redo.

  Going Green-Monday, or Wash, Pick Tomatoes, Weeding, and Flowers.

 Our side patio stretches long and skinny along our fence and flower/vegetable beds.
When we have gorgeous weather like today,
I like to hang out wash, especially bedding and linens. 
Wondering what I should post---I thought of this on the tail-end of washday. 
Going GREEN saves electricity and the wash smells so good for just a few perks.
And, I loved being outside under the blue sky! Yay!


Besides going GREEN with the wash, we picked and are ripening our tomatoes on the NEW Ikea cabinet, from a previous post. Ripening usually takes 1-3 days, and the tomatoes are safer from our pesky predators and insects that seem to think our garden is a food market, sample station.


The IKEA cabinet from previous post here: Ikea cabinet coffeepot tweak


Of course all the OLD antiques and things on the top had to go to the kitchen table.


Trays of tomatoes, getting their final sweetening. 
Some are not perfect as we try to be as GREEN and organic as possible.
The yellow tomatoes are so sweet, the best, and I will can those by themselves.
The minis are getting roasted, directions here: DIY Roasting Tomatoes


The dragonflies on the fence beckoned me to do a bit of weeding. Those are Asian Eggplants to the lower left, and the gray leaves are a huge Kohlrabi, 
and are my husband's favorite. 
We will be using Kohlrabi as a snack with humus dip soon. 
Kohlrabi are a cabbage-like tubers that grow above ground, 
and are great raw, fried, or in stews.
 I will do a posting soon, when we harvest; they are now baseball size.

So I pulled weeds, all along the fence and pinched my Marigolds. 
The Hollyhocks, sadly are in seed stage, and just a few flowers are left here and there. 
Still very interesting, and I will wait for the seeds to dry…
and then spread them all along the fence for a REDO, or technically, redux.


So--continuing the going GREEN, I picked flowers, nearly the last of the summer. 
Besides weeds, I pulled somethings unintentionally, 
which ended up in the floral bouquet for the table. 
A few Hosta leaves, the last Tiger Lily…a single white Viburnum blossom 
(totally confused bush-usually blooms in spring), some Zinnias, 
a Phlox, white and orange Marigolds, Coleus, and Ageratum. 
My arrangements are very casual and I make do with whatever is available. 


The fresh flowers in Grandmother's OLD blue coffeepot, 
the one she burnt a hole in the bottom of, but a glass fits nicely inside, a REDO
Her OLD cookie jar, a NEW apple candle and the NEW Xmas (2015) pig, 
that has taken up residence for the year, courtesy of my friend, E. 
The OLD fish poacher holds bottles of bubbles and napkins…
essentials for every table, LOL.


Another something OLD, my BarberryLane sign from my old shop, 
circa 1999-2009, in Volo, Illinois.
The sign surfaced in our garage excavation and will be a REDO
soon for my Etsy shop, BarberryLane 
We are still going through leavings from my parent's house, my closing the shop, 
and my own collecting.
 Sometime soon, I will shop again in the garage and post, like here: From the Garage


Gramma's OLD Red Wing Monk Cookie Jar. He's really that bright yellow, 
and still smells like Danish butter cookies Gramma stored in there.


On this side of the arrangement is Coleus and some purple Ageratum. 


So I managed to get 
OLD, NEW, GREEN, and REDO, into this post.


And always, Thanks for stopping by, on my Monday-Wash Day.
Sandi
Linking this week at these great blogs!


All the opinions and photographs in this blog are my own, I have not been paid or reimbursed in anyway for my opinions or posts. Please do not use photos without linking back to this blog without my permission. Thank you for your cooperation, Sandi Magle