Saturday, August 8, 2015

NEW CoffeePot Tweak

The 'DEAL' CoffeePot

One of the charming characteristics of my husband, since retirement, is to buy new sometimes useless doo-dads for the kitchen. Saying our kitchen needs a makeover is an understatement. We have been in this house since 1984 and we did the kitchen in 1987. The cupboards are original to the house from 1974 and have disintegrated in all ways: the finish, the drawers, the doors, and the layout are 
sad, Sad, SAD!. 

But, hubby got a deal. A full size, restaurant Bunn coffee maker for half-price. 
I found it, still in the box, in the bottom of his closet. 
I couldn't hang his shirts, it was taking so much room. I dragged it out into the sad kitchen. 
Whoops, minor problem, the Bunn didn't fit under any of the cupboards where the old coffeepot was, and ITS UGLY!


Where should it go? The cookbook shelves…hmmm?
I need to reduce the cookbooks---then, let's buy a new table,
 (cost more than a full price coffeepot), just for a place to put the cookbooks. 
Confession, the table was in the  master plan for the kitchen remodel, but still. 

Cookbooks Demise Where do all the cookbooks go?  Long time passing.


My collection of my mom's and my grandmother's and all their notes and my great-grandmother's on two sides in Danish, have to be gone through. Plus all the books my mom bought me, and those I have purchased since 1968. On the table was the excess. I have stashed one stack to sort through, while I incorporated another stack into the new cupboard, the rest go to GoodWill.

The 'Deal coffeepot' now occupies the cook book space. 

Also had to move all the paraphernalia for setting up the coffee station. 
Teas on top, coffees in the middle, 
filters in the enamel kettle, sugar, creamer, spooner, etc on the counter.
Gosh, it makes good coffee, but it is a big, black, ugly thing.
  

Maybe I can print a vintage label on magnet pages to decorate that thing,
…yea that's the ticket.


Vintage dishtowel 8'oclock Coffee 

Cute vintage towel from the 50's for an 8 o'clock coffee service covers the chopper blades case.
 I'm terrified to try and store the blades any other way, they are so sharp. 
Perhaps a vintage sticker on that black box, also.


Come on over and share a cup--the pot literally is always on


The New table with a fraction of my cookbooks installed


An empty shelf from the coffee stuff

Decisions, I moved the pantry staples in canning jars to the old coffee shelf on the bottom.


The middle shelf holds herbs and spices.
Most of these canning jars are from Wisconsin.


But where did those jars come from?

From, across the kitchen on the cooking side, leaving another big hole.
 The corner cupboard is a dead space, not a cupboard. 
I desperately need more cupboard space, for the big bowls and appliances. 
 In an attempt to clear the counter, I moved the blue jars, 
but I still had the items from where the Bunn machine moved to.
Golly, will it ever end?

Fruit basket or Blue Jar Upset!


All because hubby got a deal on a Bunn coffee machine.

It does make great coffee. 
And when the kitchen is remodeled we can design a cabinet for the cups and mugs.
 Oh yea, the cups are still eight feet away, but, you can't have everything. 
The cupboard above is too high to put mugs and cups, and below is the dishwasher.
 The one to the right is too skinny, we have those big red mugs.


Wonder what I'll have to move next? 

Linking to:

Thanks for stopping by.

Sandi


All the opinions and photographs in this blog are my own, I have not been paid or reimbursed in anyway for my opinions or posts. Please do not use photos without linking back to this blog without my permission. Thank you for your cooperation, Sandi Magle

Elkhorn Antique Flea Market~~What a Day in Wisconsin!

Great Finds at HUGE Flea Market in Elkhorn, Wisconsin

This is the first time we had been to this ONE DAY show. Elkhorn's located in southeastern Wisconsin, just north of the popular summer destinations of Lake Geneva and Lake Delavan. Nestled at the western edge of the Kettle Morraine area in rolling hills is the lovely town of Elkhorn. This huge Antique Flea Market is held at the Walworth County Fairgrounds four times a year.

The picture below is only about one-fifth of the exhibitors. Oodles of Fair buildings held indoor exhibits, and really not any questionable exhibits anywhere. Quality was great, prices were great, food stands were everywhere, and even benches to take a rest. The Restrooms were clean and convenient. 

The Walworth County Fairgrounds were packed


We arrived around 9 AM, it opens at 7 AM 
and runs only until 3PM, for ONLY one day???
Very professionally run, excellent attendance, and I did art shows for over thirty years and know when something is well organized and staffed. 
NL Promotions runs this great show and another in Milwaukee area. 

Some great furniture among the never ending booths.


Check out this great cabinet, love the yellow, it was---SOLD. There was gorgeous 
furniture of every style, metal cabinets, light fixtures, oak, wicker and more.

Guys Stuff!


Great guys' stuff indoors and out, lots of original vintage signs.
 Heres a KOOLS sign with the penguin, certainly from the 50's -60's.

Primitives and Farm items, it is Wisconsin after all.


I have never seen so much reasonably priced enamelware, and BLUE Jars 
ready for GOING GREEN and be reused for something special.

 Antique Farmer in the Dairy Shed.


Jenny Pinnow from Antique Farmer was more than happy to chat about her business, and her great items. This was late in the day, and she said many items were gone. 
She does appraisals online and is located in the area of Delevan.

Another Booth 


Cute children's garden wheelbarrow

FUNKY 


There was FUNKYstuff too, just look at this OLD weird chair with the 
sunken picture frame in the back,
 it looked original,…but now with the REDO the seat has a flower pot to match. 

The turquoise stools were awesome, too.

Glassware and pottery for any taste

This booth had nice color-coordinated displays of Jadeite, and OLD colored glass. 
The owner was too busy selling and wrapping to chat.


The great booth that led us to Elkhorn was Jeanine Burkhardt's, Chippy Shabby booth which despite her fab directions on her blog, had us wandering through the labyrinth of the unfamiliar layout of the fairgrounds.

This CocaCola sign was sold, about an hour after we saw it. Awesome color and in great condition.

Her booth was packed with customers, and it was hard to get pictures 
without someone jumping in front.
See her at her blog…here


That's her sign on the lower right.
She does great REDO's on vintage items.


I really love her look, she has primitives also! Her displays are always charming
 and make you want to buy the entire vignette.


I really wanted this chandelier, I hope it wasn't sold, so I can get it next time.
So want to REDO it into something NEW.


What we did get!
I got a gift, I can't show****, you know how that goes.

E made a haul!

I waited in the pick up area while E had to wander and try to find the three booths she had bought things from. The huge horses apparently attached themselves to her,
 as she was wheeling back.
The two rocking horses, sans their handles and spring holders, a REDO ready for crafting?
~ Garden horse anyone?~Mosaic horse anyone?~
~Planter?~ Carousel?~


This OLD, hand-carved, oak, 1910-20's reclining woman with a cheetah was probably
 an insert on a piece of furniture, and was only $8 -ready for a REDO and recycle.


The chalk ware Art Deco lady is missing her cigarette,
 but then smoking is bad for your health. 
She has a black marble base and was heavier then heck. 
Also in E's bag was a sweet embroidery, we both had our hands on.
Last, but not least, a 3' x 4' painting of St. Francis of Assisi from a convent.


Yes, E has an eclectic sensibility, but what fun to find so many unusual items.
Like I said, what a DAY the best kind of JUNKING! 
I'm saving my pennies for the September Show, 
and we will go fortified with coffee and with two carts, 
 room in our tummies for cream puffs, and a large map of the Fairgrounds,
 so we can actually find where we are.

Linking to:

Thanks for stopping by

Sandi


All the opinions and photographs in this blog are my own, I have not been paid or reimbursed in anyway for my opinions or posts. Please do not use photos without linking back to this blog without my permission. Thank you for your cooperation, Sandi Magle


Friday, August 7, 2015

DIY Roasting Tomatoes

DIY Roasting Tomatoes

The last three weeks have been warm and hot, with little rain after drowning most of June and July in the upper Midwest. Every other day, we have this amount of smaller tomatoes to eat. Impossible for two people. Normally I will fill bags of large tomatoes and throw them in the freezer for canning later. 
But with these small ones, I roast them, as the ripen. 

My grandmother's Father Tuck cookie jar stands guard, as the small tomatoes await their demise.


You can use parchment paper lined trays or foil. I reuse the foil several times because it seems like I'm doing this everyday. I put the foil in the refrigerator after use. Spray your lined empty trays with oil.
First, sort your tomatoes according to size. Wash thoroughly and slice tomatoes in half sideways, through the stem, this helps to reduce seeping of the juices through the stem. 
Place them close together, cut side up on the lined trays.  
Then, I spray them lightly again so they brown nicely. You can choose to season or not season, here. I find the fresh herbs char and lose some of their taste if roasted too long, 
but flavored salts and seasonings work great.

Place your larger tomatoes on the top shelf.


I use a 375 degree oven and set the timer for 30 min.
Depending on the size, they will begin to get some good caramelizing at this time. 
Reset the timer for every 15 minutes, to check on them. 
When they have shrunk to half their size and have a wrinkled appearance and are caramelized, 
they are done. Remove from oven and cool.


This tray of the smaller took approximately 45-60 minutes at 375 degrees. If you like charred tomatoes a few minutes under the broiler will do that. Cool completely. See what lovely color you get on the tomatoes.


Continue roasting the larger size tomatoes.


The larger tomatoes took 1 hour 15-30 minutes and then began to brown. This all depends on their sugar content. We grow twelve types of tomatoes, and they all will cook different. How long it takes also depends on the water content, ours were very firm and not watery at all this time.
Remove from the oven and cool.

After cooling, I bagged those I couldn't use in three days into 1 quart freezer bags and label. 


Roasted tomatoes in the store are expensive. These are so sweet and rich in flavor, 
and pre-done--they are a quick time saver. ts amazing that two trays of tomatoes only produce about 2 cups, but that is a lot of fresh flavor in a bag.
 Here are a few suggestions for using your roasted tomatoes.

Using Roasted Tomatoes

  • Add a few roasted tomatoes to boost flavor in your jars when canning tomatoes or sauces 
  • Quick roasted tomato bruschetta-just spread on toast with chopped onions, olive oil, garlic, basil and cilantro
  • Chop and add to store bought fresh salsa for a new kick
  • Add to canned or boxed pre-made tomato soup, garnish with fresh herbs--Wonderful!
  • Excellent on grilled fish or chicken
  • Use in wraps or as open-faced sandwich toppings
  • Make a Caprese panini with herbs, fresh mozarella, roasted tomatoes, olive oil and don't forget the olives. 
  • Add to pasta sauces, or to a simple oil and herb sauce.
  • Special treat, roasted tomato flatbread pizza--excellent with left-over chicken

Have a great weekend and roast all those bitty tomatoes, nummy!

Linking to: 


And thanks for stopping by

Sandi


All the opinions and photographs in this blog are my own, I have not been paid or reimbursed in anyway for my opinions or posts. Please do not use photos without linking back to this blog without my permission. Thank you for your cooperation, Sandi Magle


Tuesday, August 4, 2015

Go GREEN-REDO recycled Plastic lawn art

Yard Art-Green RECYCLE project.

Last Saturday, we did a dog event at Cantigny Park in Wheaton, Illinois. Lots of dogs and a huge beautiful park to walk in with the dogs. 

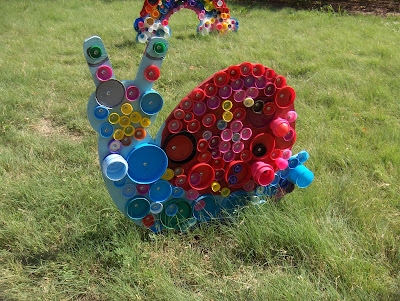
One of the best recycling ideas I have seen in awhile were these whimsical lawn decorations, measuring around two feet across decorating a pavilion.  Multiple plastic caps/lids were screwed 
onto painted exterior plywood shapes. 


Adorable Inch worm in red and blue


Each lid was screwed into the wood with a nice shiny screw, 
which added to the design and caught the sun. 

Tip-Toe through the Tulips 


This one was about 3 feet high and very rambunctious in color. Here you can see the multiple
layers of caps/lids adding to dimension. The background of the plywood was painted with 
exterior enamel. Great kids' project, would be wonderful for scouts or other youth groups. Only 
your imagination is the limitation.

Other shapes were butterflies, flowers, watering-can, cat, dog, fish, simple shapes but such fun.
 Sadly all my pictures were not in focus.
But you get the idea. 

SHARED at these wonderful blogs:


Share a cup Thursday


All the opinions and photographs in this blog are my own, I have not been paid or reimbursed in anyway for my opinions or posts. Please do not use photos without linking back to this blog without my permission. Thank you for your cooperation, Sandi Magle 

Monday, August 3, 2015

Saving a Crushed Bag of Beaded…?

Junking from the "Baggie-Wall"at Savers.

On the last junking trip to Savers in Schaumburg, Illinois, E and I had a great time on the 'baggie wall'.

The 'baggie wall' at Savers is where they hang quart size or sometimes gallon bags, full of items that are too annoying to put out on shelves, too tangly, too useless, or too what-the-heck is that.

I found three bags full of crushed, hand-beaded flowers, dirty, wadded into a small football shapes. The crafter in me screamed…NO…just because I am sympathetic with anyone's handiwork that takes umpteen hours and is not appreciated. These poor flowers were just begging to go home with me, even though I'm not a lover of anything particularly glitzy. The bags were discolored and double folded over, it was hard to see what I had purchased.

At home, I opened the bags and was almost disappointed, the contents were filthy. I mean dis-colored and encrusted in years of dusty grime. Though the stems were either satin wrapped, waxed floral wrapped or paper wrapped, I could barely tell and I thought, not really water-safe.

How to clean them, I wasn't sure?

With not much to lose, I took them to the sink, sprayed them thoroughly with Windex, swished them in a sink full of the hottest water, rinsed them under the faucet and then put them immediately onto the drainboard.


Results sparkling! Clean and vibrant, and only a couple began to unwrap. I can easily save those with fresh floral tape. The amazing thing is how heavy these are with the hundreds of tiny glass beads on each wire. The workmanship was amazing. These aren't particularly old, perhaps the 50's to the 70's. 
After researching, many listings of such flowers say French beaded flowers, 
and they are quite pricey, my three bag investment of $10.00 will go far. 

After many years of working in artificial flowers, it only took a few minutes to make all the leaves and petals perfectly arranged in their intended places.  


One of my favorites was this small pot of violets in slightly iridescent seed beads. 
Sweet, adorable and cute from all sides. 


One of the most delicate was this lovely stem of leather leaf or fern 
that was all balled up in a knot.
All the fronds bend exactly the way you wish them to go.


The roses are heavy with multi-layers of solidly-wired petals and many leaves on the stems. The largest rose measures almost five inches round. 
The medium roses have leaves and a bud to make them appear realistic. 
The red beads are a matte finish seed bead, while the green has an iridescent sparkle to them.


One of the prettiest and unusual flowers are two stems of what appear to be hyacinths. Each small lavender blossom is wired with small yellow twisted centers. The yellow is matte while the while the flower petals and leaves have an iridescent sparkle.


One of the most delicate was this lovely stem of leatherleaf or fern that was all balled up in a knot.
All the fronds bend exactly the way you wish them to go. 

There are also yellow pansies, alyssum, mini-orchids, daisies, and several lilies.
Most of these will find their way to my shop on Etsy, 
and into appreciative hands or new crafts.
That's what I love about Etsy, the total re-cycle of New, Old, Green, Redo!


These are mine though!


Daisies were my mom's favorite flower, and blue anything is mine. 
So, this small cluster with a busy little bee landing on them only made it from the drainboard to this tiny bottle on my window sill above my sink. I totally love them and they are worth oodles, as I look at them everyday and smile.

Have a great week!

Sandi


Partying here with this post:

Amaze me Monday

Vintage Inspiration Party


All the opinions and photographs in this blog are my own, I have not been paid or reimbursed in anyway for my opinions or posts. Please do not use photos without linking back to this blog without my permission. Thank you for your cooperation, Sandi Magle