Tuesday, March 5, 2024

Midwest Gardening 2024: Mousehouse back to Greenhouse

Ad-Free Blog

Our Mousehouse back to Greenhouse!

oldnewgreenredo

Last year we had some real issues with mice and worse than that---the ticks that bred on them.  But with our disaster, the greenhouse barely got any attention. We threw in some annihilation bombs for the ticks and set traps, etc. for the mice. Mice can wiggle their way into anything. We thought we had it sealed up tight.

NOT!

We had a lovely day last Sunday in the 70's, so I dashed out to the greenhouse and began ripping everything out on the North and West sides...YUGH!
I had on a mask, eye gear, gloves, long sleeves, and my pants tucked into socks, just in case, and a long BBQ tongs and a long fork to fish out all the insulation and anything 'mousey' that I might come across.

I filled three huge contractor bags of insulation and refuse: cracked containers/pans/starter bins. 


oldnewgreenredo

Here is where they were coming in---on the eastside, apparently a bit of wash-out outside made it open underneath and they dug under the 10" beams on that side. The fluffy fiberglass insulation was full of icky..yep, really disgusting. How can mice live snuggled in fiberglass. Amazingly the North wall, to the left, was done in some left over foam insulation originally...this hadn't been touched and that wall was intact, apparently MOUSE PROOF????

We had origninally attempted to use left over fiberglass insulation from the the garage to save money,---MISTAKE! 

oldnewgreenredo

After stripping this wall of everything I sprayed the whole thing with a solution of bleach and soap! 
Hubby just picked up three-4'x8' huge pink 2" thick insulation foam sheets. $$$$$ it's $25 more a sheet than before the pandemic. YIKES. And, also some rubbery waterproof surface facing panels to cover it.

oldnewgreenredo

The next warm day I will do this side! We will add some more gravely stuff to the floor and then complete the floor with patio blocks fit tightly together.  This should help eliminate the mice, ticks and anything else that wants to climb in and camp out.

oldnewgreenredo

Emptying an 8x10 greenhouse...
Not a big deal you say----well THIS is what was on those two sides of the greenhouse---I will be drastically culling, recycling, and then scrubbing anything that goes back in. Right now everything is sprayed with cleaner with bleach. We got 1.5" of rain last night so that will help clean everything, also. Sunlight will to---and it will all be out in the yard this month as we morph the 
Mousehouse back into a greenhouse!

Hubby already started yesterday...he did get this far.

oldnewgreenredo

The foam board is attached, glued and screwed, the plan is to trim it all in one swipe, when I help and hold a board as guide.

oldnewgreenredo

Hubby went right over the existing north wall in order to make the corners sealed and the walls even. Once the white wall sheeting is on it will be trimmed out, also closing off more ways for mice to camp in.

oldnewgreenredo

We removed the shelving braces on the eastside to work on the walls and floor, but they will easily be replaced once the new floor is in. Patio blocks will also provide seasonal warmth and still allow for natural drainage, since I do spray when watering our big trays of plants.

oldnewgreenredo

More stuff to go through. The large planters all get used, though we have given many away in the last few years. I think we have 8-10 watering cans. I will line them all up when I'm sorting, LOL.

oldnewgreenredo

I'm going to make room for garden tools also this time around.

 Luckily we have a month, before I will be moving plants to the greenhouse, maybe by Easter if everything goes to plan! 

oldnewgreenredo

I'm looking forward to enjoying working in there again. 
Eventually it should look like this again, some older photos of the greenhouse at it's prime!

oldnewgreenredo=
Full of plants, and organized and not cluttered. 

oldnewgreenredo

We have Water Hose hookup at the sink- which drains to the garden.

oldnewgreenredo

The greenhouse has 5 windows and a screen/storm door which give great air circulation and an overhead fan that exhausts the ceiling when it's too hot.

oldnewgreenredo

Here's hoping for a few healthy tomato plants just like this in a month or so. Tomato planting really needs to wait until the last half of May at the earliest here in Chicagoland.
I can't wait!!!!!!

HOW'S YOUR 
GARDEN 
PREP and Planning GOING? 

If you enjoyed this post please follow this blog by blogger or 
FOLLOW IT which you will find in the upper right hand corner of this site below the header. 

Thanks always for visiting. 
I will try and respond to every comment and answer every question.

I will be sharing at these fine Parties!
The photos in  this blog are my own or I have permission to using them from family. Any others will be attributed to source if possible.
I have not been paid or reimbursed in anyway for my opinions, posts or any products shown. Please do not use photos without linking back to this blog 
without my permission. 
Thank you for your cooperation, 

Sandi


Monday, March 4, 2024

Midwest Gardening: IN the Kitchen!

  Ad-Free Blog

 
Gardening in my Kitchen

oldnewgreenredo

First, I scrubbed all my trays and containers with a bit of bleach, soap and complete rinses. Normally I do this in Fall outside, but we were still dealing with our basement mess and everything from last season just got thrown into the Greenhouse.

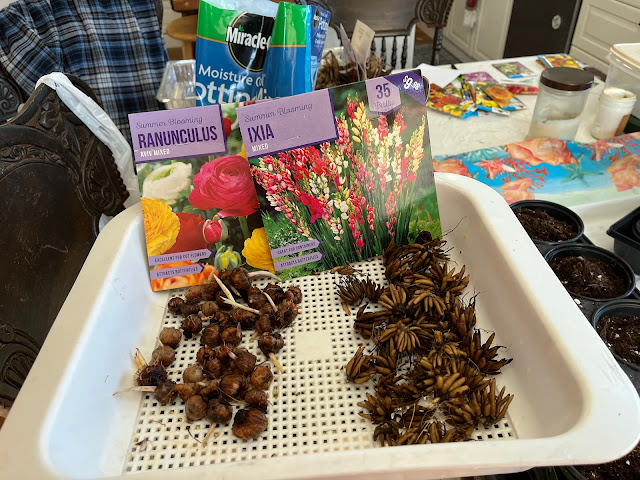
End of February, Hubby gave me seeds and bulbs for my birthday, which is a great idea, so I prepared them for planting. I had bags of 3 kinds of Dahlias, Ixia, and Ranunculus bulbs as well as my Elephant Ears I need to start early. 

oldnewgreenredo


Waste not want not---I used all the filler soil in the bulb bags and put it into my dirt pot, and then added moisture control dirt and mixed it up...this I used for the seed trays. This is perfect for seed starting.

I then started Peppers, Tomatoes, Alyssum, Chrysanthemum and  Coleus. In a few weeks, I will do couple of trays of marigolds. Hopefully by April 1 we will be able to move everything into the greenhouse. 


oldnewgreenredo

I'm not working in the greenhouse, this ends up on the kitchen table as it was too cold and windy to do it on the front porch. Cold temps alternate with lovely days here, but you can't count on a nice day. 

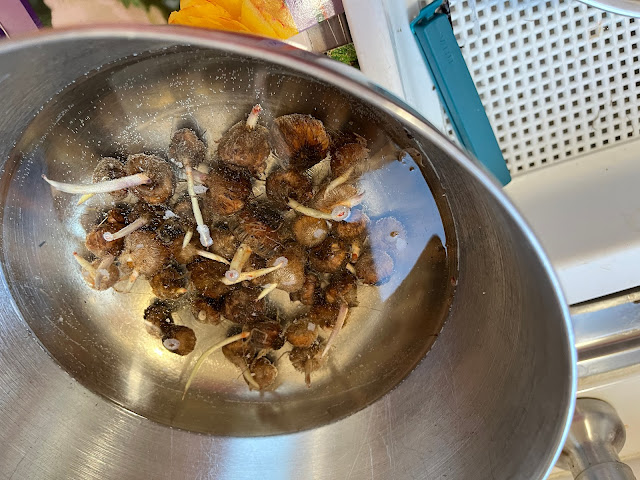
Here I am soaking my summer bulbs in prep for planting. I soaked the Ixia and the Ranunculus for a few hours in warm water. The Dahlias were quite moist so they went directly into the pots.
oldnewgreenredo

Meanwhile, I filled my pots 2/3 full with water-saving potting soil---which is a good combination. I haven't had great luck with seed starting soil, it just isn't worth the extra price and you need to transplant into better soil later---trying to skip that step.

oldnewgreenredo

I placed multiple corms in the pots, they will be easy to pull apart later as they will all be planted in large mixed pots, rather than in the ground.

oldnewgreenredo

Here are my corms after soaking---they really perked up with the water.

oldnewgreenredo

I'l really interested in the IXIA as I haven't planted those before, but spikey plants are always interesting in pots.

oldnewgreenredo

I used some old barbecue table cloths from last year to cover my table and the floor, makes for easy cleanup. I use a canning funnel to cut down on the mess, which works perfect with the 4" pots.

oldnewgreenredo

After the corms were placed I filled up the pots to the top. This will all settle below the rims with the first watering.

oldnewgreenredo

Every dirt company now makes moisture control soil...with our last few dry summers this has been a MUST to use here in the upper Midwest. We also add peat moss to our dirt in the compost pile as well as all our vegetable, eggshells and coffee grounds from the entire winter. This will be churned up soon, and I use that in all my large planting pots for outside as well as 10-20 larger pots for peppers and tomatoes.

oldnewgreenredo

Inside, this is our set-up in the South window of the kitchen. These are old racks I used for art shows over 20 years ago---and I still use the door panels for shelves. We've definitely reused everything I had from my shows or when I had the shop. Many of those shelves are built into the garden sheds for storage.

oldnewgreenredo

My hubby doesn't read my blog and doesn't know I DISLIKE the seed starting pods.You have to first squeeze them all around to loosen the the compacted material before planting. And, then DON'T plant them directly into the garden...because they don't break down the way the directions say they do. In Fall you'll end up with a miserable plant with rotted roots all knotted up in the sack. They do start plants well, but I cut the sacks off and transplant the healthy seedlings into larger soda drive-thru glasses,  especially the peppers and tomatoes which want deep root systems. It really is easier to just start seeds in small pots with soil or in full size trays.

I planted these pods with 2 trays of peppers and also 1 tray of 10 small pots for Heirloom Brandywine Tomatoes seeds. We are cutting back on Tomatoes this year, because my canning shelves are still full. We plan on purchasing 2 cherry tomatoes and 2 early tomatoes plants. 

The Heirloom Brandy Wine Tomatoes
should produce until frost...so we will have fresh tomatoes for the whole season. 

Purple Alyssum 


Mixed Coleus


I also started a large tray of Purple Alyssum, Coleus, and red Chrysanthemum plants. My colors will be yellows, reds, oranges, purple and lime green in the front of the house this year! I have two packages of  Nasturtiums (lower right)  which I'll start in their long planters directly in the greenhouse in April as well as lots of Marigold seeds. 


After frost, I'll purchase lime green sweet potato vine plants....to cascade in my pots. Some of the Coleus will be lime/ or white green to use in pots with all the warm colors. 

We also have a huge Hibiscus camping out in the garage, if it lives it is orange/red and an abundance of dark green leaves. 

This is all the plants I have going at the moment. In two-three weeks I'll start some more, mostly flowers. When the greenhouse is going---I'll add packages of sunflowers, cucumbers, squash, pumpkins, green onions and lettuces in small pots and planters. Planting in the garden won't happen before the second week in May---maybe later---we never really know??? with the weather calendar being so topsy turvy in the Midwest.


Next project: The MOUSE HOUSE otherwise known as the GREENHOUSE.

DO YOU HAVE BIG PLANS FOR GARDENING?

If you enjoyed this post please follow this blog by blogger or 
FOLLOW IT which you will find in the upper right hand corner of this page. 

Thanks always for visiting. 
I will try and respond to every comment and answer every question.

I will be sharing at these fine Parties!


The photos in  this blog are my own or I have permission to using them from family. Any others will be attributed to source if possible.
I have not been paid or reimbursed in anyway for my opinions, posts or any products shown. Please do not use photos without linking back to this blog 
without my permission. 
Thank you for your cooperation, 

Sandi


Mather Printmaking Week 3

Ad-Free Blog

Mather Printmaking Week 3:Relief Printing

I've switched my Mather printing day to Friday, seems something always comes up in the middle of the week. The weeks are really seeming to go fast. Since the classes are now only 1 hour long, we really move fast.

oldnewgreenredo

Everything I used for the printing today! 

 Early on Friday I preprinted some backgrounds since black and white really isn't my thing. I did this by using the paints included in the kit, and here is an example of mixing the yellow and blue(both pastels) and getting this. I did a few more in other colorations mixing paints, blending medium, and some with small amounts of black ink.

Since this week was relief prints, where you press or carve into a surface to make a design that 'doesn't print' and the rest of the block or in this case foam surfaces does print. This is much like the wood block or linoleum carvings you might have done as kids. 

oldnewgreenredo

I actually started on my surface before class,  you can see a bit of a complex garden scene I pressed into the 'foam' tray that was trimmed for the 'plate' surface.

oldnewgreenredo

Directions/suggestions were giving by our hostess Ruth Guery on Zoom with emphasis on enjoying what you are doing as a learning experience and it's supposed to be fun.

I had dug into my little bin of junk from that DRAWER we all have, and used a lot of different things to press into the foam.

oldnewgreenredo

I used the flower frog, the picture hangers, the small end of the bobby-pins, screws, a nail head (great for drawing) etc. 
oldnewgreenredo
I was having so much fun carving, I did the backside also, this started as a sea horse and then morphed into a dragon.

oldnewgreenredo

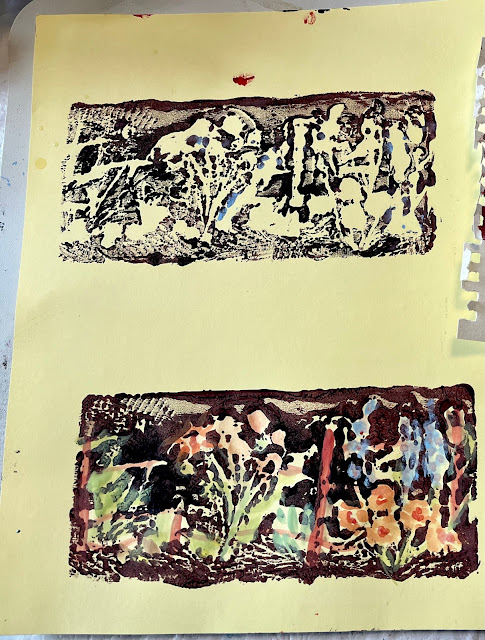
I had a piece of yellow cardstock set aside for the flower garden. I mixed some red with the black acrylic ink, and it gave a rich brown---the color of earth...which I though was apropos with the subject. My first print (top) wasn't great---they seem to never be great like the first tray of baked cookies or that first pancake, LOL.

oldnewgreenredo

The second  and third print were deeper in color, but much of my detail didn't print...so after class I filled in the blank areas with some color---the illusion worked and these are charming small prints. I stuck with watered down mixtures of the three colors they gave me. It wouldn't be fair to be adding some of my hundreds of paints I have downstairs.

NEXT: 
I flipped my plate over and tried the seahorse/dragon. I added lots of blending medium to my ink so I could get a nice thin coat  on my brayer that might be even.

oldnewgreenredo

Here is the plate with ink on it. You can see the ink filled in all the bubbles I had made, sigh. To the left you can see another 'plate' I made on dark denser foam.

oldnewgreenredo

A few of the bubbles showed up here in the print. Still a lot of tiny details are lost, this is because of the very soft foam surface.

oldnewgreenredo

Here you can see the second print on the green painted paper---l'm liking this, and the print is clearer, apparently I had moved the first one and that was part of the muddy look issue.

oldnewgreenredo
I did two more...the one on the right had too much ink and really didn't work at all. I think when I washed the plate in between prints I also removed more detail by rubbing the surfaces clean.

Hmmm...Foam trays that are really soft don't last through many prints? Still great for working with kids or experimenting!

oldnewgreenredo

It stands to reason that pressing on the paper (use the smooth surface of this little pitcher...will also compact the details foam. But the process is a learning experience.

I had another black tray (a bit denser) from a larger meat tray, I decided to use. I want to make a brick patio for the dolls, so I thought I might try an overall print that I could repeat. 
oldnewgreenredo

Above is a roller from one of my shelf/racks in the cupboards I rolled this double edged 'wheel'  across the surface which was denser than the white foam. This was a nice smooth and thicker line which I hoped wouldn't fill with ink/paint.

oldnewgreenredo

This was my first print and definitely interesting. 

oldnewgreenredo

Here are two prints with a double image on them. The one on the left is a simple repeat, the other is a reverse print. I will have to try top edge to bottom edge prints next. 

This will definitely have possibilities for doing a patio and  I can see filling the small textured squares with coloring/moss and maybe using a gray paint on darker paper. I will play with this in the future as the black foam, printed very well and held it's details.

Here's one more patio print on red/yellow painted surface...too quick and too loaded with paint which was part ink and red paint to make a brown. 
Phew! That was a very fast hour!
Maybe I will dip into my hundreds of colors down stairs and try some others. Now I have to buy meat according to their trays, LOL.

Can't wait for next week and Gelli prints? 

If you enjoyed this post please follow this blog by blogger or 
FOLLOW IT which you will find in the upper right hand corner of this page. 

Thanks always for visiting. 
I will try and respond to every comment and answer every question.

I will be sharing at these fine Parties!


The photos in  this blog are my own or I have permission to using them from family. Any others will be attributed to source if possible.
I have not been paid or reimbursed in anyway for my opinions, posts or any products shown. Please do not use photos without linking back to this blog 
without my permission. 
Thank you for your cooperation, 

Sandi


\