Thursday, March 14, 2024

Spring and Midwest Gardening 2024 : Mid-March Miscellaneous

Ad-Free Blog

Happy Spring somewhere in the USA, dear Readers. Here in Chicagoland it is a bit IFFY, day to day.


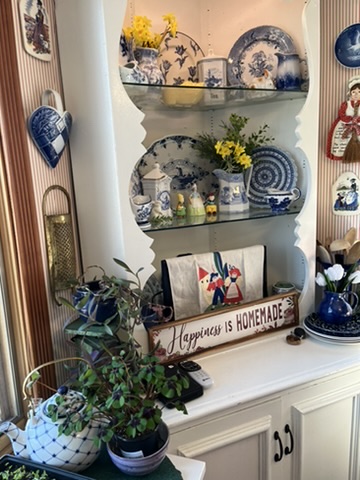
This is the extent of my Spring decorating. We have so many projects and messes going on right now, decorating is last on the list. I have removed 90% of the red in our home, but we are stuck with the red chairs in the living room. 


Here in the kitchen, it is all about blue and white pottery-much with a Dutch theme, and a few tulips and daffodils. 


I found the adorable peasant applique towel to cover the TV...in an antique store, it's too sweet, a little red is fun!


The top shelf has Daffodils, Dutch shoes and a very old German paste bunny. The Tulip plates are almost 20 years old, I don't remember where they came from, Crate and Barrel maybe?


My Spring linens are AWOL somewhere in the 50 tubs out on the summer porch. That's on the TO DO List. 


I pulled out a linen towel desperately in need of ironing
 (I don't iron anymore, do you?) But Christmas Pig is messy when eating. The marbles are a jar full of fun for Spring! The Tulip card was for my Birthday in February while the French coffeepot is full of faux pansies, but waiting for fresh Daffodils, soon!


The Green is the main decor elsewhere in the kitchen, the seedlings are doing well, and grow by leaps and bounds each day.


An Oxalis plant with a bit of purple...I'm looking forward to growing outside in a pot and maybe wintering back in the house. My porcelain Teapot was a vintage purchase off Etsy.


My IXIA bulbs are all sprouting as well as the peppers, tomatoes and the Ranunculus and Dahlias are unfurling as I type this.


It's raining today with a promise of colder temps again.


Tuesday it was warm in the high 60's and I dragged a big bin around and collected all the big branches and twigs that had fallen in the last storm. It wasn't too bad, but I definitely packed the biggest garbage bin full with branches and my sedum branches, just from the front yard. 
Only things blooming were these crocus that I planted last year.


Our messy beds will stay messy until we have no more frosts---this protects the BEES and other bugs that are nesting in the waste. They dig down and hide under anything that can insulate them to 'sleep' in the winter. It's their winter hidey-holes, so PLEASE leave all your messy waste in the garden, the birds also eat the seeds.
Please SAVE THE BEES!


Apparently we still have critters (bunnies-woodchucks?-deer), chomping down on all our plants. Hubby swears he hasn't seen any tracks? But, then we have no bare ground in our front yard. I will look tomorrow after our heavy rains today.


This Zebra grass is chewed right down to the ground. Tomorrow I will apply coyote urine all around my tulips and grasses, a great natural harmless deterrant.


Those are some pretty big chomps...making me think a deer might be involved.


Grass has begun to green up. The platform was the project hubby started in Fall of 2022, and never got to finish last year with all the basement reconstruction and fruit-basket upset we had to do on our property.


I'm going to have to quit calling this the mound, it flattens each year. This is where we piled all the excavation dirt from building the garage in 2000ish. Can't even remember when for sure. Periwinkle is blooming, but Iris and bulbs are barely coming up here. Daffy's are just spikes as this is exposed and not sheltered at all here.


The crispy roundish leaves are Vinca which were green most of the winter, the last snow definitely burned them though. It's very hardy and I don't think you could get rid of all of it if you wanted to. Great ground cover that kills weeds.


Tuesday, my only Daffy trying to bud. The rain today should make them explode starting tomorrow.


Three years ago we planted 4 new bushes out here...this one is on the SW corner of the lot---shaded and very exposed to drying winds. Despite heavy watering on this corner this poor bush...well, it does have some green sprouting on the lower branches, so we will see. The others are thriving, so 75% is pretty good considering our very hot dry summers these last three years.


Hubby has been working in the greenhouse. The 2" pink foam insulation is being covered with plastic shower wall sheeting which is glued on the surface. He is finishing it off with treated boards. 


This will make it all water resistant and hopefully mouse proof. We had 180 patio blocks delivered this morning at 6:40 am...and it was still dark, LOL. 


We added a few bags of gravely stuff to even out the floor, and tomorrow we will start laying the blocks as tight as possible, and then the shelves can be put back in.


Hubby cut off the lower supports of these shelves and then hung the rest from the ceiling beams? Will this work with dirt filled pots on the shelves, we will see. He can always add supports underneath again after the floor is in place. 

We have had some very vicious storms in the last few years and the greenhouse has held up well, so it's worth the investment to finish this off.


 I can't wait to get everything moved back in and the plants growing in the greenhouse without the company of critters. The new stones on the floor will soak up solar heat/ which will cut the amount of electricity we use in the future. We are looking into a few solar panels down the line to make it off the grid to run the fan and maybe a heater in the cooler months. 

I'll show the floor in the next post, before we fill it up again...LOL. 

HOW'S YOUR SPRING GOING?

If you enjoyed this post please follow this blog by blogger or 
FOLLOW IT which you will find in the upper right hand corner of this site below the header. 
Thanks always for visiting. 
I will try and respond to every comment and answer every question.

I will be sharing at these fine Parties!

The photos in  this blog are my own or I have permission to using them from family. Any others will be attributed to source if possible.
I have not been paid or reimbursed in anyway for my opinions, posts or any products shown. Please do not use photos without linking back to this blog 
without my permission. 
Thank you for your cooperation, 

Sandi


Tuesday, March 12, 2024

Mather Printmaking Week 4: Gellie Printing

 Ad-Free Blog

Mather Printmaking week 4: Gellie Printing

So far, this was the most fun, and the most frustrating. I am my own worst enemy when it comes to these projects. I see in my head what I want to achieve, but not always the path to get there.

Gellie prints are flexible and ideal for quick print projects and can be used multiple times to get many different effects. 

oldnewgreenredo

The gelatin plate for inking is made from 4 packages of gelatin mixed with 2/3 cup of cool water, mixed in a flat bottom surface container, and then add 1/3 cup of very hot and mix well. Cover and store in the refrigerator.

Surprisingly, the set-up gelatin comes out of your container quite easily, and the bottom of the thickened gelatin becomes your flexible, smooth and becomes a reusable plate for roughly two weeks until it begins to 'foul' up or crumble.

Mistake one---I chose a round container...lol. Why, because there are no corners to line up when doing multiple layered printing, so aligning is difficult, which I didn't even think of.

oldnewgreenredo

Not too attractive, the gellie I made in an 8" cake pan. 

oldnewgreenredo

Here you can see how thick it is...the rust mark is from the bottom of the old pan.

oldnewgreenredo

We were told to start with a stencil....I did a bird cutout on a piece of card stock and had some pieces of fresh ivy. I inked the plate and went over the ivy and the stencil bird and this was backwards of what we were supposed to do, but this was a test idea to begin with.

This time I decided to use blue paper, before I inked the gellie, I placed the bird shape on the bare gellie, then inked the whole plate with a yellow-green brownish tone. You place your natural materials on into the ink press down, take a throw away print. Remove all the materials and stencils and take a second print (your real one) and see all the details. 

oldnewgreenredo

I printed twice on the blue paper print. The second one with a blacker/brown red. and added the string...the idea being the bird was making a nest.
And this is when I decided placement needed to be better.

oldnewgreenredo

Experimenting with a more area printed background...I lost the bird because I forgot to replace the stencil piece, and the alignment was still off...but that is so cool what did print.

oldnewgreenredo

Here's another start....two layers, dark green background, and detail, and then rust on
top. My colors are far from perfect because I stuck with the colors given in the kit. A baby blue, a pastel yellow and a true red, also black ink. The pastel colors muddy everything...but I figured everyone in the classes had issues with their colors.

Because of having to work fast-----I didn't take photos as I was going along of every step. Acrylic paint dries very quickly even with a retarder added.

oldnewgreenredo

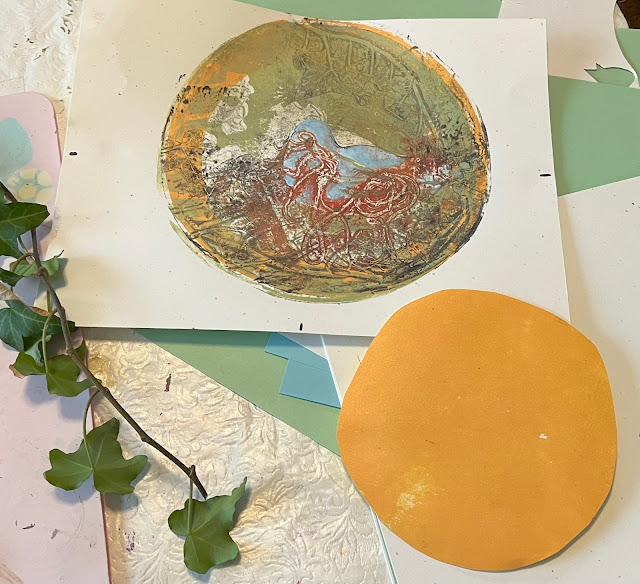
Here is another start. I made a simple circle as a blocker for printing color background.

oldnewgreenredo

I wanted a warmer yellow and adding a bit of red did help. 

oldnewgreenredo

Yellow stencil covered in the golden red rim. By now I have my papers and my plate with markings to line up.

oldnewgreenredo

You can kinda see where this might go---

oldnewgreenredo

I followed that with a dark green print, then redid the ivies in a dark brown, and then a very controlled dark red, where I concentrated on the string. The blue bird was painted in a bit...as the poor bird got lost in the design. I could see the outline so I just did a wash of the blue paint. She needs eyes but I might still do another dark detail print on this, if I can line everything up. 

oldnewgreenredo

The most important part is the learning curve on all this. A little paint and a bunch of paper---and an hours worth of time...I will revisit this technique within the next two weeks and see what I come up with. 


It's just such a great way to do prints but it's an inside-out-upside-down-backwards process, once you wrap your head around it!!!

HAVE YOU TRIED A NEW CRAFT, 
PLEASE SHARE!

If you enjoyed this post please follow this blog by blogger or 
FOLLOW IT which you will find in the upper right hand corner of this site below the header. 

Thanks always for visiting. 
I will try and respond to every comment and answer every question.

I will be sharing at these fine Parties!


The photos in  this blog are my own or I have permission to using them from family. Any others will be attributed to source if possible.
I have not been paid or reimbursed in anyway for my opinions, posts or any products shown. Please do not use photos without linking back to this blog 
without my permission. 
Thank you for your cooperation, 

Sandi