Friday, March 24, 2017

Great Grandmother and Pansies.


Spring makes me think of
Great Grandmother Anna, who adored everything Pansy.

http://oldnewgreenredoblog.blogspot.com

My great grand parents, Anna and Niels's wedding picture 1895 in Denmark. Her dress, while not white was perfect for the cold wind on the west coast of Northern Denmark or 

Nordjylland

Niels was a fisherman and might have wooed my great grandmother with Pansies, she was 19 here.

Source: The Graphics Fairy

I wonder if she had beautiful prints of pansies, such as this one from the era.

http://oldnewgreenredoblog.blogspot.com

In 1911 Anna and Niels and family had enlarged to three girls and one boy, my grandfather.
My great aunt who passed my mother the pansy items, is the baby girl. She lived to be 100.
This was a photo taken before their immigration to the United States that year.


The Graphics Fairy

There are many Victorian cards and graphics including Pansies.
The Victorian meaning for Pansy was "to think," or "thoughts," about love.  So to give a pansy was to say, "I'm thinking about you," fondly we would hope.
The pansy was considered a bad-luck gift to give to a man.
Violets or Violas, the smaller pansies meant modesty, where 'shrinking violet' came from. The colors also added to the message.
Blue pansies meant, "I'll always be true, faithful and watchful,"
while white pansies meant "let's take a chance.
A wonderful site about flowers is The Plant Farm blog.

One of Anna's plates http://oldnewgreenredoblog.blogspot.com
I have two OLD Alumina plates which were everyday wares produced at the turn of the century
by Royal Copenhagen. Produced with a thicker/ironstone tan clay body this line of pieces were  painted white and then a design was stenciled or hand painted on top and then clear glazed.


http://oldnewgreenredoblog.blogspot.com

This thick porcelain thunder mug or porcelain potty had a gorgeous top, 
which bit the dust a long time ago. 
I have used it for a planter, table decoration, and held my curlers for awhile. The piecemoves about the houseseasonally. It is beautiful and weighs a ton.

http://oldnewgreenredoblog.blogspot.com

Pansy thunder-mug, Anchor mark on the bottom circa 1906 or there about. 
Anchor Pottery Company in Trenton NJ, produced this piece probably in the early 1900's. 
Perhaps it was the first item Anna purchased when coming to the US


Wikipedia tells us that “the pansy is a group of large-flowered hybrid plants cultivated as garden flowers. Pansies are derived from viola species Viola tricolor, hybridized with other viola species. These hybrids are referred to as Viola. The common words “pansy” and “violet” are often used interchangeably. When a distinction is made, plants considered to be pansies have four petals pointing upwards, and only one pointing down. Violets have three petals pointing up and two pointing down.”

http://oldnewgreenredoblog.blogspot.com

I have very few items from Great Grandmother Anna since my grandfather was the only son. The daughters most often inherited all their mother's pretty items. These pieces were passed down  
to my mother through my great aunt, the baby in the second picture.

http://oldnewgreenredoblog.blogspot.com

In America, Great Grandfather and my now grown grandfather (left) opened a fish market in 1922.


http://oldnewgreenredoblog.blogspot.com

I have the OLD original tools from the fish market, cleavers, sharpeners, a scaling knife, the notes hook which was in the small office where all the books were kept. On the right is a picture of a woman serving fish, which I had always thought was Great Grandma Anna, but wasn't as it was a generic print that an advertising calendar could be made from. 
The year is 1923 and was printed for my family's fish market.

http://oldnewgreenredoblog.blogspot.com

The major piece I have from her is this lovely teapot. The mark on the bottom is 
 Plant Tuscan China made in England 1936 or later. She passed in 1938. 

http://oldnewgreenredoblog.blogspot.com

What is unusual is how beloved this pot was, as it is smashed into at least 20 pieces and was lovingly glued back together. Anna had eight grand children by then, and was aunt to another dozen. 
Somehow this precious teapot was broken and then repaired. 
I handle it very gingerly and it is on display in a locked china cabinet most days.
This is what I call a monumental REDO.


http://oldnewgreenredoblog.blogspot.com

I can imagine Anna's garden was filled with pansies, Forget-me-knots, and other lush flowers that liked the chill of the North Sea or Lake Michigan.


http://oldnewgreenredoblog.blogspot.com

Another piece I know very little about is a a silver plated brass tray with matching lid, 
on an enamel glazed milk-glass bowl. 
My guess it is very early 20th century and the milk glass has that 
tint of green so desirable in old milk glass.
 I don't have a black light, but I imagine it would glow green. Nothing was marked on this piece,
 despite how beautiful the enamel glazed decorations still are on this. 
Those are Mom's antique books, the dish sits on.


http://oldnewgreenredoblog.blogspot.com

So with "Pansy Thoughts" of my great grandmother...I post a Spring gift for you. 

Thanks always for visiting. 
I will try and respond to every comment and answer every question.

All the opinions and photographs in this blog are my own, I have not been paid or reimbursed in anyway for my opinions, posts or any products shown or anywhere I shop.
 Please do not use photos without linking back to this blog without my permission. 
Thank you for your cooperation, Sandi Magle

I will be sharing at these fine Parties!


Sandi


DIY Barbie:New second floor

Here is the vintage Barbie Victorian Mansion purchased at GoodWill 
for $4.99 in amazing condition, with all working parts, that we have been playing with for a year.

The second floor as originally designed which barely had room for a single bed with its 9"depth. 
The hole in the floor for the elevator which cranks on the knob of the turret took up lots of room.
 When the tub on the left was down, it further cramped the space.

http://oldnewgreenredoblog.blogspot.com

Where are all the Barbie's supposed to sleep-let alone where do their clothes go?


Since the Grand isn't tall enough to reach up and over to use the crank on the elevator,
 I decided to board it over on the second floor. We also extended the wall forward 6 feet in barbie scale (1:6 scale) and 13 Barbie feet to the left side of the existing bedroom.
Who wouldn't want a 600+ sq. foot addition to their bedroom?

http://oldnewgreenredoblog.blogspot.com


Because the Mattel construction's very strong---when the house was opened, it was still sturdy.
 The green thing above is a vanity/tub that swung down and further used up the precious little floor space on the second floor.


http://oldnewgreenredoblog.blogspot.com
]

Here is the elevator on the second floor in the up position. Ramp just really reached far into the room.


http://oldnewgreenredoblog.blogspot.com

To begin the first job was to hack off the fittings for the built-in tub/vanity. 
I used a Dremel circular saw and eventually cleaned this all up, 
leaving the wall in great condition. 
If you are doing any kind of miniature work--a Dremel tool is a must have. 
I'm 69 now and have had 4 of these tools over the years, 
and they have always earned their keep.

http://oldnewgreenredoblog.blogspot.com

The largest paper I had to make a pattern for the new floor was a Hello Kitty coloring book. you can see the jig-jags as it is laid out on a light weight piece of pressboard. We chose this for its smooth surface and thin profile, light enough to be supported on the existing floor with a little help.

http://oldnewgreenredoblog.blogspot.com

More jogs to cut out which I did with the Dremel tools and a small saber saw.  The paper was fitted around all existing parts of the house including the built in pink cabinet. By fitting around the jogs, the floor adds additional stability to the now opened house.

It took several shavings and adjustments for the floor to neatly slide into place.


http://oldnewgreenredoblog.blogspot.com

Sadly the paint did not end up matching the existing green on the house, 
but is a more contemporary country green. Paint will happen later, when I can spray and use plastic paints outside.

http://oldnewgreenredoblog.blogspot.com

Here you can see the jogs (many)that had to be made,  but these also stabilized the house.
The floor is simply set in place without any gluing or screws.


http://oldnewgreenredoblog.blogspot.com

Here is the NEW second floor fitted over the dining room below. A support column made out of a 
dowel on the left supports the closet room, that once held the attached vanity/tub. we may add an edging to the floor to make it blend with the townhouse to the left. It is one step up into the bathroom from one house to the other---not bad for an urban renewal "This OLD DIY Barbie House."


http://oldnewgreenredoblog.blogspot.com

The support column below, appears a shade different then the original beige white column, will REDO that when we have some good weather to spray paint. Maybe I can faux some grooves. The column is attached with velcro dots, at top and bottom. 
Not permanently attaching anything the two houses can still be closed up into boxes.


http://oldnewgreenredoblog.blogspot.com

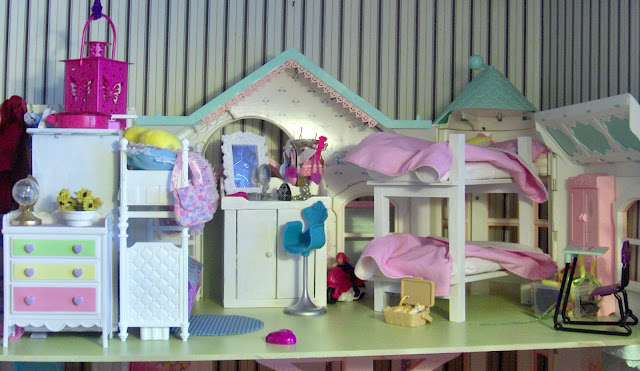
Now the extended floor forward allows for 2 beds, a 12"long bunk bed 
and a 12" double bunk bed placed over the elevator hole which is now covered. 
Plenty of room for 6 barbies now.

Now where to put clothes for Barbies, in the NEW walk-in closet.

http://oldnewgreenredoblog.blogspot.com

The old wall of the bathroom with the new floor is perfect for a walk-in closet.
Again the floor is slotted around the opened left wall of the house.
Some paint will be used in the future to unify this house with the Barbie Town House to the left.
The convenient walk-in closet is next to the bathroom. 


http://oldnewgreenredoblog.blogspot.com

I made tons of hangers from plastic coated wire, tutorial sometime in the future.

http://oldnewgreenredoblog.blogspot.com

I love the old vintage hangers but they are quite expensive and the new ones are very flimsy.
These are easy for 4 year old hands to work with and can be used for pants and skirts also.

http://oldnewgreenredoblog.blogspot.com

I had intended to build an entire wall closet, but found this OLD wood wardrobe very beat-up at Savers for $1.99, all it needed was a paint REDO--and it fit perfectly as the wall between the closet and the bedroom.
.
http://oldnewgreenredoblog.blogspot.com

Here it is placed perpendicular to the closet wall.

http://oldnewgreenredoblog.blogspot.com

Add some plastic drawers originally from the dollar store. And a walk-in dream closet.
Like most people, we have winter clothes and summer clothes, so I will have 
to switch out the coats and long sleeves for summer dresses.


http://oldnewgreenredoblog.blogspot.com

Here you see the new floor addition in the middle.
 It goes above the dining room, but really doesn't inhibit reaching into the rooms.

http://oldnewgreenredoblog.blogspot.com
Cost for the 600 square foot addition, $7.00 for floor, $3.87 for paint, dowel was scrap $.30 and velcro dots ($.75)

And the REDO bedroom complete with with Old, New, Green, Redo furnishings 
just waiting for another post.

Thanks always for visiting. 
I will try and respond to every comment and answer every question.

All the opinions and photographs in this blog are my own, I have not been paid or reimbursed in anyway for my opinions, posts or any products shown or anywhere I shop.
 Please do not use photos without linking back to this blog without my permission. 
Thank you for your cooperation, Sandi Magle

I will be sharing at these fine Parties!


Sandi