Ad-Free Blog
Wow, June flew by so fast, and I was so not into blogging, and more into doing the yard, the gardens, family and friends events, and projects.
The last two months I have participated in the Senior Mather Introduction to Drawing class and my first post was here:Introduction to Drawing.
Originally the class was supposed to run 6 weeks, one hour a week, but it was extended to 8 or 9, not even sure.
Background: The Mather Institute here in Illinois offers these online enrichment courses free to seniors over 55. Maybe you have followed me through different types of Printmaking and also Textiles of Weaving and dyeing.
You can follow the links with the two photos below to my previous posts.
My styrofoam print repeated for Mather Printing.
You can follow the four Printing posts starting Here.
 |
oldnewgreenredo
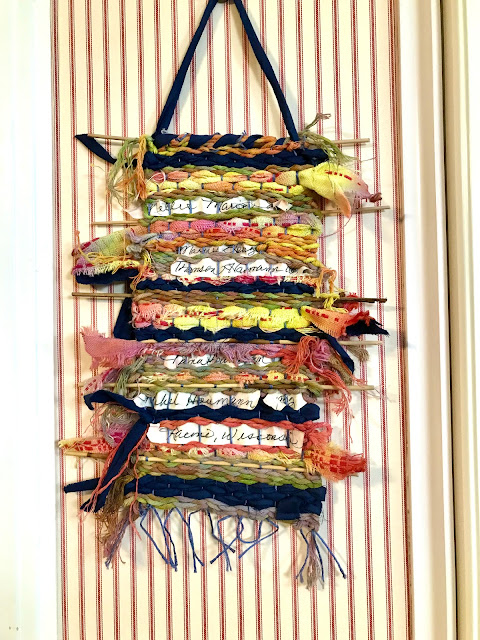
Personalized weaving with found materials and string and frame from Mather Textile kit. Link under the photo.
|
My drawing skills needed to be freshened up and I'd forgotten more than I had known.
Seriously, back in the 70's I had a job teaching Art in a Vocational School in Wisconsin. One of my classes was Basic Art and Design---a semester class for enrichment for adults or for GED qualifications for highschool diplomas. You would be surprised how many anxiety ridden adults taking GED classes and dread/hate the idea of having to take an art class.
Over the years, I have always sketched and planned out projects on paper. but I seldom drew anything start to finish. More often I rough sketched and filled in with paint or glaze/underglazes. Yes, color, I'm an addict for sure.
This is pretty much is my style for my projects, basic layouts. With some scribbles indicating hills, a few block buildings...and well, planning on paint to take care of the details..lol. Is that a stream or road? The vertical squiggles in the middle are pine trees. YIKES!
I knew my hand coordination had weakened, I even have to fight a bit of shaking. So, this drawing class would be a perfect refresher course.
We began slowly with materials and how to use them---see this post HERE.
Because we working in a huge group via ZOOM, Ruth was very encouraging and skillful in reaching all ability levels for this class. She worked from a desk and overhead camera via live video on Zoom, while questions were reviewed on the side, and many answered through staff, or demonstrated by Ruth.
We worked on gray values and various techniques of shading, focusing on where the light source is. Most of all, Ruth had us break down everything we drew into basic shapes. It's fun to LOOK at nature and objects as circles, squares or triangles. And shading makes a simple shape three dimensional.
One of the sketches I did after the shading classes was the louvered blinds and sunlight streaming in...shadows, light and line...not a work of art, but a great exercise of playing with the light---this would make an interesting painting.
We were encouraged to draw anything---this was our coffee table, with a slightly mashed box, scattered books and a few magazines laying on a textured tablecloth.
Animals and Figures were for two weeks' topics.
Who would think normally look at an Elephant as circles, ovals, triangles and elongated squares. Here, I erased the some of basic shapes in my drawing of my quick Elephant, but you can see some.
We moved on to working from photos/or other sources.
I think every kid has learned to do the grid method of transferring a photo or design.
I'm too lazy to draw grids---but I know it can be very useful in making large projects like wall murals or if you want a perfect likeness.
My quick sketch of Barley---really evolved from basic shapes, circle muzzle, triangle nose, almost a square head and triangle ears, or my friend's pit bull mix.
Suddenly a circle becomes a sphere because of shading.. and a reference to perspective.
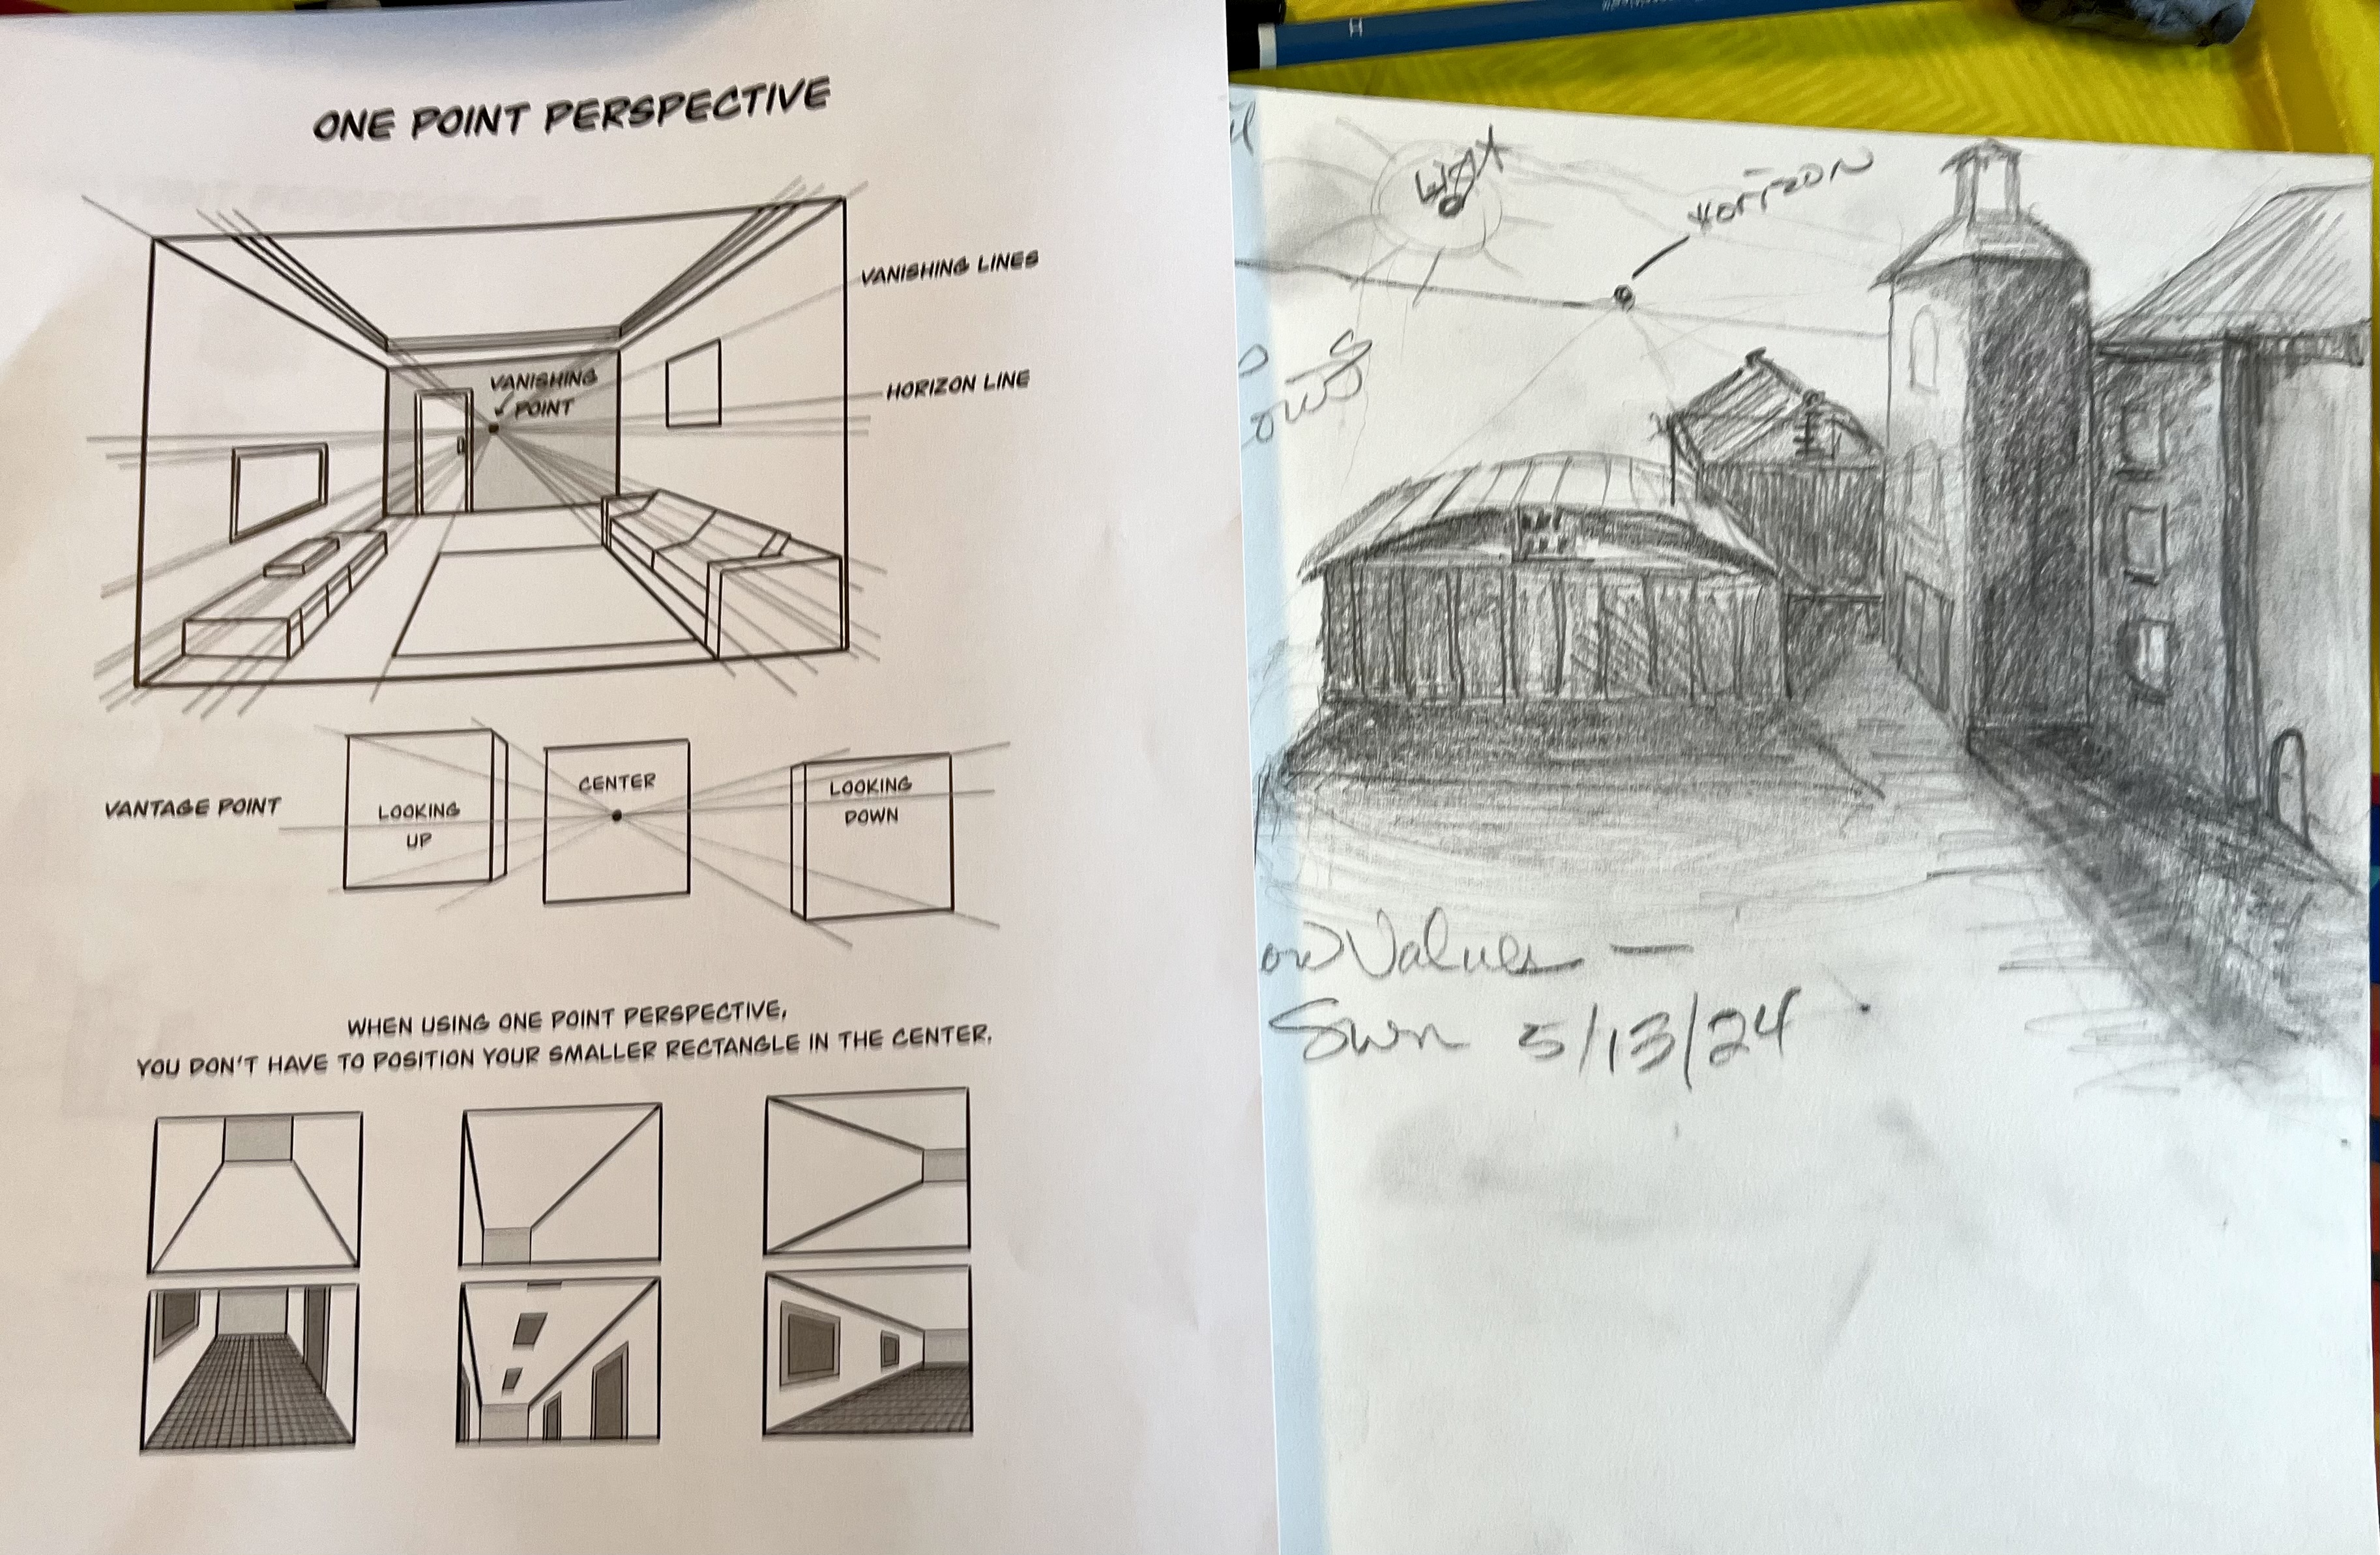
The bottom is a box casting a shadow in single point perspective.
From my teaching experience...Perspective is the hardest thing to teach, and this ended up taking a few weeks longer than the hour class allowed. I did spend a bit of time on the perspective village I drew, mostly drawing all those dark values in the shadows.
The handouts were excellent and better than those I had access to. I can't even remember what teaching was like before TV, video, computers and instant print handouts.
Teaching two-point perspective is hard, because some people just don't see it. I think they just don't have the perspective gene. When I taught I literally set up a 'village' of boxes with strings connecting to vanishing points taped to the chalk board. This took up half the room, but----the students could walk around it, in it, and view the buildings from different angles I think we spent 6 hours on perspective. I passed everyone on that whether they got it or not.
This was my in class quick drawing---nothing was measured (recommended) so it's rough. Two point perspective sometimes exaggerates everything. I recommend placing vanishing points at eye level...so you feel like you are standing in the picture.
Here, I'm on the second floor across the street...if I were doing a completed work, I would do so from eye-level and maybe further away to lessen the exaggeration.
Moving on to figures and faces.
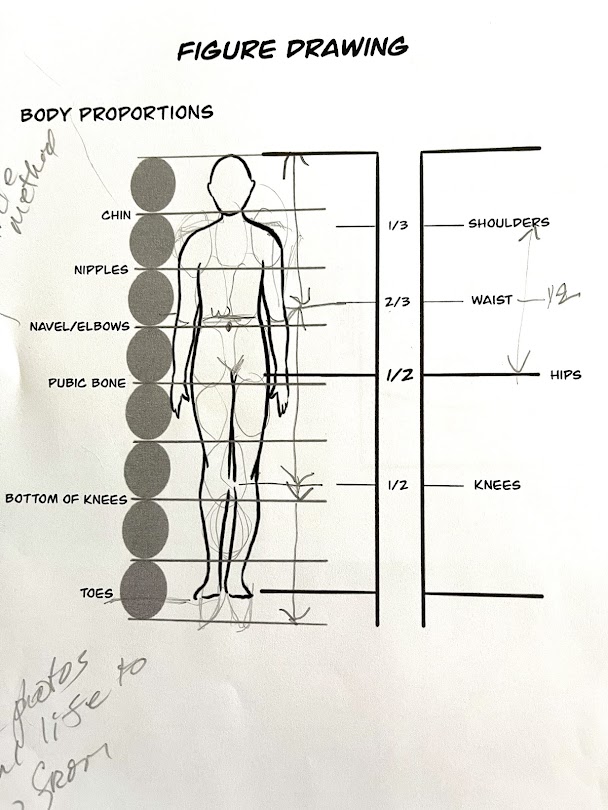
When we started to talk about figures...Ruth brought us back to 1490 and DaVinci's Golden rule. Despite almost a thousand years, it seems his ideal proportions for humans is still accurate. We are taller, wider and with bigger feet, but the basic proportions are the same.
internet
This is my scribble as a reminder of what we are talking about on that page of my notebook. Below is a chart broken down for the average human's proportions.
 |
| Mather institute and Thank you. |
Everything is based on the length of the head. Little round heads are short people..etc and long faced individuals are taller. Looks simple doesn't it.
Of course I had to draw a seated figure...and had problems, eventually transferring the figure to 2-point perspective, and yes, that even works. Standing above viewing the figure---makes the feet exaggerated. But, I think when finished it would look fine.
Here's a straightened view of my drawing I know I will be referring to these guides for figures, and no longer avoid them.
We also receive this great facial handout....my guy looks like a MUG SHOT, but then at least I've got most things in the right place. Eye placement isn't centered or maybe he had too many brats and beer over the 4th. LOL
Again this was a class sketch with minimal extra drawing. I do love breaking everything down into the basic proportions and shapes. We received handouts for noses, eyes and lips...
Surprisingly the last classes were trees, bushes, grass bark, again with emphasizing where the light comes from.
Then we went back to nature with trees, grasses, bark for landscapes.
I restrained myself from dragging out the colored pencils and left this after a little fiddling. Tree barks were interesting with many examples...again, where is the light coming from.
Throughout the classes, Ruth often talked about atmospheric perspective. With color and heavy details being close and less defined images and shadings being far away. We sort of used that when were were doing sketches.
The final class we learned about clouds and water...and how loose you should work and try and use the side of the pencil, with an eraser for sunbeams and highlights.
This is actually two separate sketches. The cloud on the left was first...simple--more attention to the sky, then the cloud, the one on the right worked into the landscape below with atmospheric perspective. I think I have viewed too many tornado videos this month---phew!
What are the most important things I learned...How to use an ERASER!
In my childhood erasers were for mistakes and not used as tools to ADD something by erasing something. Need a highlight, skim a white eraser across a line or want to soften a series of lines, daub a gray eraser here and there to erase the harshness. Want something to blend, use your fingers or a blender stick, paper toweling, or a q-tip.
No drawing is a failure---it's a learning experience. Once you erase, some of the fear,---you can move ahead.
I may not have the skills I had 50 years ago, but I still have an eye, and with fear lessened, I can move forward.
A totally ambitious Cathedral sketch---what's wrong- the arches are not quite right...and they should get thinner as they are further away, instead of fatter...I learned from this, and will try it again.
I plan to add one more post, on composition, which is really important no matter what sort of artwork or designs you are doing. First, I need to do my own drawing for all the 'types' of composition so I don't break copyright on using examples.
I'm happy to answer any questions...or share your own class experiences you've had in crafts or arts in the comments.
IT'S ALWAYS FUN TO LEARN
SOMETHING NEW '
OR EVEN A THOUSAND YEARS OLD,
THANKS LEONARDO
Ruth Guerry and the Mather Institute
If you enjoyed this post please follow this blog by blogger or
FOLLOW IT which you will find in the upper right hand corner of this page.
Thanks always for visiting.
I will try and respond to every comment and answer every question.
I will be sharing at these fine Parties!
The photos in this blog are my own or I have permission to using them from family. Any others will be attributed to the source if possible.
I have not been paid or reimbursed in anyway for my opinions, posts or any products shown.
Please do not use photos without linking back to this blog
without my permission.
Thank you for your cooperation,
Sandi


