Ad-Free Blog
Mather Printmaking week 4: Gellie Printing
So far, this was the most fun, and the most frustrating. I am my own worst enemy when it comes to these projects. I see in my head what I want to achieve, but not always the path to get there.
Gellie prints are flexible and ideal for quick print projects and can be used multiple times to get many different effects.
The gelatin plate for inking is made from 4 packages of gelatin mixed with 2/3 cup of cool water, mixed in a flat bottom surface container, and then add 1/3 cup of very hot and mix well. Cover and store in the refrigerator.
Surprisingly, the set-up gelatin comes out of your container quite easily, and the bottom of the thickened gelatin becomes your flexible, smooth and becomes a reusable plate for roughly two weeks until it begins to 'foul' up or crumble.
Mistake one---I chose a round container...lol. Why, because there are no corners to line up when doing multiple layered printing, so aligning is difficult, which I didn't even think of.
Not too attractive, the gellie I made in an 8" cake pan.
Here you can see how thick it is...the rust mark is from the bottom of the old pan.
We were told to start with a stencil....I did a bird cutout on a piece of card stock and had some pieces of fresh ivy. I inked the plate and went over the ivy and the stencil bird and this was backwards of what we were supposed to do, but this was a test idea to begin with.
This time I decided to use blue paper, before I inked the gellie, I placed the bird shape on the bare gellie, then inked the whole plate with a yellow-green brownish tone. You place your natural materials on into the ink press down, take a throw away print. Remove all the materials and stencils and take a second print (your real one) and see all the details.
I printed twice on the blue paper print. The second one with a blacker/brown red. and added the string...the idea being the bird was making a nest.
And this is when I decided placement needed to be better.
Experimenting with a more area printed background...I lost the bird because I forgot to replace the stencil piece, and the alignment was still off...but that is so cool what did print.
Here's another start....two layers, dark green background, and detail, and then rust on
top. My colors are far from perfect because I stuck with the colors given in the kit. A baby blue, a pastel yellow and a true red, also black ink. The pastel colors muddy everything...but I figured everyone in the classes had issues with their colors.
Because of having to work fast-----I didn't take photos as I was going along of every step. Acrylic paint dries very quickly even with a retarder added.
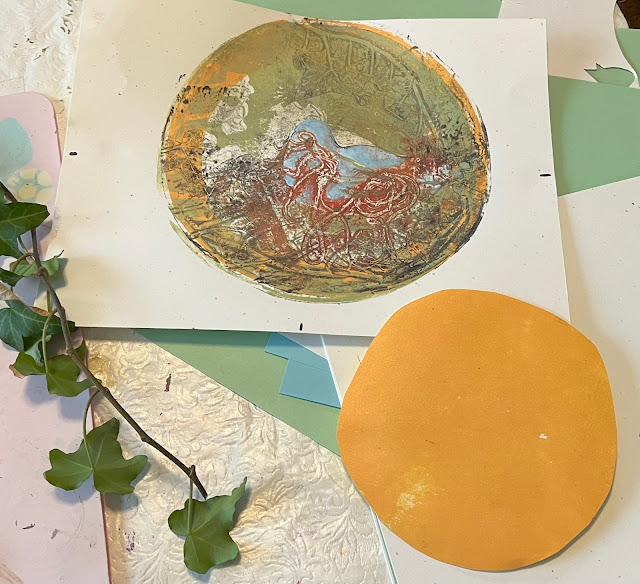
Here is another start. I made a simple circle as a blocker for printing color background.
I wanted a warmer yellow and adding a bit of red did help.
Yellow stencil covered in the golden red rim. By now I have my papers and my plate with markings to line up.
You can kinda see where this might go---
I followed that with a dark green print, then redid the ivies in a dark brown, and then a very controlled dark red, where I concentrated on the string. The blue bird was painted in a bit...as the poor bird got lost in the design. I could see the outline so I just did a wash of the blue paint. She needs eyes but I might still do another dark detail print on this, if I can line everything up.
The most important part is the learning curve on all this. A little paint and a bunch of paper---and an hours worth of time...I will revisit this technique within the next two weeks and see what I come up with.
It's just such a great way to do prints but it's an inside-out-upside-down-backwards process, once you wrap your head around it!!!
HAVE YOU TRIED A NEW CRAFT,
PLEASE SHARE!
If you enjoyed this post please follow this blog by blogger or
FOLLOW IT which you will find in the upper right hand corner of this site below the header.
Thanks always for visiting.
I will try and respond to every comment and answer every question.
I will be sharing at these fine Parties!
The photos in this blog are my own or I have permission to using them from family. Any others will be attributed to source if possible.
I have not been paid or reimbursed in anyway for my opinions, posts or any products shown. Please do not use photos without linking back to this blog
without my permission.
Thank you for your cooperation,
Sandi


These are fun and you did some terrific pieces. You're ahead of me on making your own gelli plate -- I just bought one. I loved doing it but never did it to create an art piece from one gelli like you did. I can see why/how that would be hard and frustrating. I wanted to do it to make deli papers to rip up for collage and it works beautifully on deli paper. If you didn't try deli paper, buy a box at the store (it pops up and you get a whole lot). It's thin and that can be a plus or minus. But it's cheap and if you mess up you don't feel like you messed up your good paper. It's great for start-up.
ReplyDeleteAh, Jeanie, we always have Deli paper pieces to use with freezing meats...way better than wax paper or clear plastic. It was fun---but you do have to work fast. I can't believe how much paper towels I go through. I definitely will try it...I'm going to experiment on Friday before class on the gellie again.
ReplyDelete