
Ad-Free Blog
Mather Printmaking Week 3:Relief Printing
I've switched my Mather printing day to Friday, seems something always comes up in the middle of the week. The weeks are really seeming to go fast. Since the classes are now only 1 hour long, we really move fast.
 |
| oldnewgreenredo |
Everything I used for the printing today!
Early on Friday I preprinted some backgrounds since black and white really isn't my thing. I did this by using the paints included in the kit, and here is an example of mixing the yellow and blue(both pastels) and getting this. I did a few more in other colorations mixing paints, blending medium, and some with small amounts of black ink.

Since this week was relief prints, where you press or carve into a surface to make a design that 'doesn't print' and the rest of the block or in this case foam surfaces does print. This is much like the wood block or linoleum carvings you might have done as kids.
 |
| oldnewgreenredo |
I actually started on my surface before class, you can see a bit of a complex garden scene I pressed into the 'foam' tray that was trimmed for the 'plate' surface.
 |
| oldnewgreenredo |
Directions/suggestions were giving by our hostess Ruth Guery on Zoom with emphasis on enjoying what you are doing as a learning experience and it's supposed to be fun.
I had dug into my little bin of junk from that DRAWER we all have, and used a lot of different things to press into the foam.
 |
| oldnewgreenredo |
I used the flower frog, the picture hangers, the small end of the bobby-pins, screws, a nail head (great for drawing) etc.
 |
| oldnewgreenredo |
I was having so much fun carving, I did the backside also, this started as a sea horse and then morphed into a dragon.
 |
| oldnewgreenredo |
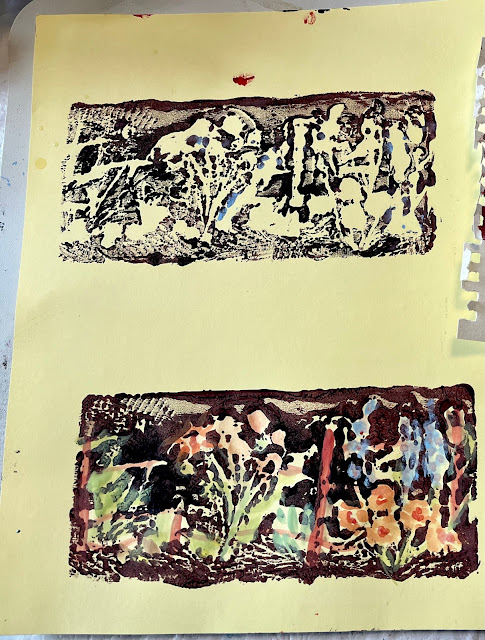
I had a piece of yellow cardstock set aside for the flower garden. I mixed some red with the black acrylic ink, and it gave a rich brown---the color of earth...which I though was apropos with the subject. My first print (top) wasn't great---they seem to never be great like the first tray of baked cookies or that first pancake, LOL.
 |
| oldnewgreenredo |
The second and third print were deeper in color, but much of my detail didn't print...so after class I filled in the blank areas with some color---the illusion worked and these are charming small prints. I stuck with watered down mixtures of the three colors they gave me. It wouldn't be fair to be adding some of my hundreds of paints I have downstairs.
NEXT:
I flipped my plate over and tried the seahorse/dragon. I added lots of blending medium to my ink so I could get a nice thin coat on my brayer that might be even.
 |
| oldnewgreenredo |
Here is the plate with ink on it. You can see the ink filled in all the bubbles I had made, sigh. To the left you can see another 'plate' I made on dark denser foam.
 |
| oldnewgreenredo |
A few of the bubbles showed up here in the print. Still a lot of tiny details are lost, this is because of the very soft foam surface.
 |
| oldnewgreenredo |
Here you can see the second print on the green painted paper---l'm liking this, and the print is clearer, apparently I had moved the first one and that was part of the muddy look issue.
 |
| oldnewgreenredo |
I did two more...the one on the right had too much ink and really didn't work at all. I think when I washed the plate in between prints I also removed more detail by rubbing the surfaces clean.
Hmmm...Foam trays that are really soft don't last through many prints? Still great for working with kids or experimenting!
 |
| oldnewgreenredo |
It stands to reason that pressing on the paper (use the smooth surface of this little pitcher...will also compact the details foam. But the process is a learning experience.
I had another black tray (a bit denser) from a larger meat tray, I decided to use. I want to make a brick patio for the dolls, so I thought I might try an overall print that I could repeat.
 |
| oldnewgreenredo |
Above is a roller from one of my shelf/racks in the cupboards I rolled this double edged 'wheel' across the surface which was denser than the white foam. This was a nice smooth and thicker line which I hoped wouldn't fill with ink/paint.
 |
| oldnewgreenredo |
This was my first print and definitely interesting.
 |
| oldnewgreenredo |
Here are two prints with a double image on them. The one on the left is a simple repeat, the other is a reverse print. I will have to try top edge to bottom edge prints next.
This will definitely have possibilities for doing a patio and I can see filling the small textured squares with coloring/moss and maybe using a gray paint on darker paper. I will play with this in the future as the black foam, printed very well and held it's details.

Here's one more patio print on red/yellow painted surface...too quick and too loaded with paint which was part ink and red paint to make a brown.
Phew! That was a very fast hour!
Maybe I will dip into my hundreds of colors down stairs and try some others. Now I have to buy meat according to their trays, LOL.
Can't wait for next week and Gelli prints?
If you enjoyed this post please follow this blog by blogger or
FOLLOW IT which you will find in the upper right hand corner of this page.
Thanks always for visiting.
I will try and respond to every comment and answer every question.
I will be sharing at these fine Parties!
The photos in this blog are my own or I have permission to using them from family. Any others will be attributed to source if possible.
I have not been paid or reimbursed in anyway for my opinions, posts or any products shown. Please do not use photos without linking back to this blog
without my permission.
Thank you for your cooperation,
Sandi
 |
\
You accomplished a LOT in an hour! I like what you are doing and it will be exciting to see how your patio turns out, too. It looks like a terrific series of classes!
ReplyDeleteThanks, it sure goes fast. Yes, it's a great set of classes! It's been almost 54 years since I did printmaking in College. It's amazing what you forget in a lifetime. Hugs, Sandi
DeleteSo creative and I liked the results. I think I once took a Class in Printmaking in High School, don't remember any of it. Surprise, huh? *Bwahahaha*
ReplyDeleteYes, this has been fun...and makes me want to try and do some more---but we have 4 more weeks, so I will just keep up with the experimenting, but 45min to 1hr isn't enough start to finish, but then if I had more time I'd pick my nose first before getting anything done...LOL.
DeleteI loved your printmaking post.
ReplyDeleteHere is one of mine...
https://jeanneselep.blogspot.com/2023/11/autumn-oak-leaf-wreath.html
Using a styrofoam tray yields nice results. You might try a rolling pin, I've had luck with that when playing at home.
Excellent Jeanne. I didn't have a single leaf to use that was the right side, everything is dead here, lol. Ivy was the only thing, not too thick. I can see where coloring afterward would be an excellent idea...! Will try again---! Hugs, Sandi
Delete