Showing posts with label mixing colors. Show all posts

Thursday, September 11, 2025

Using Gesso as a 'Painting' medium or base.

 Ad-Free Blog

While gardening and cleaning out flower beds, I was just getting rid of the really dead stuff, I collected some interesting bits and pieces.

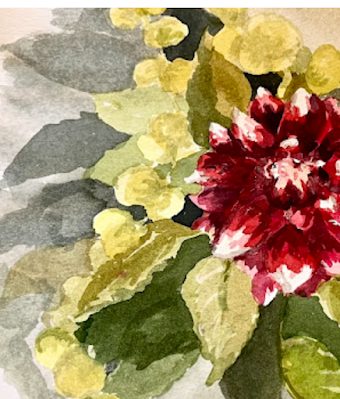
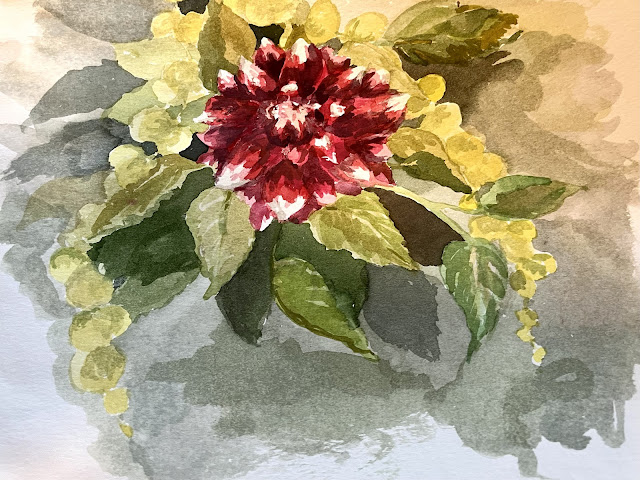
Three very brown dried Hydrangea blossoms

A Long dried stem of HollyHock. The seeds weren't even exposed as blossoms and had dried on the stem un- opened.

and 2 branches of Chinese lanterns were dried green before they even turned orange. I planted 1 package maybe 4 years ago and they show up everywhere as a weed now.


I plopped them in my thick weird glass pitcher (squared fence picket pressed glass). 

The pitcher is before 1891 and made by King Son Glass Co. in Pittsburgh, Pa. It's weird and chunky, thick but that wonderful slightly blued/green/clear glass of that period.


The pitcher is very heavy, but the dark hydrangeas...really visually weigh a bit themselves.

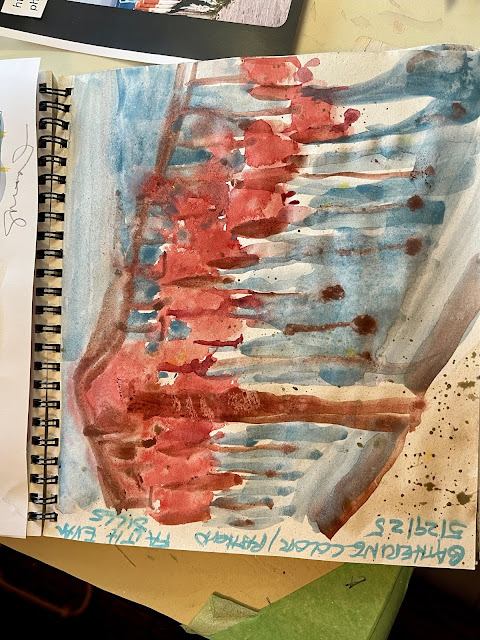
I chose a large sheet of Water Color paper and used the back rougher side.


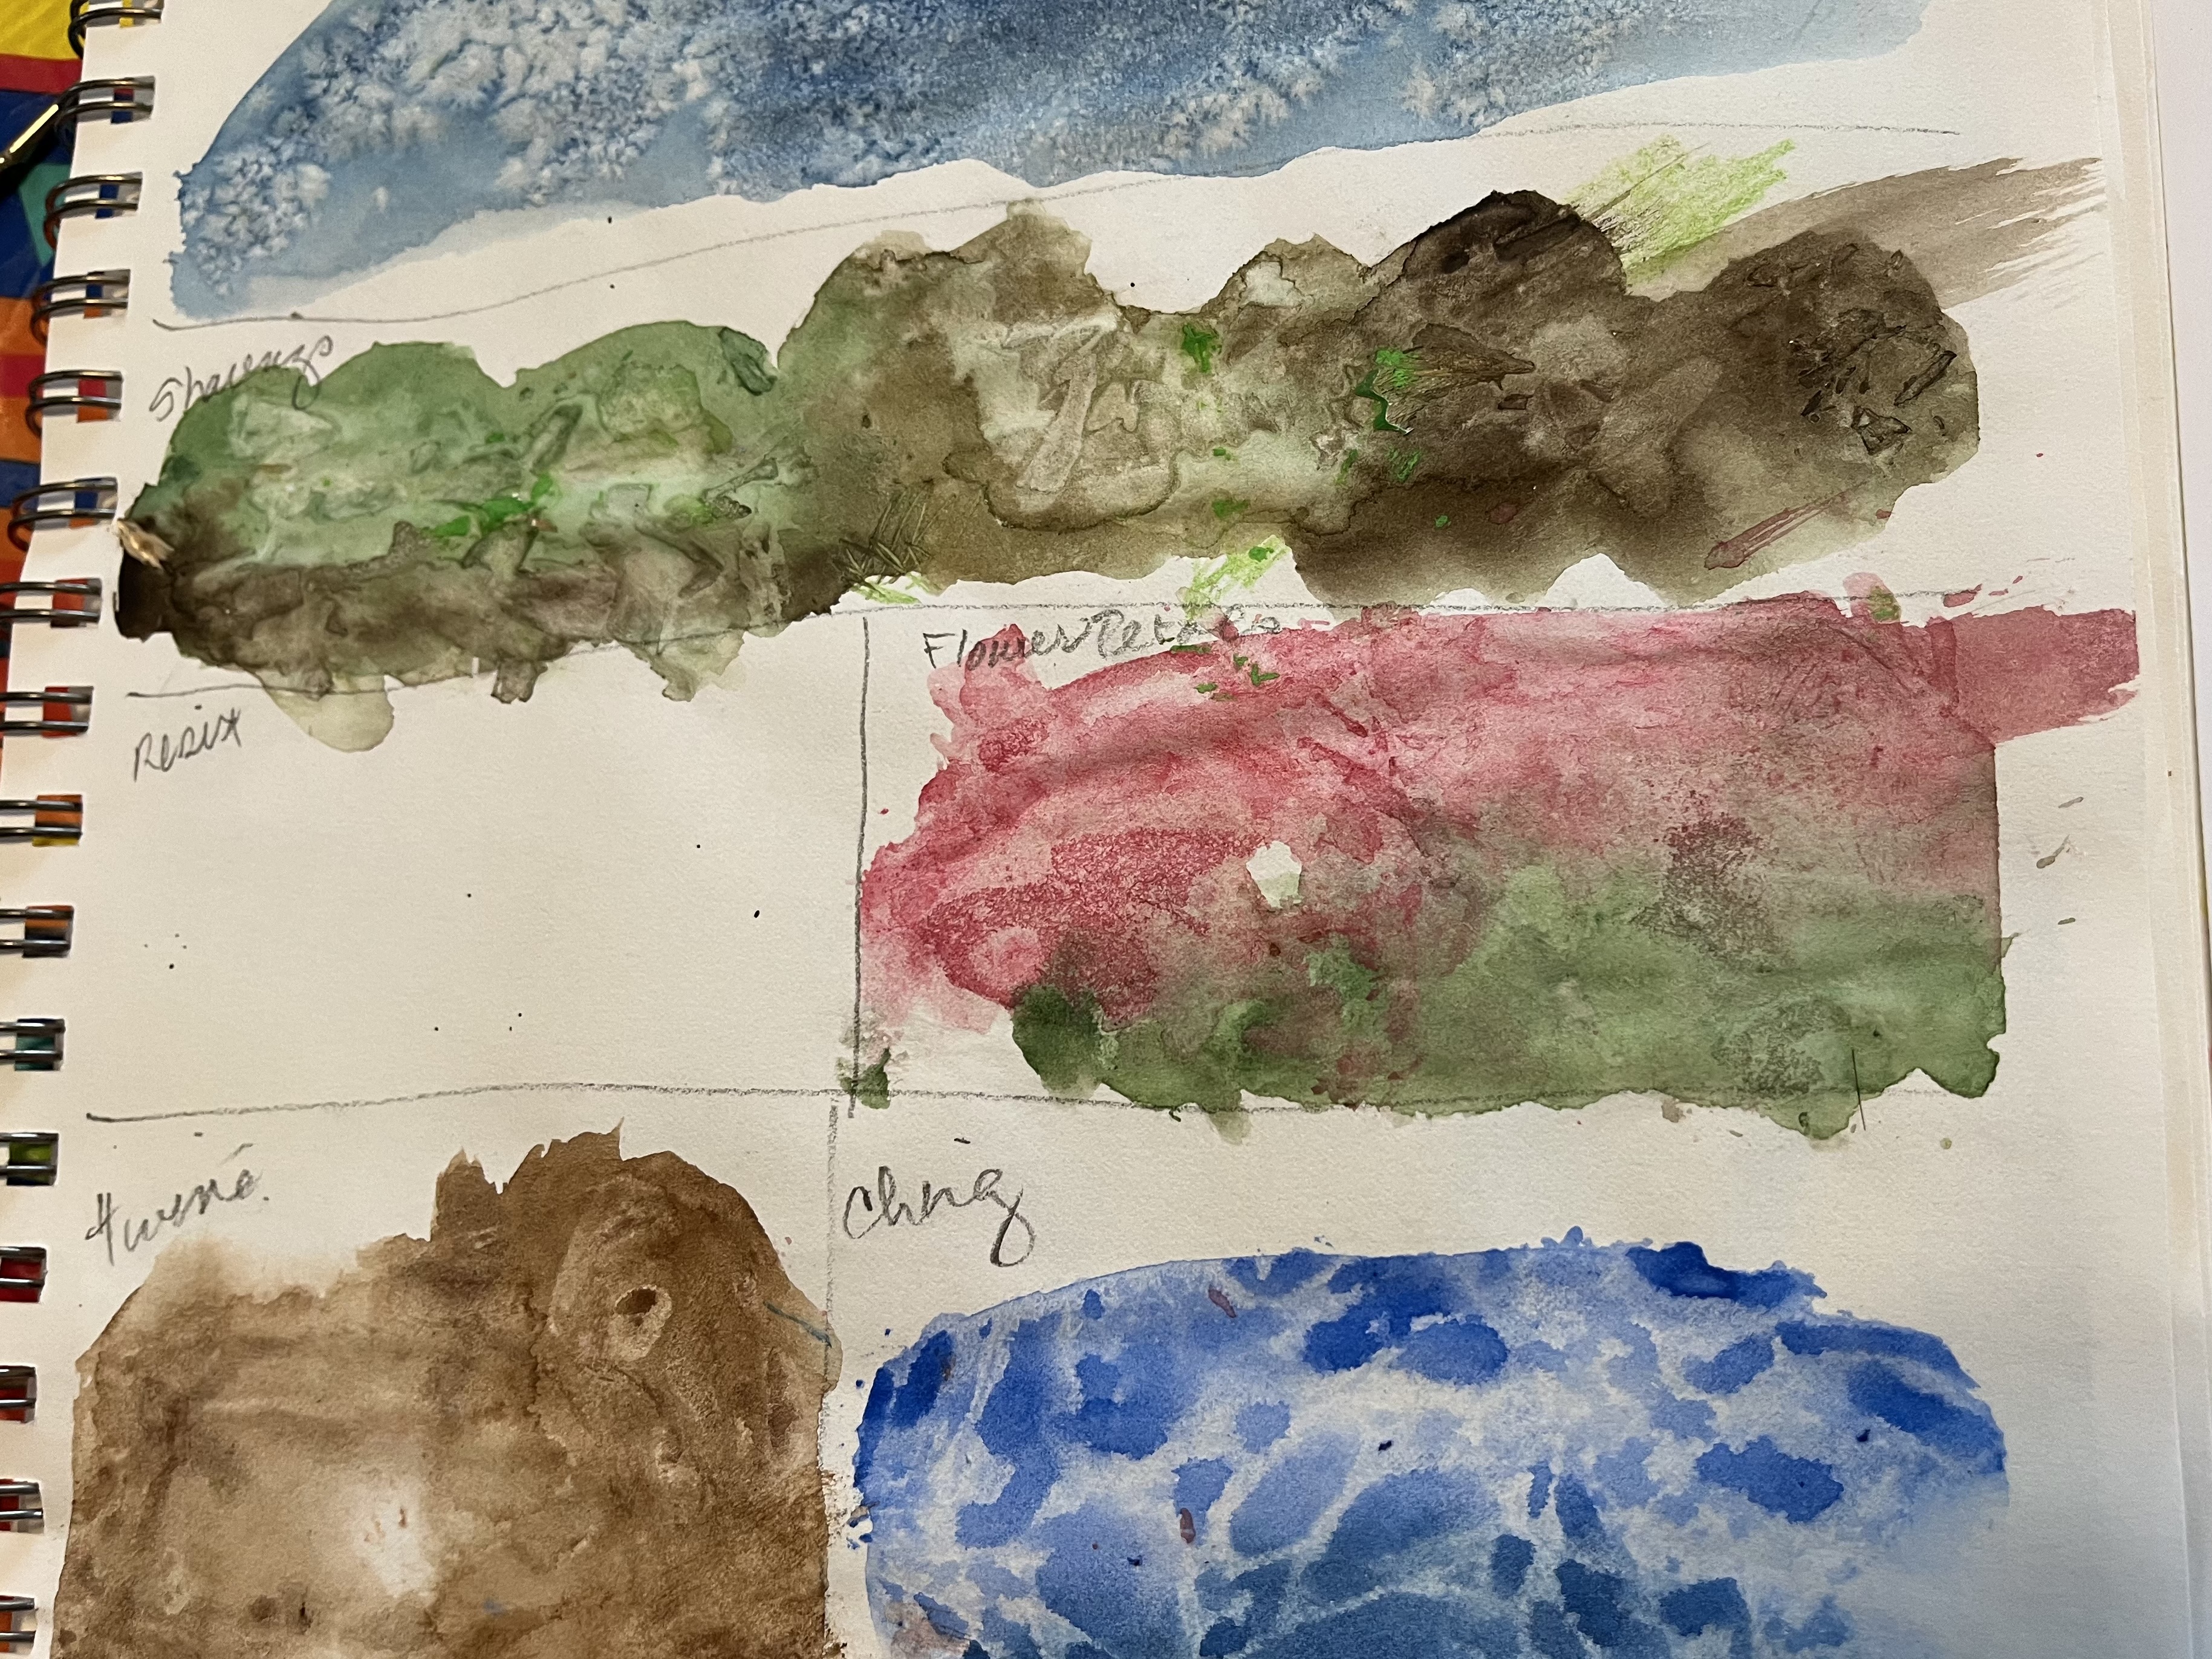
In an attempt to loosen up---I scribbled with yellow, turquoise and gray(silvery) watercolor gel sticks. I love using these as you can erase your lines simply by painting water on them and the colors mix well with regular wc. 

The gray mushy stuff is textured gesso which I lightly tinted with gray and smeared on with a serrated plastic carry-out knife. I wanted to get some texture going on this piece...all the petals being so tactile. I even dabbed gesso on with my finger tip to give the feeling of round petals.


Closeup on the pitcher and thick glass and a stray lantern on the table. 


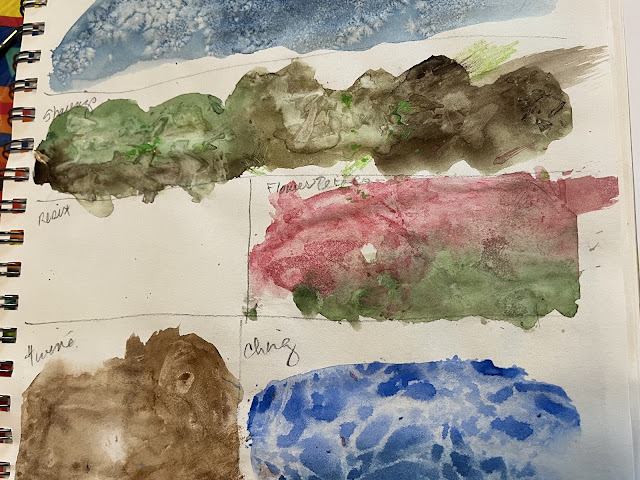
My limited palette was made from Cadmium Yellow Med, Carmine, Ultra Purple, Viridian, and Van Dyke Brown--a rich deep almost black brown which I used for the dried up leaves and mixed with so many of the washed out earthy colors. All the colors on the sheet were mixed from those 5 colors.


I didn't paint everything brown and went more for imagined light source on slightly green foliage and flowers. 

It's very busy, but I enjoyed working on top of the gel sticks, and the slight shimmer of the gray gel stick was perfect for the glass. I painted out 99% of the white paper again, only leaving the glass void of some paint.

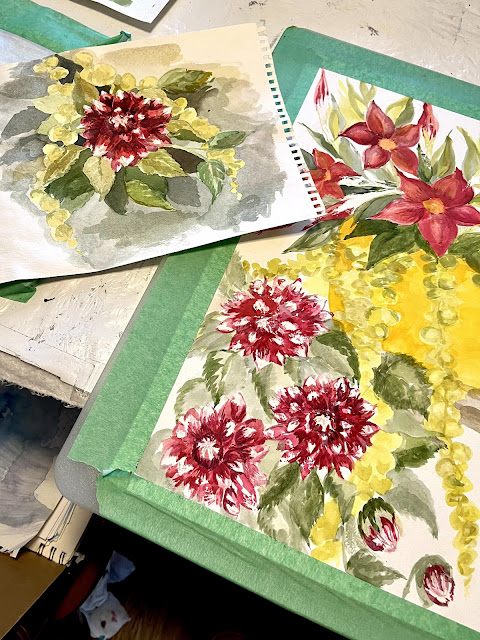
I named this 'Last Bouquet', in honor of the end of summer. 

I think I will try the same vase and flowers on larger paper with more 'AIR' around it and even looser...maybe with different colors. I guess we will see. I'll also use gesso more and maybe with more fingers!!

Happy Painting!

If You enjoyed this post please FOLLOW IT in the upper right hand corner, to get just one email of each AD-Free post.

I will post at the following Link Parties, I hope you visit them.

All the opinions and photographs in this blog are my own, unless otherwise designated. I have not been paid or reimbursed in anyway for my opinions, posts or any products shown or anywhere I shop.


Thanks ALWAYS for visiting!

I will try and respond to every comment and answer every question. Please don't use my photos without my permission.
 Sandi Magle

OldNewGreenRedo


Friday, May 30, 2025

Sketchbook BingeFest: Color/Pattern with Faith Evan Sills

Ad-Free Blog
Sketchbook BingeFest 

Gathering Color and Pattern

Wow, these projects are flying. I had a hard time deciding to pick an image for this color pattern project. Faith led us through looking at a photo---any sort, she used a muted home decor photo to create a page of patterns and mixed colors suggested by the photo. And adding designs reminiscent of textures from the photo.

BUT, 
I still have these three palettes I'm trying to use up of three basic yellow, blue, crimson and some brown up.

oldnewgreenredo

Going through my mail, I saw this great photo from a blog I follow on dolls, Antique Lilac..Mary Boer shared some vacation photos...and my favorite was this one of fishing bouys along a dock here on her blog:
She does fabulous handmade dolls and scenes along with detailed settings. Her dolls were on the seashore plus she added a few maritime photos.

Mary Boer Photo

HER PHOTO: definitely had color and pattern for inspiration.  I choose three bright rounds brushes and one flat brush and planned on working from my limited palettes only.

oldnewgreenredo

As suggested, I broke down the patterns and shapes into basic color swatches. Working in watercolors in the sketchbook. The paper is very tight and smooth with small speckles in it, and holds up fairly well with water for a thin paper.

The blues all began with Cerulean and then adding Crimson, a bit of yellow or Burnt Umber to change the depth or tint. Grays were combination of Crimson, Yellow, Cerulean.

This was very quick....maybe 12-15 minutes.


oldnewgreenredo
  
Turning this on it's side you can lose the actual imagery and it becomes more pattern. I worked quite wet, since we were speeding along and the watercolors definitely bled into each other. 

I also drew on a second page within a defined rectangle. Worked from a quick sketch and painted in the background before and around the bouys. Here I am going for a bit more realism, because I just really like the repetition of the image.

oldnewgreenredo


Keeping in mind this is sketchbook and not a finished project I went for some shading and again layers of color. Lesson...breaking down the idea to simple shapes and forms. I managed to keep the bright contrast here with the white on the bouys.]
This was equally quick, only planned out by doing the backgrounds first.

oldnewgreenredo

 Special thanks to Faith. I may try her approach again when contemplating a large piece, making lines and shapes of colors to match a desired project. Limiting a palette is always interesting...and these pieces with only the four colors are definitely a challenge. 

Everyday a new project,

 I wonder what tomorrow will bring!


All the opinions and photographs in this blog are my own unless identified, I have not been paid or reimbursed in anyway for my opinions, posts or any products shown.  


Saturday, September 14, 2024

Playing with Paint: September #1

Ad-Free Blog

I've been PLAYING WITH PAINT on this in the mornings...very slowly, not my usual mode of operation. But, it's so relaxing and clears my mind. 


oldnewgreenredo

 Here is the stage I'm at now, at day three of painting.  I haven't been worrying about the background and I've been concentrating on building up layers. This is a painting and not a photograph, so you edit and add where your composition takes you.

oldnewgreenredo

This is the color study I shared before during my Mather Watercolor classes in August. Right now, I'm not worrying about anything other than building up layers...
This is much moodier than my new painting, I hope to capture some of this in my layers in the future.

oldnewgreenredo

My color wheel from my paints. I probably should have made one just for this painting, but that would seem so limiting, I do refer to this constantly.

oldnewgreenredo

My working Palette. I'll give you a list of the colors I've used  so far:

Lemon Yellow
Cadmium yellow Medium
Cadmium Red Light 
Carmine
Thalo red 
Sap Green
Foliage Green 
Yellow Green
Purple 
Prussian Blue
Burnt Sienna
Burnt Umber
Paynes Gray
Watercolor resist

My reference photos which are very bright because we have had such brilliant sunshine this summer. 


oldnewgreenredo
Reference photo
Working from nature is always a challenge, as of course Nature is perfect.

oldnewgreenredo

reference photo

These Mandilla had drooped but I watered them again and again, and they are still going wild.


oldnewgreenredo

Reference photo

Early in the morning they seem to follow the sun. Note the white throats...I used resist on 

oldnewgreenredo

Dahlias...are amazing, you wait so long for them to bloom. Mine have tons of foliage to produce these few blooms.

oldnewgreenredo

I started with light washes of lemon, on the pot, yellow green on the baby tears and the leaves to the Mandilla. The Mandilla are Carmine, Cadmium light with brown under tones from mixing a bit of green for shadows. The white streaky stuff around the stems is where I had resist shich is now removed.


You can see how the mixing space has become very dark, watered down,  layers/washes are applied, and some is lifted to try and give the petals highlights.

I also haven't attacked the centers which will be much darker with yellow/gold highlights.


oldnewgreenredo

The opposite of the Mandilla at the bottom are the Dahlias with two layers of reds applied, Thalo and Carmine. I've added a bit of purple to a light wash to start enhancing the depth in the petal bases. The resist has been removed on the petal tips and in the buds, so I'm working carefully now. The greens are just in the early stages.

oldnewgreenredo
 

The tones in the study are not as bright...but I'm doing the flowers in the sunshine now. 

oldnewgreenredo

Mixing pan with Thalo, Purple and some Prussian blue, I think. Purple is very strong...so I'm trying to be restrained in adding it.

oldnewgreenredo

I think this was with three layers of color, I still have to deepen the petals to make them not appear so flat. I've done three layers of washes for the leaves, these will need deepening. and more leaves/deep washes in the background.


oldnewgreenredo

Balancing out the reds ...is a challenge, totally different and then with all that green in opposition. 
I may do another study, just to see how I should use the darks for the backgrounds?

oldnewgreenredo

The container got a second layer of  Cadmium Yellow Medium

oldnewgreenredo

I'm really glad I have labeled my pans...makes life easier to do these posts.

oldnewgreenredo

I'm pretty sure this is Burnt Sienna, Cad Yel Med. and maybe a bit of sap green, I used in some of the leaves in first wash. The yellow at the top is being used for shadows on the pot.


oldnewgreenredo

The pot is very flat now---I will add dark to both sides to make it appear rounder. In real life it is LEMON YELLOW.

oldnewgreenredo

Working on the baby tears...I seem to do here and there. I think they will really pop when I do that lower right corner. So far, they are a mix of Lemon Yellow, Yellow Green and a bit of Sap Green.
oldnewgreenredo

That's all for today, lots of other things have to get done around here.

oldnewgreenredo

I can't wait to see where this goes next! I'm considering using whites for veinings...as I've washed the leaves almost too much?  

Do I know what I'm doing, not necessarily!

If you enjoyed this post please follow this blog by Blogger or FOLLOW IT 
which you will find in the
 upper right hand corner of this page. 

Thanks always for visiting. 
I will try and respond to every comment and answer every question.

I will be sharing at these fine Parties!

I have not been paid or reimbursed in anyway for my opinions, posts or any products shown. 

Please do not use photos without linking back to this blog 
without my permission. 
Thank you for your cooperation, 

Sandi


Tuesday, August 6, 2024

Mather INTRO TO WATERCOLOR: Week Four...trees/bark/techniques/masking resist

AD0-FREE BLOG

This watercolor basics class seems to be flying by. Mondays come so quickly---last week I didn't get to work on anything, so I forced myself to play after class yesterday.

oldnewgreenredo

Our handouts this week, were trees/bark/grass with paying particular attention to light sources.  Ruth shared her palette box...all cleaned up---I never have a clean palette(S), LOL!

We did work on some interesting techniques. I sectioned off my sketchbook to make little samples of these.

oldnewgreenredo

It's so gray today after stormy weather, these were hard to photograph.

oldnewgreenredo

Blue TOP: I did a wet on wet  Prussian blue stripe under a wet on dry stripe above---they melded and then I sprinkled canning salt. Note to self to buy some Kosher salt, and maybe some Himalayan crystals ??? Very Cool effect, you just leave it on to dry and then brush it off...Might be great for backgrounds for sure.

Green Brown: I did a double color load on a mop brush across the page. (I misunderstood when it said pencil shavings...SO... I sprinkled a bunch of wood shavings across this, but what the instructor meant was to shave watercolor pencil lead into the wet paint..(that's the lime green bits). I'll have to experiment with this more, but I really like the textures from the wood shavings. It was also suggested to sandpaper or emery board the pencil lead onto the paper for speckles. (Interesting idea)

oldnewgreenredo

TOP: Pink/Green  following the pencil shavings, I used some dry and semi-dry flower petals into this wet pink/green stripe. I think you might have to use very dry petals and somehow press them down to dry. This may be worth experimenting with.

Bottom: Cobalt Blue and Prussian blue wet-on-wet and then squish a sheet of cling clear wrap onto the surface, pull up and neat stuff happens. Other suggestions, bubble wrap, synthetic place mat material, fabrics, lace, trims....anything that will absorb some the color and make a pattern.
 
oldnewgreenredo

This one wasn't suggested on the sheets, Wet on Wet brown on the left and Wet on Dry on the right. Then I quickly draped cotton twine on the paper...again, it may need some pressure...a bit of mono-print making basically--one shot and you get what you get.

oldnewgreenredo

I used white color pencils (L-Derwent and  R-Prismacolor) to see if I could keep-white after painting. Results not white, but nicely subtle... We talked about wax resist pencils and crayons---but then you can't paint over the white. Water base resist is really gummy, and I had just enough not hardened in the bottle to play with later.

Our next lesson was about bark/trees/grasses. We talked about light/sources as well as atmospheric shading...
how far away is duller and less detailed while in the foreground you have more detail and brighter/intense colors. Ignore that strip of lime...it got away from me, grins.

oldnewgreenredo
I've been using a good quality sketchbook for lessons and practice bits, so the paper isn't quite as reactive as watercolor paper which becomes expensive for scribbling and playing. I'm more adventurous this way.

This tree study is done from the given photograph the class used. I concentrated on the light source and the bark. I gave the sky background a very light wash...of blue/gray. I'm concentrating on layers in painting, working a bit, then walking away and letting it dry. The tree isn't perfect in shape or proportion, but again this wasn't a finished picture, but a working lesson. All the shadows are made with complementary colors...greens use added reds or blues use the oranges to get my shade colors. I add Payne gray mixed to get even darker shadows with the complements. It's really interesting to play with the shading and to work in layers.

oldnewgreenredo

Our Dahlias are finally blooming on the porch after making mounds of greenery with all our rain. 
Definitely worth trying to paint, the leaves have so much texture to them.

oldnewgreenredo

I have five Mandevilla plants, three which are blooming bonkers...who couldn't resist wanting to paint these.

oldnewgreenredo
1

I'm planning a painting mixing all these elements and our crazy Baby Tears that are just so lush and textural. What a challenge?

I also wanted to use the last drops of resist to cover the Dahlia points. (I have to get a new bottle...UGH $$$$) I grabbed an old watercolor pad and took a damaged sheet to play on and to do some color studies and see if the resist would work for the white tips on the Dahlias.

oldnewgreenredo

The 50's color scheme reminds me of the first home I remember as a child...the wallpaper my mom chose and fabrics were all in these tones. 

Again, I worked in layers, not trying to duplicate the flowers/greens but make an interesting composition and work all sorts of tones onto the paper.  Yesterday was great bright sunlight, but today is very gray day with artificial light and I couldn't get the colors to photo accurately on the painting. The yellows/greens are a bit brighter in real life.
 

oldnewgreenredo

I'm really liking working in layers...it gets quite moody, Paynes Gray with the greens and complementary reds and a touch of other yellows here and there. 

oldnewgreenredo

The resist peeled off nicely and I was able to layer in the colors of the Dahlia petals. Gosh, I think I used Vermillion, Thalo Red, and Cadmium red light as well as Chromium green (very opaque) and Prussian blue for leaves to be opposite the deep reds.

I'm glad I made this study---I may do one more and add more gold tones, and try to figure out how to add the metal plant stand, or just a simple shelf for the top pot to sit on? 

oldnewgreenredo

My light sketch on real paper has me using elements of all three flower photographs.  I may do a few more studies...before I challenge the whole thing.

WISH ME LUCK!!

If you enjoyed this post please follow this blog by Blogger or FOLLOW IT which you will find in the upper right hand corner of this page. 

Thanks always for visiting. 
I will try and respond to every comment and answer every question.

I will be sharing at these fine Parties!

I have not been paid or reimbursed in anyway for my opinions, posts or any products shown. 

Please do not use photos without linking back to this blog 
without my permission. 
Thank you for your cooperation, 

Sandi