Showing posts with label Baby Tears. Show all posts

Saturday, September 14, 2024

Playing with Paint: September #1

Ad-Free Blog

I've been PLAYING WITH PAINT on this in the mornings...very slowly, not my usual mode of operation. But, it's so relaxing and clears my mind. 


oldnewgreenredo

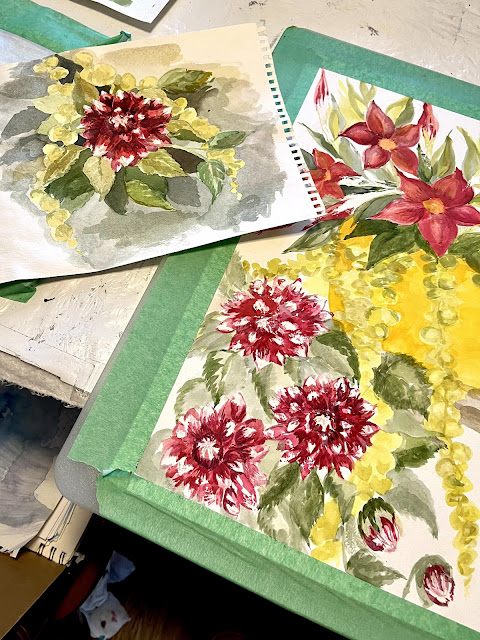
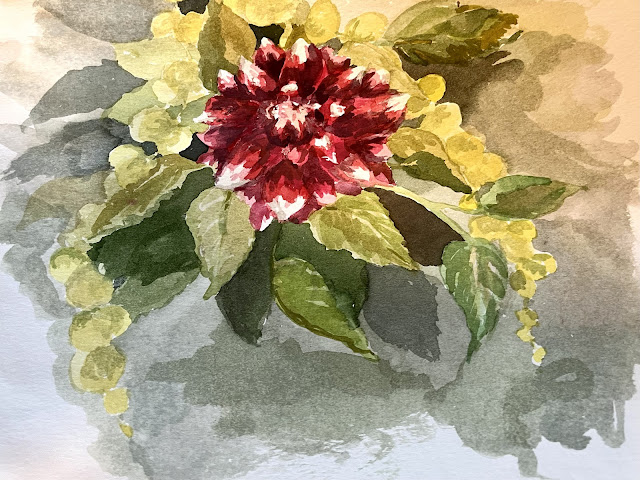
 Here is the stage I'm at now, at day three of painting.  I haven't been worrying about the background and I've been concentrating on building up layers. This is a painting and not a photograph, so you edit and add where your composition takes you.

oldnewgreenredo

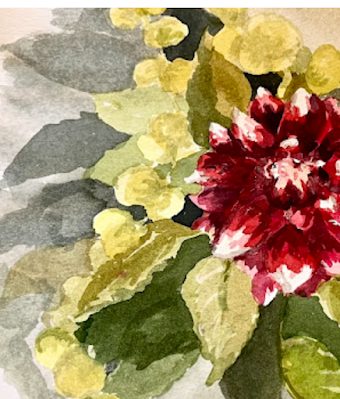
This is the color study I shared before during my Mather Watercolor classes in August. Right now, I'm not worrying about anything other than building up layers...
This is much moodier than my new painting, I hope to capture some of this in my layers in the future.

oldnewgreenredo

My color wheel from my paints. I probably should have made one just for this painting, but that would seem so limiting, I do refer to this constantly.

oldnewgreenredo

My working Palette. I'll give you a list of the colors I've used  so far:

Lemon Yellow
Cadmium yellow Medium
Cadmium Red Light 
Carmine
Thalo red 
Sap Green
Foliage Green 
Yellow Green
Purple 
Prussian Blue
Burnt Sienna
Burnt Umber
Paynes Gray
Watercolor resist

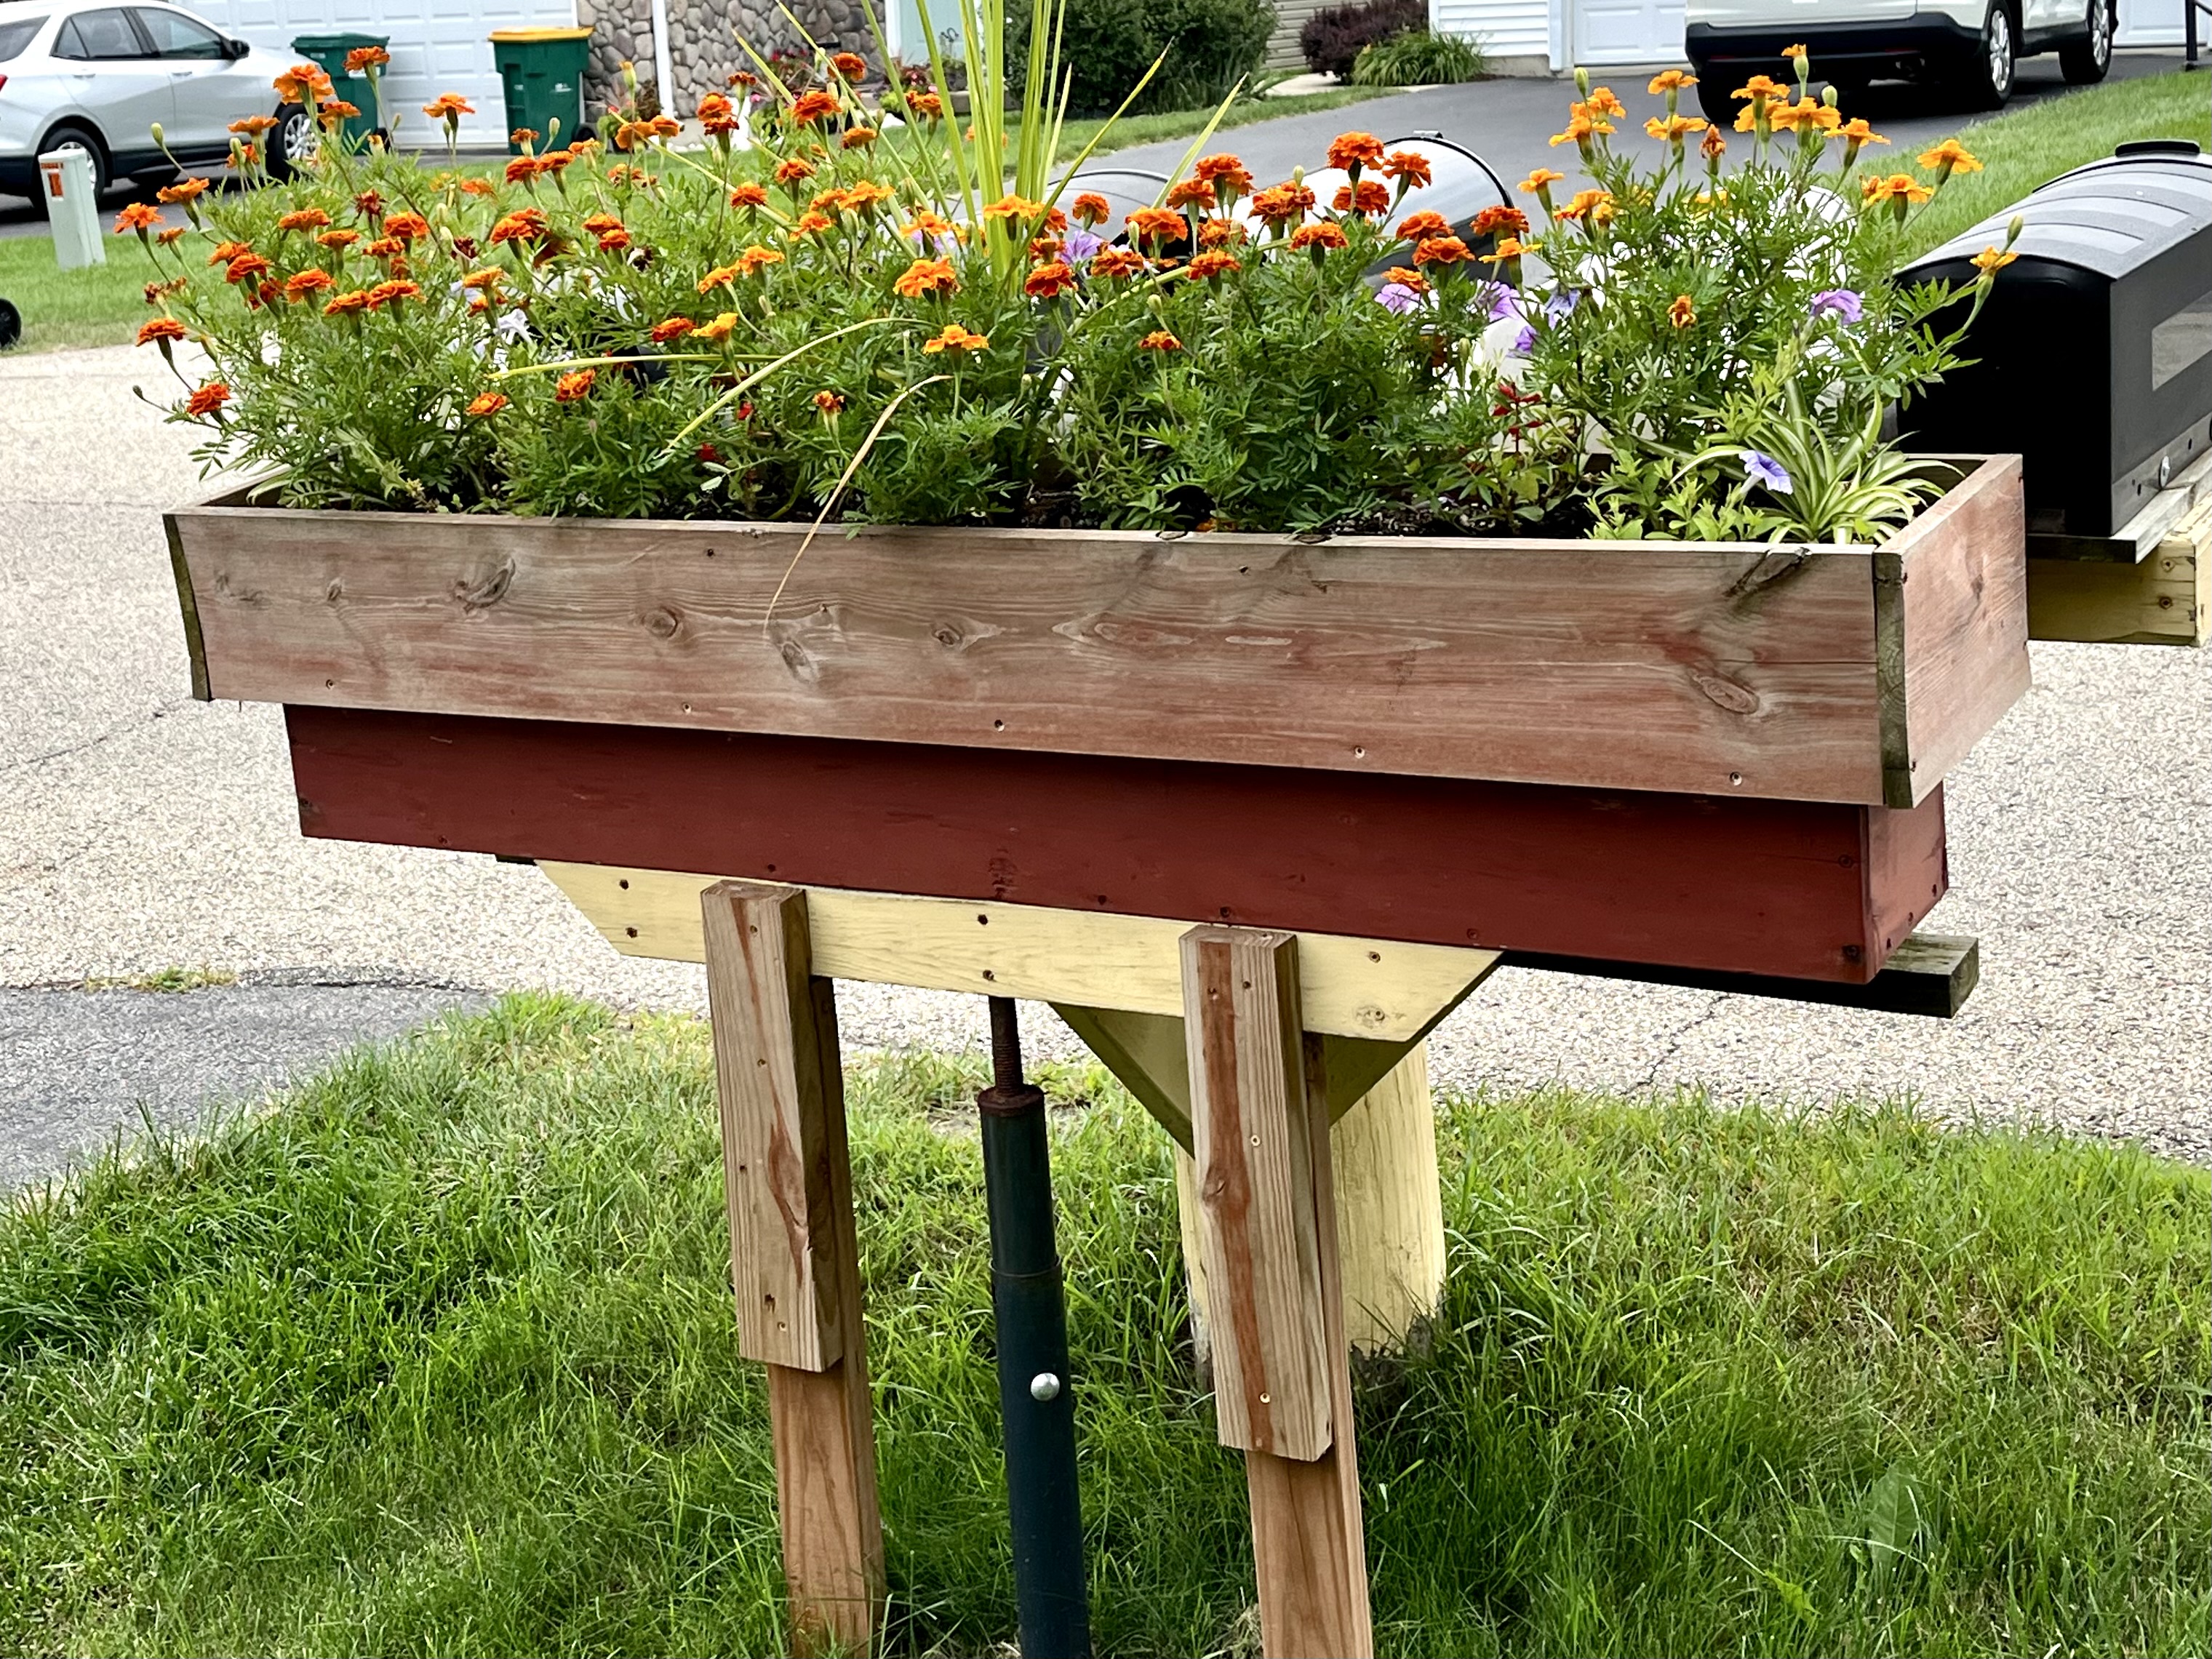
My reference photos which are very bright because we have had such brilliant sunshine this summer. 


oldnewgreenredo
Reference photo
Working from nature is always a challenge, as of course Nature is perfect.

oldnewgreenredo

reference photo

These Mandilla had drooped but I watered them again and again, and they are still going wild.


oldnewgreenredo

Reference photo

Early in the morning they seem to follow the sun. Note the white throats...I used resist on 

oldnewgreenredo

Dahlias...are amazing, you wait so long for them to bloom. Mine have tons of foliage to produce these few blooms.

oldnewgreenredo

I started with light washes of lemon, on the pot, yellow green on the baby tears and the leaves to the Mandilla. The Mandilla are Carmine, Cadmium light with brown under tones from mixing a bit of green for shadows. The white streaky stuff around the stems is where I had resist shich is now removed.


You can see how the mixing space has become very dark, watered down,  layers/washes are applied, and some is lifted to try and give the petals highlights.

I also haven't attacked the centers which will be much darker with yellow/gold highlights.


oldnewgreenredo

The opposite of the Mandilla at the bottom are the Dahlias with two layers of reds applied, Thalo and Carmine. I've added a bit of purple to a light wash to start enhancing the depth in the petal bases. The resist has been removed on the petal tips and in the buds, so I'm working carefully now. The greens are just in the early stages.

oldnewgreenredo
 

The tones in the study are not as bright...but I'm doing the flowers in the sunshine now. 

oldnewgreenredo

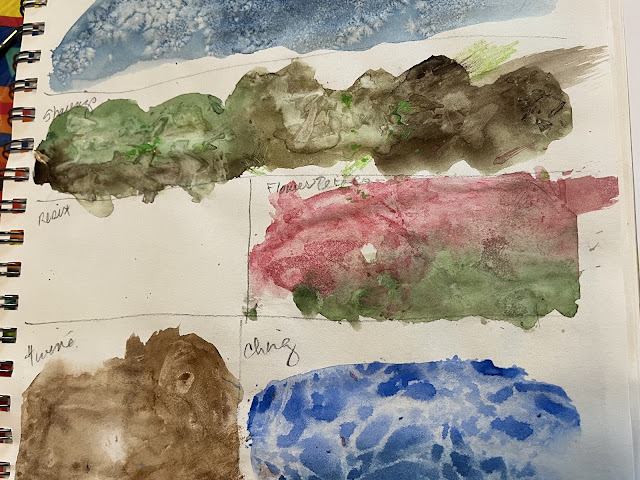
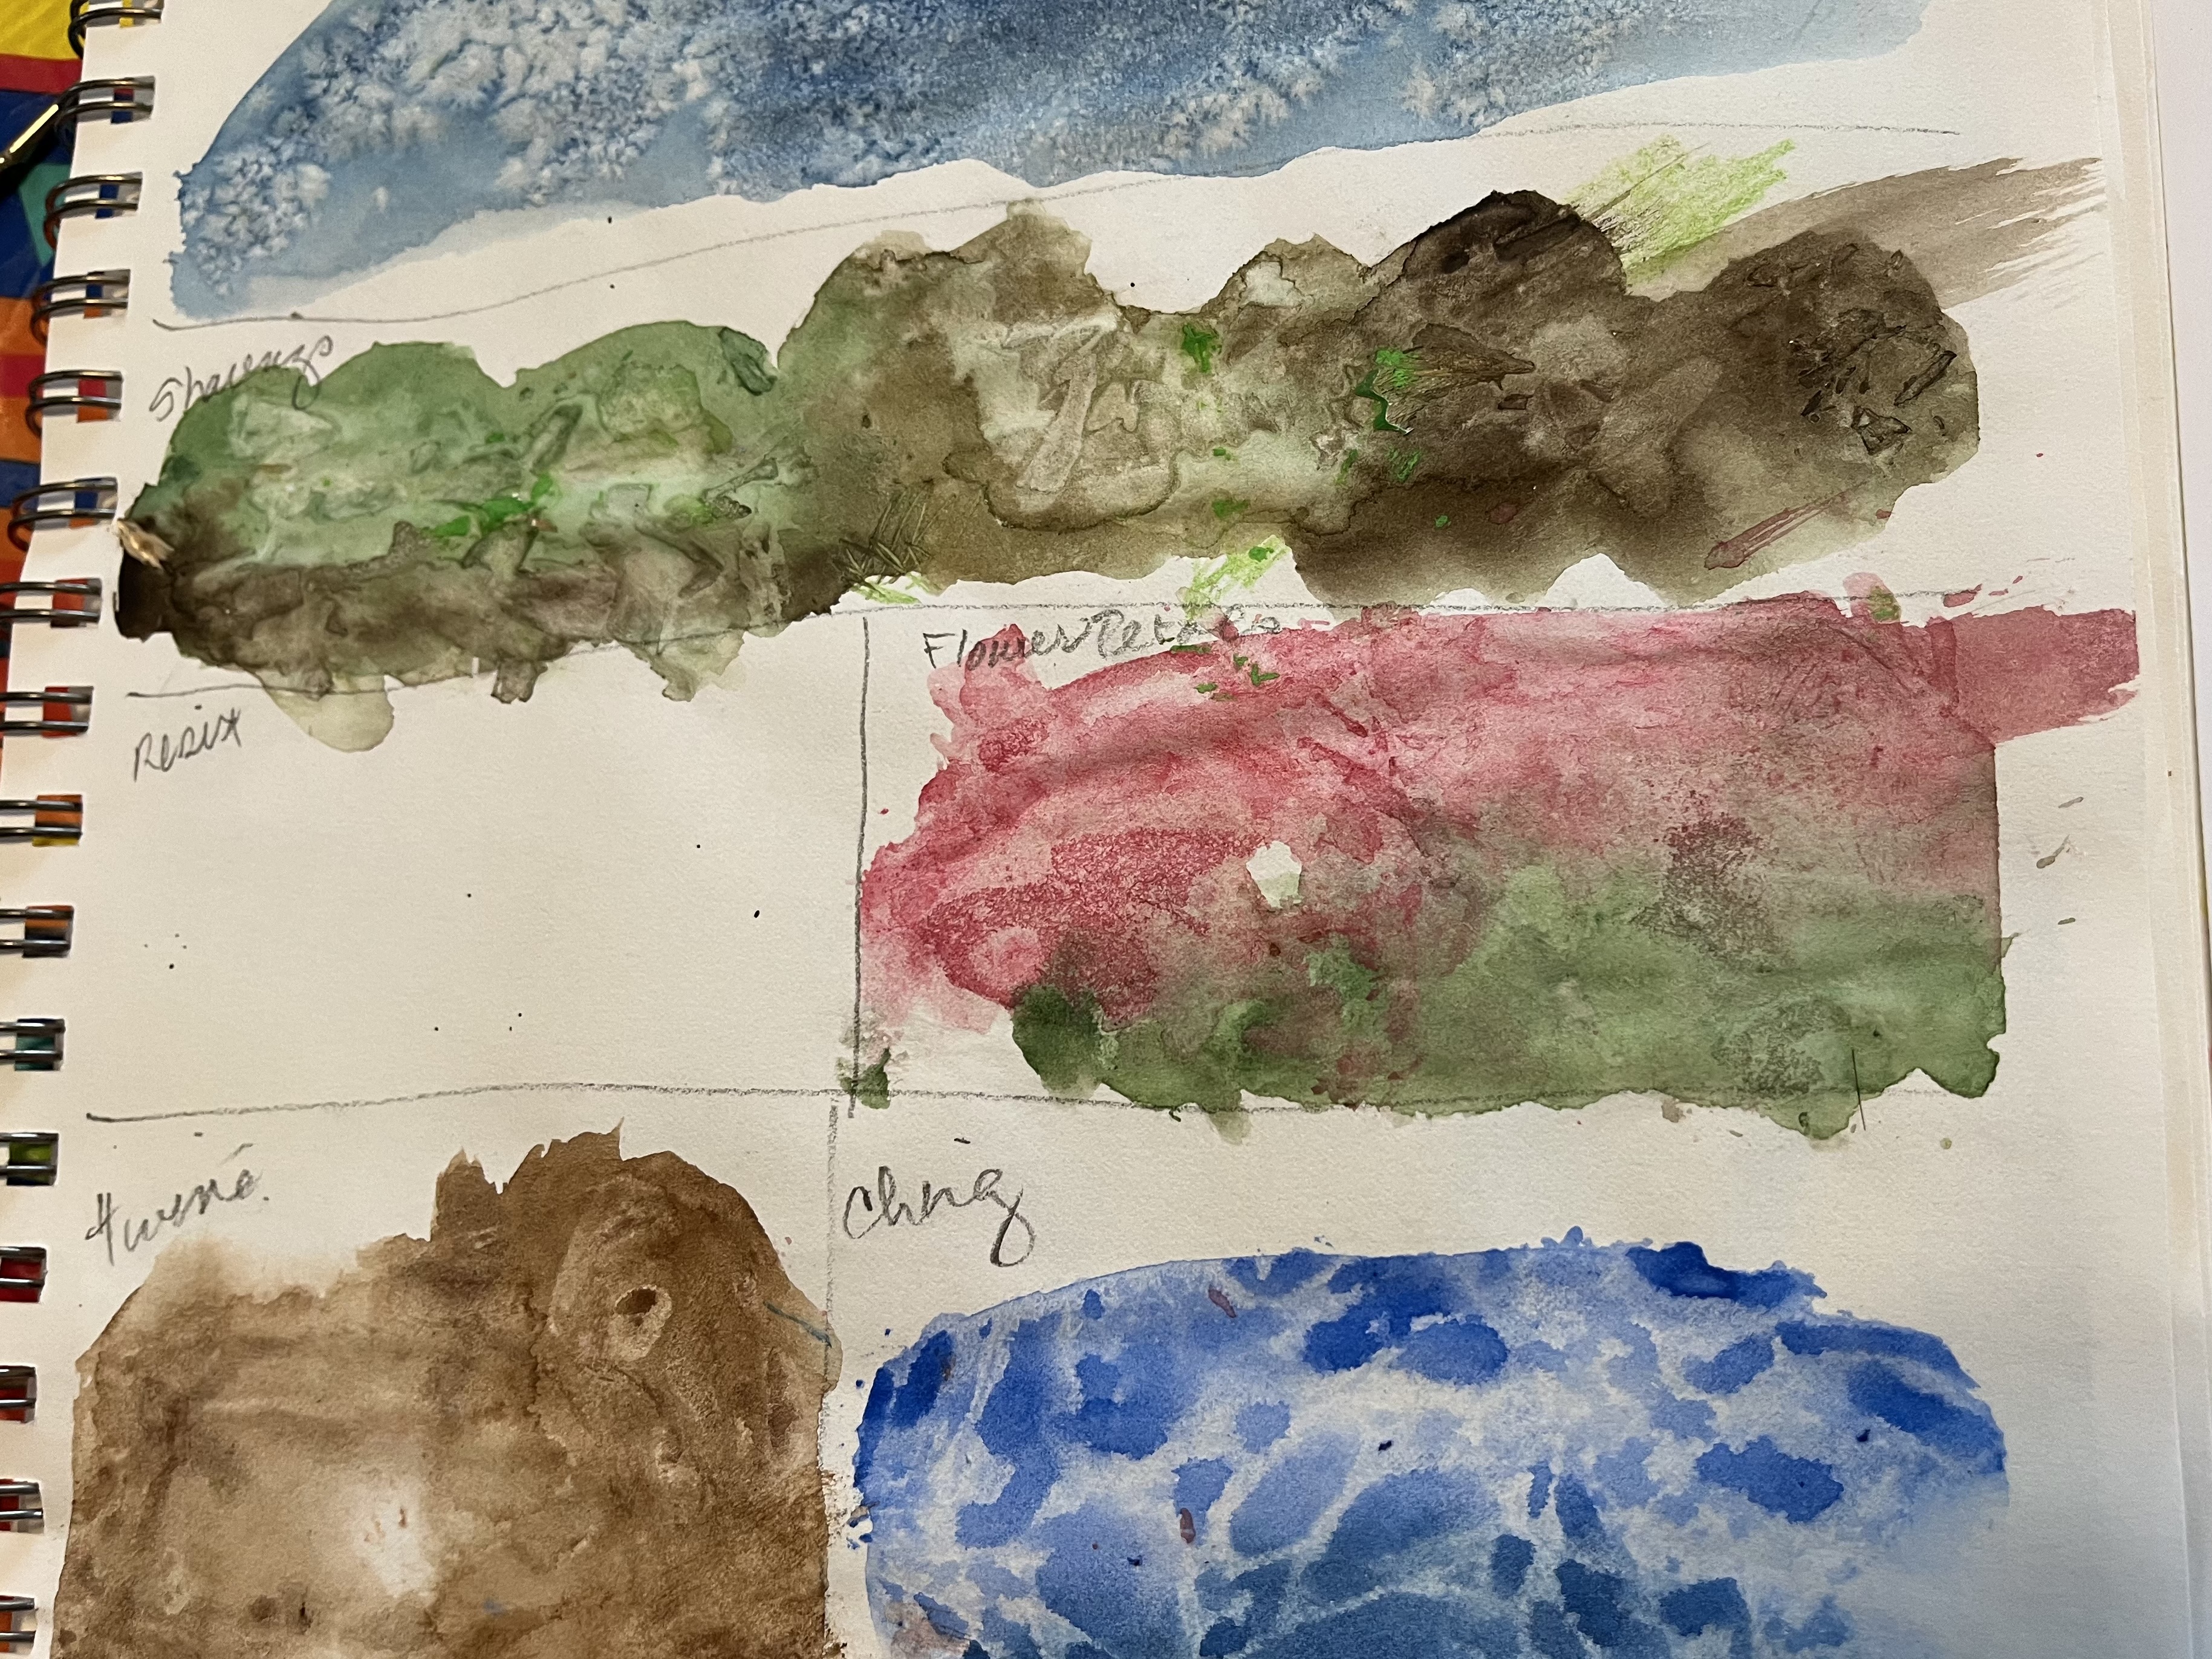
Mixing pan with Thalo, Purple and some Prussian blue, I think. Purple is very strong...so I'm trying to be restrained in adding it.

oldnewgreenredo

I think this was with three layers of color, I still have to deepen the petals to make them not appear so flat. I've done three layers of washes for the leaves, these will need deepening. and more leaves/deep washes in the background.


oldnewgreenredo

Balancing out the reds ...is a challenge, totally different and then with all that green in opposition. 
I may do another study, just to see how I should use the darks for the backgrounds?

oldnewgreenredo

The container got a second layer of  Cadmium Yellow Medium

oldnewgreenredo

I'm really glad I have labeled my pans...makes life easier to do these posts.

oldnewgreenredo

I'm pretty sure this is Burnt Sienna, Cad Yel Med. and maybe a bit of sap green, I used in some of the leaves in first wash. The yellow at the top is being used for shadows on the pot.


oldnewgreenredo

The pot is very flat now---I will add dark to both sides to make it appear rounder. In real life it is LEMON YELLOW.

oldnewgreenredo

Working on the baby tears...I seem to do here and there. I think they will really pop when I do that lower right corner. So far, they are a mix of Lemon Yellow, Yellow Green and a bit of Sap Green.
oldnewgreenredo

That's all for today, lots of other things have to get done around here.

oldnewgreenredo

I can't wait to see where this goes next! I'm considering using whites for veinings...as I've washed the leaves almost too much?  

Do I know what I'm doing, not necessarily!

If you enjoyed this post please follow this blog by Blogger or FOLLOW IT 
which you will find in the
 upper right hand corner of this page. 

Thanks always for visiting. 
I will try and respond to every comment and answer every question.

I will be sharing at these fine Parties!

I have not been paid or reimbursed in anyway for my opinions, posts or any products shown. 

Please do not use photos without linking back to this blog 
without my permission. 
Thank you for your cooperation, 

Sandi


Tuesday, August 6, 2024

Mather INTRO TO WATERCOLOR: Week Four...trees/bark/techniques/masking resist

AD0-FREE BLOG

This watercolor basics class seems to be flying by. Mondays come so quickly---last week I didn't get to work on anything, so I forced myself to play after class yesterday.

oldnewgreenredo

Our handouts this week, were trees/bark/grass with paying particular attention to light sources.  Ruth shared her palette box...all cleaned up---I never have a clean palette(S), LOL!

We did work on some interesting techniques. I sectioned off my sketchbook to make little samples of these.

oldnewgreenredo

It's so gray today after stormy weather, these were hard to photograph.

oldnewgreenredo

Blue TOP: I did a wet on wet  Prussian blue stripe under a wet on dry stripe above---they melded and then I sprinkled canning salt. Note to self to buy some Kosher salt, and maybe some Himalayan crystals ??? Very Cool effect, you just leave it on to dry and then brush it off...Might be great for backgrounds for sure.

Green Brown: I did a double color load on a mop brush across the page. (I misunderstood when it said pencil shavings...SO... I sprinkled a bunch of wood shavings across this, but what the instructor meant was to shave watercolor pencil lead into the wet paint..(that's the lime green bits). I'll have to experiment with this more, but I really like the textures from the wood shavings. It was also suggested to sandpaper or emery board the pencil lead onto the paper for speckles. (Interesting idea)

oldnewgreenredo

TOP: Pink/Green  following the pencil shavings, I used some dry and semi-dry flower petals into this wet pink/green stripe. I think you might have to use very dry petals and somehow press them down to dry. This may be worth experimenting with.

Bottom: Cobalt Blue and Prussian blue wet-on-wet and then squish a sheet of cling clear wrap onto the surface, pull up and neat stuff happens. Other suggestions, bubble wrap, synthetic place mat material, fabrics, lace, trims....anything that will absorb some the color and make a pattern.
 
oldnewgreenredo

This one wasn't suggested on the sheets, Wet on Wet brown on the left and Wet on Dry on the right. Then I quickly draped cotton twine on the paper...again, it may need some pressure...a bit of mono-print making basically--one shot and you get what you get.

oldnewgreenredo

I used white color pencils (L-Derwent and  R-Prismacolor) to see if I could keep-white after painting. Results not white, but nicely subtle... We talked about wax resist pencils and crayons---but then you can't paint over the white. Water base resist is really gummy, and I had just enough not hardened in the bottle to play with later.

Our next lesson was about bark/trees/grasses. We talked about light/sources as well as atmospheric shading...
how far away is duller and less detailed while in the foreground you have more detail and brighter/intense colors. Ignore that strip of lime...it got away from me, grins.

oldnewgreenredo
I've been using a good quality sketchbook for lessons and practice bits, so the paper isn't quite as reactive as watercolor paper which becomes expensive for scribbling and playing. I'm more adventurous this way.

This tree study is done from the given photograph the class used. I concentrated on the light source and the bark. I gave the sky background a very light wash...of blue/gray. I'm concentrating on layers in painting, working a bit, then walking away and letting it dry. The tree isn't perfect in shape or proportion, but again this wasn't a finished picture, but a working lesson. All the shadows are made with complementary colors...greens use added reds or blues use the oranges to get my shade colors. I add Payne gray mixed to get even darker shadows with the complements. It's really interesting to play with the shading and to work in layers.

oldnewgreenredo

Our Dahlias are finally blooming on the porch after making mounds of greenery with all our rain. 
Definitely worth trying to paint, the leaves have so much texture to them.

oldnewgreenredo

I have five Mandevilla plants, three which are blooming bonkers...who couldn't resist wanting to paint these.

oldnewgreenredo
1

I'm planning a painting mixing all these elements and our crazy Baby Tears that are just so lush and textural. What a challenge?

I also wanted to use the last drops of resist to cover the Dahlia points. (I have to get a new bottle...UGH $$$$) I grabbed an old watercolor pad and took a damaged sheet to play on and to do some color studies and see if the resist would work for the white tips on the Dahlias.

oldnewgreenredo

The 50's color scheme reminds me of the first home I remember as a child...the wallpaper my mom chose and fabrics were all in these tones. 

Again, I worked in layers, not trying to duplicate the flowers/greens but make an interesting composition and work all sorts of tones onto the paper.  Yesterday was great bright sunlight, but today is very gray day with artificial light and I couldn't get the colors to photo accurately on the painting. The yellows/greens are a bit brighter in real life.
 

oldnewgreenredo

I'm really liking working in layers...it gets quite moody, Paynes Gray with the greens and complementary reds and a touch of other yellows here and there. 

oldnewgreenredo

The resist peeled off nicely and I was able to layer in the colors of the Dahlia petals. Gosh, I think I used Vermillion, Thalo Red, and Cadmium red light as well as Chromium green (very opaque) and Prussian blue for leaves to be opposite the deep reds.

I'm glad I made this study---I may do one more and add more gold tones, and try to figure out how to add the metal plant stand, or just a simple shelf for the top pot to sit on? 

oldnewgreenredo

My light sketch on real paper has me using elements of all three flower photographs.  I may do a few more studies...before I challenge the whole thing.

WISH ME LUCK!!

If you enjoyed this post please follow this blog by Blogger or FOLLOW IT which you will find in the upper right hand corner of this page. 

Thanks always for visiting. 
I will try and respond to every comment and answer every question.

I will be sharing at these fine Parties!

I have not been paid or reimbursed in anyway for my opinions, posts or any products shown. 

Please do not use photos without linking back to this blog 
without my permission. 
Thank you for your cooperation, 

Sandi


Wednesday, July 24, 2024

Midwest Gardening 2024: What's Blooming Late July Between the Raindrops!

Ad-Free Blog

Yesterday between the raindrops, as I was trying to get to the car, I took a few shots...of our ABADANZA growing things...All the rain has made everything explode.  I had to up the exposure a bit, but the colors are....


Are just as they are....so vivid... color recipe must be water and clouds for great color in Midwest Gardens. Here the statement is the Baby Tears....crazy...they have been wintering over and I've been sticking bits in my pots.


I think we need to build a platform for the birdbath, everything is HUGE this year...the Giant Sedum is blossoming early and the second year Phlox is really a gorgeous hot pink in color.


Here you can see the nest of Baby Tears along the walkway...the Hostas are all blooming big, thick stems of fragrant flowers. 


I had to dash across the grass...Hubby is replacing our composite decking stairway because of wash out and warpage. He is going to pour concrete. We have to use too much salt in the winter and a rougher surface  will be better and safer, the composite is extremely slick.


On the mound the birdbath is equally hidden. The Tiger Lilies are almost done, they were huge blossoms and also tall. This pot has escaped the bunnies, full of Marigolds, Balsam, and Zinnias all grown from seed in the greenhouse.


Normally this Phlox ( 20 years old at least) is washed out looking, but it is also very vibrant this year. It's in the crappiest dirt corner of this flower bed...so I'm happy it exists.


This is the second pot out on the mound with Marigolds, Zinnias and Balsam. These are thick insulated pots I bought ages ago...and are still holding up. I remember I got them for $6.00 each on deep discount at the end of the season.


You can see the Giant Sedum peeking out at the bottom of the bed, the white Phlox are second year, I'm really going to have to get in there and trim 
some of the excess out.


A few years back...quite awhile actually they replaced our telephone pole and tore out all the Joe Pye Weed around it. I nursed a few sprouts and I now that it has taken at least 10 years to re-mature to blooming status. This is an favorite plant of Monarchs and other butterflies. I'm so happy it has regenerated to this point. 
Sadly in 2027 the entire front easement will be torn up for a very much needed turning lane into our complex. Next year I may attempt to  get some of this moved to the back yard. I know it won't survive the next wave of construction, as the pole will probably be redone again.

We have over  600 households in our community and only three entrances and exits, add  rush hour, add schoolbuses and it's a jam out there. I never make Doctor appointments before 10:00 in the morning, because you might not get out in time.


Lilies were magnificent....but lasted only a day or so with the repeated rains we have had. After years of drought to severe drought in our area...this is a welcome relief, bugs and weeds, love it too. 


My focal points in the planter are supposed to be two spider plants on the end and the Spike in the middle. None of the red Salvia had done a thing and the Spider plants are exactly the same size as 8 weeks ago.
The purple Petunias, are eh...eh..eh...! Thank goodness the Marigolds are bonkers. It is hot and windy here, so I keep trying to find the magic combination. 

Upside with the rain, I haven't had to drag the 80 feet of hose too often, that has been really nice!


Right before I jumped in the car...this is the pot along the driveway...Balsam, Tall Marigolds, and short ones...and an ornamental grass. The Tree Rose of Sharon is starting and everything seems really happy here.

I'm Off to do errands, and dodge between the raindrops! 

HOW ARE YOUR FLOWERS FLOATING?

If you enjoyed this post please follow this blog by Blogger or FOLLOW IT which you will find in the upper right hand corner of this page. 

Thanks always for visiting. 
I will try and respond to every comment and answer every question.

I will be sharing at these fine Parties!

I have not been paid or reimbursed in anyway for my opinions, posts or any products shown. 

Please do not use photos without linking back to this blog 
without my permission. 
Thank you for your cooperation, 

Sandi