Showing posts with label sand. Show all posts

Tuesday, April 9, 2024

Midwest Gardening: Late Start in the Greenhouse Part 1

 The weather has been hideous this Spring.  Today is the first sunshine and above 40 degrees we have had in ages(April 5) Long range forecasts show us frost free after Sunday.

DRUMROLL PLEASE! 

We will finally move all the plant starts into the greenhouse on Sunday April7. Only about three weeks late!

NOT: It was beastly Sunday with rain, cold and wind!!!!

Anyway these Photos are from March 30th. It was crappy all week though and everything looks the same today as when I wrote this post, April 5.


In desperation, I planted a faux bush in a pot for Easter just for COLOR!


The pond is very sheltered and that's the only place where the Daffodils were/are actually in full bloom.


In the back yard we are still going through all the stuff from the greenhouse and working it back in.


Several storms and wind damage are apparent everywhere. 


The garden itself has pretty much cleared of all the weeds, tiny bits of moss are growing. I love that the frost pushes up missed pegs. When I do clean all the flower beds all the leaves and refuse will be great mulch for the garden when it's tilled.


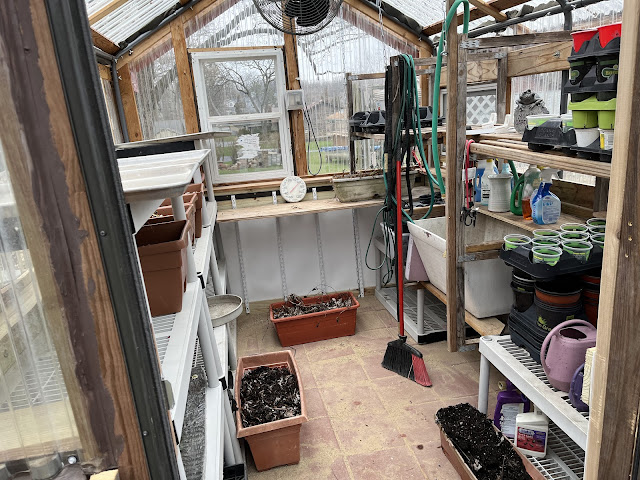
The Greenhouse on April 2. I had started to move back in...not even sun and the temp was now over 60. Hubby dragged in all the planters from around the yard and we lined the floors with them for the dirt to warm up. 
I'll be planting those on Sunday April 8-9.

The block floor is still settling and we swept the excess sand around to fill in between the patio blocks. Once water is sprayed in there...it will settle more. We will hook up the hose to the sink this week and bring out the heater.


I can't wait to have radishes/lettuce/onions. I may try a planter with beets also. I'm also starting Sugarpod peas in some round pots with bamboo trellis towers. Last year I got one pea pod from 3 packages---seems the bunnies ate everything despite our fences. I might try some spinach in a container also, all that was eaten also.

We eat a pound of fresh spinach a week. Actually growing spinach will be a savings and super fresh and delicious!

All the containers aren't where they will stay, but we have to clean up the yard. I think I have a plan.


Hubby did a great job finishing off the plastic wall panels (waterproof) over the insulation. This should keep critters out and really keep the greenhouse warmer in cold weather. 
We have a storm/screen door on the front (south side) and a huge fan and 5 windows to adjust the heat build-up. The fan can suck up the dirt off the floor to the ceiling and it sounds like a jet on high. Upside the low setting is perfect for making our plants stronger, it seems they love a little 'wind' during their growth.

Hoping to have some more shelves under here for planting. We usually have a large container of dirt in this area, a mixture of compost and bagged moisture control potting soil. This area is on the north side so the sun streams in here and hits this area early in the season. Perfect spot for pots and planters.


I recycled an entire garbage can of containers, trays, and pots, weeding through all of them and only keeping enough to put in the black trays. These containers are all ready for transplanting or starting our cucumber, squash, pumpkins, zucchini in two weeks. The greenhouse will be stuffed for  then. I will be transplanting the tomatoes into my McDonald's plastic glasses. One thing, they are stronger than anything the greenhouses give you for pots and taller---allowing roots to be strong and longer. 

The great watering can collection...I found three more today to add...I will have to find another place for  all these. This will be a good place for some of my large pots to start.

More when I can actually work in the greenhouse!

What Plans do you Have for Your Garden?

Thanks always for visiting. 
I will try and respond to every comment and answer every question.

I will be sharing at these fine Parties!


The photos in  this blog are my own or I have permission to using them from family. Any others will be attributed to source if possible.
I have not been paid or reimbursed in anyway for my opinions, posts or any products shown. Please do not use photos without linking back to this blog 
without my permission. 
Thank you for your cooperation, 

Sandi


Thursday, October 22, 2015

DIY Barbie Doll House: Week #2 Cutting, Sanding, Priming


Welcome to the DIY Barbie Doll House. I've been a bit stalled on posting, but I have been working hard and will get two up this week, and two up next week. If you want to catch up, here's Week #1 DIY Barbie Doll House.

Everything was done, but I wasn't sitting down long enough last week to post.

Besides doing the scheduled Week #2 Cutting, Sanding, Priming there was still more planning and finally deciding on the appropriate lighting as well as ferreting out moldings, colors and fabrics. More on that later.

oldnewgreenredo

 After consulting the plans...we decided on a couple of adjustments and made the doorways and stairways 1/2"-1" wider than originally planned within the 48" width of the house.

I measured out the windows, doorways, and stair holes on the pre-cut 1/2"plywood pieces. Hubby cut the large pieces on the table saw and the holes with a saber saw.

There are twelve pieces in this house: 2 roofs, 3 floors with holes for stairways, 2 side walls with window cutouts,  1 garage wall, 1 bathroom wall on bottom floor, 1 kitchen wall on the stairway (open in a triangle) to  stairway to third floor, 1 bedroom/bathroom wall on the third floor 
and 1 back piece with the roof pitch.

We did not make any exterior doorways, (imagine them on the open side of the house)

oldnewgreenredo


On the bottom is the east wall of Ken's Bathroom on the stack of 16" wide sidewalls, floors and roof pieces. All surfaces were sanded with 60-grit sandpaper with an orbital sander. It has a dust bag attachment that basically doesn't work, so I did all the sanding outside.

oldnewgreenredo

This is one of the roof pieces, which we have left the full 48" and will cut after we see it assembled.


oldnewgreenredo
 After sanding it was clear the 'bad' sides of the plywood had a few knots and dark spots. Not willing to fight dark marks seeping through my primer and paint, I gave all dark spots and knots a good brushing of shellac. It dries quickly and seals up many imperfections.

oldnewgreenredo

I use sponge brushes for almost everything but detail work. They do not last long with shellac.
Since I had 12 pieces to deal with and 24 surfaces, I spread out on 3 sets of saw horses. The weather was warm, with low humidity, so everything dried very fast.

Next step was to fill all holes, dents, scrapes and knotholes. I used a new purple version of Elmer's wood filler that dried between white...with little shrinkage.After doing 24 surfaces...the first ones were already dry.

oldnewgreenredo

I rolled a latex primer on all surfaces very quickly because the weather started to look like rain...!

oldnewgreenredo

The dollhouse pieces all dried fast. Now the hard part is trying to picture new colors in the new Barbie house. One reason we are doing this, is the abominable purple and magenta pink PLASTIC for Barbie. So we are hoping to make the house a home, with more realistic colors and furnishings. Not that there won't be SOME pink.


oldnewgreenredo

Here are the middle walls for between the rooms with their doorways. It is a puzzle. Most of the materials used from now on except moldings will be recycled or vintage.

Now choosing, pink multi for the bedroom and bathroom, green & white for the kitchen, and white, green, teal for the living/dining room, and sand/beige/wood for the first floor Ken's Man Cave and bathroom + Chicago sports colors. Having had boys, I almost think I'm looking forward to the 'mancave' more than anything.

Ken's says so too, he's really tired of sitting in a pink and white bathtub and is looking forward to his
own shower in sand beige.

oldnewgreenredo

Coming soon, DIY Barbie House: Week #3 Windows and Surfaces--COLOR!


All the opinions and photographs in this blog are my own, I have not been paid or reimbursed in anyway for my opinions or posts. Please do not use my photos without linking back to this blog without my permission. 
Thank you for your cooperation, Sandi Magle 

And always, thanks for stopping by, 

Sharing at these parties: 
What's It Wednesday 
Share Your Cup Thursday
Vintage Charm 
Simple & Sweet Fridays
friday-features-linky-party-
Think and Make Thursday 
Funtastic Friday 
Shabbilicious Friday 
Feathered Nest Friday 
Best of the Weekend 
Silver Pennies Sundays 
That DIY Party 
Party in Your PJ's 
 Merry Monday Link Party
Metamorphisis Monday 


Sandi