
Ad-FRee Blog
Like any art project some things that are 'pro' level are expensive. One of those items is watercolor resists. $15.00+ per small bottle. Since this is OLD NEW GREEN REDO...how about using some household items for resists.
 |
| oldnewgreenredo |
The Mather handout for this week's Paper Explorations was interesting.
Materials:
- Acrylic paints, (I used craft and tube)
- Thick paper such as mixed media or watercolor paper ( I used rough finish watercolor paper, I used FineArt (Walmart) 140# pad bought on clearnace)
- Paintbrush or sponge
- Pencils
All of these are inexpensive resists
For soap resist:
- Liquid dish soap (Dawn)
- I wondered about drawing with bar soap????
For glue resists:
- Washable glue stick
- Washable liquid washable glue (I used Elmer's Clear)
OTHER OPTIONS for resists.
Wax crayons, oil crayons/pastels, grease pencil for black lines (These will all repel the acrylic or watercolor on top of them)
Optional materials:
- Stencils or paper cuttings to use with glue
- Hair dryer (to speed up drying)
- Spray bottle (for rinsing)
- Alcohol markers (for background colors accents)
- Paper toweling or soft towel
.
 |
| oldnewgreenredo |
First my supplies...trusty alcohol markers, some luminescent acrylic craft paint, my clear washable glue, FineART (Walmart on clearance)140 Water Color paper, (rough side, if I do this again, I'll try the smooth (tight) side.)
PLAN B. I left the bulk of the washable glue partially on the paper as it was let it dry spread out and some spots bare.
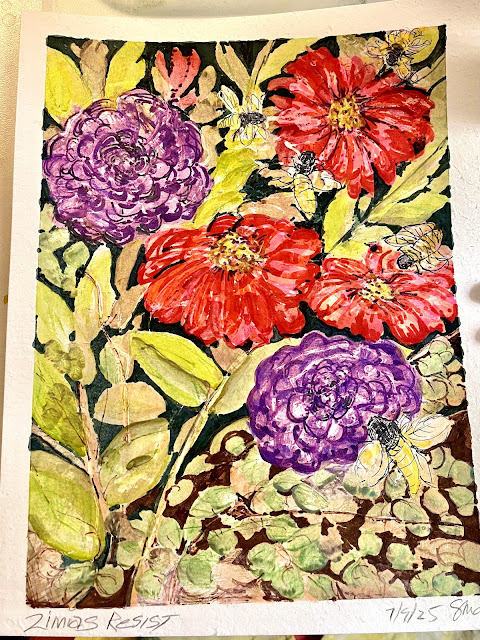
I had a night-time painting idea with Fireflies on Zinnias with a dark background and the highlights of the glue to be the lightning bugs and moonlight on the Zinnias...well.... I scribbled some rough outlines in green Prismacolor pencil (also a bit resistant) for guides and then the glue as lines.
Original Directions:
Apply glue/soap resists and sketches on paper, let dry. Paint Acrylic over, let dry
Then wash by spritzing with water, or wet cloth/paper towel, or under the faucet.
Wash the acrylic off the top of the glue and then wash or rub the glue off to expose the light areas paper.
Treat the open areas with more paint, markers or leave exposed. SOUNDS SIMPLE.
After the sketching, glue and drying. I painted my first washes of Acrylics I left them to dry.
To remove the paint on the glue, I carefully tested my paper first with paper towel and spritzing to lightly rub off most of the paint, then the glue and found very quickly the paper began to peel a bit, while the glue broke down and just thinned out covering larger areas still on the paper. A mess of sorts and blotchy.
PLAN B. I decided to leave the bulk of the washable glue partially on the paper as it was and let dry spread out and some spots bare. Results Below
 |
| oldnewgreenredo |
Okay, I used the resist for stems, sticks, bug outlines flower edges(lined), but the glue wouldn't dry so I tried to wipe some off or make petals, to get it to dry within the class time.

The rocks on the bottom of the painting were scribbled with White Oil Crayon that melted with the hairdryer, so I scratched on that surface to remove some for texture. I may try an entire piece with this crayon and see what happens. The brown marker filled in the lines I scratched out.
I used the acrylics thinned out a bit...letting these dry again and then began working on the background in Dk Green and Dk Brown alcohol pens. It's really not night-time at all by this point.
PLAN B. I left the bulk of the washable glue partially on the paper as it was let it dry spread out and some spots bare.
oldnewgreenredo

It's hard to see the glue textures, but you can see some of my green sketch lines underneath that I used and then added the glue.
 |
| oldnewgreenredo |
Quite the mess? Now what?
 |
| oldnewgreenredo |
I was afraid to try and scrub all the glue further than this. Well, instead of working with more Acrylics, I grabbed my alcohol markers in lighter shades first, then darker colors which worked right on top of the glue residues transparently. HMmmm, VERY interesting.
 |
| oldnewgreenredo |
With light marker colors I went over lots of the whites, then accented with darker pens on top of that...still leaving bits of white here and there. We do have Peppermint Zinnias coming up here.
 |
| oldnewgreenredo |
Before working over
 |
| oldnewgreenredo |
These are the same areas, after adding some yellows to brighten it up to match the flowers...now Day light and the bugs will become Bees... I just need to add some black stripes.
 |
| oldnewgreenredo |
Yikes scribbled ZINNIAS...missed an N.?
Same areas after applying the alcohol markers and details.
 |
| oldnewgreenredo |
 |
| oldnewgreenredo |
Both photos the same areas. Since this wasn't the plan, I don't consider it a failure, but a learning experiment with unexpected results, lol.
|
| oldnewgreenredo |
I will definitely play with these homemade resists and applications. And, I didn't have to go to the store and spend $15.00. Upside of the glue, it could be brushed on with a bit of water easier than actual masking fluids, which are instantly gummy and sometimes difficult.
 |
| oldnewgreenredo |
My favorite bit from this exercise. You can see my expensive watercolor tape, actually lifted the paper surface after two hours.???
I will be using this paper I think for Sketchbook bits or quick watercolors. Or I will try the backsides and see if it holds up better on the smoother side.
Next art post will be all the other resist techniques in a more clinical way with examples. Finding out what a specific product does or doesn't do,
is worth the effort!
WHAT NEW IDEA-TECHNIQUE
HAVE YOU TRIED LATELY?
Thanks to Free Mather Senior Online Classes
Thanks always for visiting,
All the opinions and photographs in this blog are my own unless identified, I have not been paid or reimbursed in anyway for my opinions, posts or any products shown.
Thank you for your cooperation,
Sandi
Sandi
 |
Really beautiful and very creative!
ReplyDeleteSuch simple products, I am going to do a whole bunch of trying different things for different results, experimenting is fun! Thanks for visiting, Sandi
DeleteI love what you did here. And thanks for the recommendation -- I've never used alcohol inks and that sounds like an inexpensive way to try it out.
ReplyDeleteHi, Jeanie. I actually ordered the pastel set too...one thing all you have to do is spray the tips with alcohol or dip to refresh. They also come in a gray/neutral set which I haven't snagged yet. All the pieces I've done this year, I think I have used them somewhere on every one. Grins!
DeleteYour final painting turned out lovely; I've only ever worked with rubber cement and "real" watercolor resist products but I like the different techniques you tried.
ReplyDeleteI thought about rubber cement, but I haven't had any for years...remember Lepage glue..? wonder...thank you for your comment, I'm not very good at resists to begin with either. thank goodness for the alcohol markers, lol. Sandi
DeleteAny kind of resist is my bane! It's me, not the masking fluid. Fun experiments and your painting turned out lovely.
ReplyDelete-Soma
Gosh, I did a few pages of tests of different things, I'll probably post...soon. Still experimenting, and I need to add a few more. I have mixed luck...the best I have tried are Pebeo pen and masking fluid. But, you have to remove them all as soon as possible. grins, thanks for visiting, Sandi
DeleteVery creative and pretty. So fun to experiment. Thanks for sharing at Love Your Creativity.
ReplyDeleteHi, Linda. I'm still working on some pages of tests...which is kinda interesting. I just think that experimenting is the best homework you can do for art projects. When I did pottery, I would take January totally off in the workshop, then I would spend the better part of February each year, glaze testing and experimenting with different shapes, clays, making stamps for pressing in and trying to reproduce sketches of different types of pots/designs. I guess this is February in my art explorations right now.Thanks for visiting. Sandi
Delete