Showing posts with label Painting techniques. Show all posts

Wednesday, July 29, 2026

More Art in the Heat!

 Chicagoland has been in and out of HEAT WAVES this past month. This week we finally got 3" of rain all at once...and some very severe storms throughout the midwest. We escaped that...but it was fun to just take art classes, follow my favorite artists on YouTube ....and PLAY!


I did a lot of art playing in mid July---especially making some collage papers. My video below includes :

The ART of Creating Collage papers from leftover palette paint, watercolors, markers, alcohol inks. Reviews on some papers, paints, alcohol inks and surprising techniques achieved on different drying surfaces. Happy Crafting and Painting for Collages.


\

It's not a demo, but I do describe how I got some of the effects I did, the materials I used, some tips and well some of the joyfulness of creating.

Any questions on materials, techniques and I will be happy to elaborate. Enjoy!

Below is one of the pieces I showed in the video which will actually become a painting.


This was a palette cleanse on some heavier 120# multi-media paper. I love this weight of paper because you can do anything on it, and it's not horribly expensive like watercolor paper. Biggest drawback is trying to get tape off. I'm using paper medical tape at this point...all the artists' tapes I've used are expensive and even more horrid in trying to get off.  Paper bandage tape is roughly a little heavier than washi tape...and on sale is pretty reasonable, ie...Walgreens.

But, I'm getting ahead of myself. 

My free Senior Mather Virtual classes offered a Basic Acrylics class with Emily. She's a lovely artist from Ireland who works very small and with multiple layers of thinned acrylics. Her work is beautiful and slow, but I'm a bit more energetic and impulsive. 

But, I worked on a painting the first two weeks of the class, and then have been staring at it. The rest of the class is working on different subjects and they are basically still on the background and this week beginning the foreground.

In college...I worked so fast the instructor made me work on three canvases at once in acrylic painting class...and then I muddied all of them up to total messes. 
 So, I'm trying hard to limit my time when painting, and to walk away. 

(I actually switched my major to Psychology because of Acrylic Painting and metalworking....UGH!)


Pinterest photo...no attribution? guessing the coast of England/Ireland or Scotland.

I'm using Blick/Liquitex Acrylics on gessoed watercolor paper.

My Palette is Ultramarine Blue, Primary Red, Cadmium yellow Lt., Raw Umber and Titanium White.


This was my second session on this painting, the ridges you see are from the gesso that was applied haphazardly on heavy watercolor paper for another project. Since this was a class I wasn't interested in a finished product, but the process.

I wasn't trying to duplicate the photo, but use it as a stepping off point. 

I thought this stage was a bit undefined and lifeless.

And something I do now, when I'm not happy with a project is take photos and make them black and white to see the values (the intensity) of my colors in shades of gray.


The lower photo is the original photo, now in black and white. 

The foreground bothered me and also the land mass sticking out into the sea. I needed to darken or define those areas a bit...and fix the foreground...maybe?


At the top, bits of red are suggestions...and also a little in the sand. I darkened shadows under the trees with all the palette colors mixed together, but white. 
You also can really see the gesso marks here...how they are going the wrong way for this composition. 

But then again, this is a practice piece.


While the village is pretty undefined and here you can see the gesso marks again, I really darkened the foreground and avoided details...as for me, the subject is the cozy village and the water.


Yesterday, I scribbled a bit here and there with a watercolor pencil in black(horrors--black). I can add some water for shading and either erase it by wiping off or...spray with a fixative. Then I can seal the painting when I decide it's done.

Is this finished? I don't know...but it has been a great learning experience. It's still taped on the easel, so we will see. 

Moving on....


Back to that palette paper cleanse in the video. I decided to do an edited version of the photo, this time.


Here again is my subject photo from Pinterest but....I loved the colors and tried to stay true to that with another go and even looser attempt at the village. 


My Acrylic colors used above and below are: Yellow Ochre, Cadmium Yellow Lt, Ultramarine Blue, Raw Umber, white and no red in this project. I enjoy working with a limited color palette, and it forces me to mix colors...so the greens are mixed as are the sandy colors and the grays. I went for the deeper shades and the brightest shades first over the existing base.


The above is my first run...blocking out the shapes and basic colors. I used a 12 flat brush..yes, like 3/4" wide on this paper.
This is when it is wet and you walk away.


A second go...I like the looseness of this one, the simplicity...is it done???? 
I have all these blank canvases downstairs, I think I will try this subject matter one more time and see what happens on a 24"x36" maybe? 

What do you think, are they FINISHED???


All the opinions and photographs in this blog are my own unless identified, I have not been paid or reimbursed in anyway for my opinions, posts or any products shown.  


OldNewGreenRedo

Thursday, July 24, 2025

Playing with Resists and Different Medias

Ad-Free Blog

You must think all I do is paint, well, maybe 4 times a week for an hour or so...so not that much. It takes me longer to make these posts. Well, the budget just doesn't allow for too many new products, so I decided to test what I have in the house and in my paint stashes as resist products. Some items are over 20 years old...so bear with me and my results.

Charting your own products can be the only way to give a crafter/artist information on what a product actual does with the media/products they use.

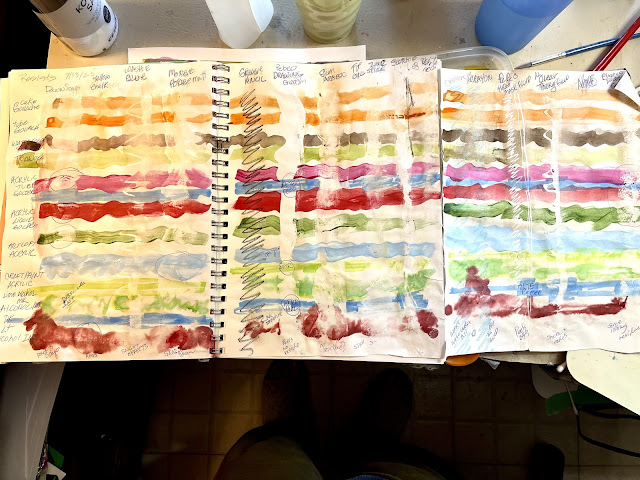
On the left side I have my different types of media which are stroked from left to right across all three connected pages, it folds up neatly in my sketchbook.

Across the top are different resist or what I thought could be resist products.

Procedures after scribbling/striping each resist media down the pages. 

 I then painted by mixing the chosen media with enough water to carry the brush across one page and refilling and continuing, left to right.  I chose different colors and sometimes transparent and opaque hues of the same type of paint. Of course water weakens anything, but I needed a fluid one layer wash of as strong as possible color. 

oldnewgreenredo

Looks, like a mess, but let's look at it page by page and in detail.

Page 1
oldnewgreenredo

Across the top are the resist type products,
LtoR
Dawn Soap,
Yellow chalkboard chalk, 
Washable Elmers Clear Glue in twist top bottle
Modge Podge Matte. 

These were all brushed, scribbled or painted down the page in quick strokes.
After painting, the resist surfaces were wiped with a damp cloth...of course this also affects the water colors.

I've circled in pen any interesting or worthy effects.


The colored stripes from Top to bottom are the following media. 
(Gold) Cake Gouache,
(Orange) Tube Gouache, 
(Brown-almost opaque) VanDyke Brown tube watercolor, 
(Lime-Green transparent) tube Watercolor, 
(Quinacradone Crimson-Transparent) Golden tube fluid acrylic, 
(Blue opaque)-Golden tube acrylic, 
(Crimson transparent)-Golden tube acrylic, 
(Green)Artists Loft Acrylic tube paint, 
(Blue) Apple Barrel acrylic craft paint,(Lime transparent) Alcohol marker,(Green )Alcohol Ink dripped into sprayed alcohol solution, 
(Blue) Alcohol Marker, 
(Deep red )Alcohol ink dripped unto sprayed alcohol solution.

The alcohol products were not in contact with the water.

All the products were thinned so they would paint/mark all the way across the page.

BELOW on page 2, the  color stripes are all the same as above on each of the three pages.
I've circled in pen any interesting or worthy effects.

Page 2
oldnewgreenredo

Resist from Left to Right going down the page.

Left to right going down, 
Black Grease Pencil-nice and strong, 
Pebeo Drawing Gum solution, 
Gum Arabic, 
Titanium Zinc white oil stick, 
Scotch Permanent Glue stick, 
White acrylic gesso,

These were all wide stroke applied without any  scribbling except for the grease pencil.  Again everything was wiped off with a damp paper toweling.

Page 3
oldnewgreenredo

Left to Right to bottom, 
Lt. Blue wax Crayon,  
Washable Wax Crayon, 
Pebeo Masking Pen, wiggles and straight (peel off when dry), 
Aleenes Clear Tacky Glue,
Empty space was to be- Winsor Newton masking liquid-second bottle that has dried up on me...and it's 15+$ a bottle so no results, but I won't be buying it again. DANG!)
Elmer's washable Glue stick in last spot.

The Pebeo products actually worked the best, leaving white paper to show, but had to be peeled off after everything was dried. All the other products worked to some degree with certain types of paints. All columns were lightly wiped with a wet paper towel to wipe away on top of the other resists. the alcohol products did what they were supposed to do without washing off.

 Alcohol inks and markers really penetrate the paper and even the Pebeo products didn't completely protect those surfaces. You can definitely get some interesting textures and mottling though, so if you use these mediums experiment with your own products and by all means, chart them.

Water colors are mostly transparent and water based Gouache are opaque were also weakened or textured with almost all of the products except for chalk and white gesso.

 Gesso is actually a painting ground and simply absorbs the colors of everything, but washing off a bit will expose the textures the gesso strokes or application may show.Interesting textures can be had with stencil or textured gesso surfaces on paper.

The Acrylic products worked pretty well over all the resists, except for again Gesso which absorbed the colors.

Inexpensive Good results for water based paints were: 

Washable Kids Elmer glue stick...great mottling for large surfaces.

Dawn dish soap worked OK, but removing from small areas would be difficult and q-tips would need to be used. Mottling effects can be achieved with this.

Elmers Washable bottle glue with twist tip...works well for lines with even opaque products, smeared gives interesting effects.

Crayons show through pretty much anything, but don't actually resist much. Worth experimenting with.

Scotch Permanent Glue stick, a little bit stronger than the washables, and it won't wash away, so permanent.

Chalk---gave interesting effects with alcohol products, not much with water based.

$$ Pricier Good results for water based paints or alcohol products.

Grease Pencil...shows through everything, won't remove with repeated layers or rubbing off with water, but dissolves with alcohol products. (this is the pencil you peel paper off of to expose the grease stick).

Modge Podge is basically a sealer/but, alcohol soluble..so great for washing off water media surfaces. A thin or thick application or stenciling/stamping would effect water based media and give great effects. Totally ineffective with alcohol products as it will dissolve into mush with them.

Aleene's Clear Tacky Glue. (This is my go to glue for lots of projects) A bit pricier than Elmers, but works well under all water based paints except for opaque craft paint. Even plays well with alcohol products. Test first before using.

$$$ Most Expensive ( of course these have the best results)

$$ Pebeo products provided excellent results....on the higher $ amount but for precise resists, it's great. (note bought and used at the same time as Newtons but doesn't seem to dry up (1 year old product)

$$ Gum Arabic is used in oil painting and as a binder for water colors...so it does give some resistance to watercolors when wiped off with a wet cloth. Mottled textures, stands to reason it may react differently with different types of water colors.
It also affects alcohol, but probably not predictable, but a way of creating unexpected textures!. 

$$$Windsor Newton resist. I do not recommend, because I have two bottles that dried up in less than 2 uses each.

I hope you find this useful, and even better encourage you to try different types of resists with the painting/crafting products you use. 

   Happy RESIST Painting!  

All the opinions and photographs in this blog are my own unless identified, I have not been paid or reimbursed in anyway for my opinions, posts or any products shown.