Showing posts with label plumbing. Show all posts

Wednesday, April 8, 2020

The DREADED DUNGEON!


                                                               AD-FREE Blog

Hi, Everyone, hope you are staying SAFE!

In 1984, when we bought a 12 year-old, 1400 sq.ft., modest builder grade Ranch House on a bit more than a quarter of an acre. We thought we had gone to heaven after living in a congested townhouse area. 
Our unincorporated community had a lake, parks, un-congested lanes and streets, what we from Wisconsin, call a 'townie bar' on the lake, clean air, critters, bull frogs, raccoons, pheasants, deer, etc. Perfect for two pre-teen boys to grow up in.

The minus-was no garage (we built one, years later),  plus a big empty 1400 sq. foot basement, some of which today is this 

DUNGEON!

oldnewgreenredo

The basement, gave me a clay shop for my pottery business---us, a family room, hubby an office, and a huge storage room shop 
that I shared with my husband.

Over the years we remodeled upstairs, put the washer-dryer upstairs, added a mini-master bath in a walk-in closet, reconfigured the other bath, added exterior water service to all sides of the house and piece-meal'd the plumbing, ourselves. You can see the cobbled plumbing by all the different types of drain pipes, and the extra heat runs. We had a metal pipe failure from the kitchen, which is 50 some feet away from the kitchen, two years ago, so that had to be replaced. It was filled with sand from the sump pumps. Sigh.

Anyway, now the house is 46 years old. We need to update/replace the bathrooms to walk-in showers, improve our water flow, and retackle the tangle of sewer pipes that adding-on eventually taxed. 
Hubby will totally replace and redo all the plumbing on this side of the house.


oldnewgreenredo

But before we could do that-we added a new floor over the concrete.  First we had to go through this room and the 30 some years of storage. 

Behind all those bins is a run of kitchen cabinetry gleaned from a remodeler in the area. 

These ARE the AFTER Photos....YIKES! 

oldnewgreenredo

Behind this mound of bins of antiques and craft supplies, lurks a 1900 record player, furniture, and the doorway to the other doll/craft room. 

oldnewgreenredo

The finished, doll craft room, and I also have a shipping room! Bins here also hide family treasures. Flowers  are just plopped in a vase, not designed. I hope to have friends here for projects, when I have water-another reason for the plumbing debacle.


This sink has water, but not drainage. Originally the sink in the clay room ran to the sump pumps. We have purchased a pump/well for draining directly to the sewer from here, that will be installed to the left through the wall into the DUNGEON.

Oh, and I use LOTS of picnic baskets, woven and metal!
I can't believe how full this room is now---hopefully the dungeon will alleviate the excess. 

oldnewgreenredo

This was my first photos of the completed craft room.
I use picnic baskets for current projects or groupings of items with labels, so I can keep track. 


My goal is to have this Dungeon 
look and work as well as the doll craftroom! We 
have a long way to go!


I say this is an AFTER photo now in the dungeon, because every container has been gone through. Ninety-five percent have been sorted, ALL are labeled. I also keep our household seasonal items in here. 

oldnewgreenredo

I have 8 huge bins of flowers, and probably 3 more just full of greens, and grapevine. I still have a penchant for expensive, quality flowers, which I mixed in with 'good' ones and gorgeous greens.
In the past, I did weddings, parties, home-decorating, as well as commercial work. NOW, the prices of floral product are insane, and while I have cut my stock to less than half, I still have a ton. 

oldnewgreenredo

There are the bins of 4 generations of stuff, good and bad, antiques and photos inherited from my family. PLUS, I've collected also-I know I have at least 2 dozen blue mason jars---
but, can I let them go now, or will I use them for mini's storage? 

 Many bins are marked SELL. I don't really need to do garage sales, flea markets, antique stores to buy...I just need to go to this basement room. I will be posting some of all this in my Etsy store.


oldnewgreenredo

January through March during the dreary winter, we went through this room-slowly, and hubby redid the floor. We will seal the floor with some roll on floor paint as we work from the plumbing back to the entrance. Right now, he was laying out all the pieces of the new drainage/sewer reconfiguration. 

Eventually we will paint walls and put up pegboard in places, as we start that after the plumbing is done. As I move into the room ---I'll start with storage on that wall of the plumbing, I will consolidate and eliminate the contents of all those totes. 

oldnewgreenredo

I can only get into this one wall cabinet which holds my paints, all stored upside down. They will have to be sorted, because paint doesn't last 20 years, even stored upside down. I taught craft painting, art theory, color mixing, and floral classes through a local craft store for 10 years or so. My classes were always full, 
which really helped with the kids' college bills. 

Do you remember when there were tons of craft/art classes and people who actually knew about the products available in craft stores? When someone could answer a question about how to USE the product...???

I do need to CULL so many bins of holiday supplies, and will probably try and sell some of the more interesting things on Etsy. I commonly purchased items wholesale in dozens to grosses. YES, I purchased wreaths by 72's and 144's. Ornament makings were also bought in huge quantities. I toted off the last of my pine swags and small wreaths to Goodwill, since I no longer mass produce anything.

Craft materials have gotten very expensive. I can sell my 20-year new-old-stock stuff at cost, and make myself and customers happy. Surprisingly, I remember what I paid for everything and who my suppliers were. Tons of things I have already sent to GoodWill included lots of glass, and almost all my baskets. I'll let GoodWill store my baskets, because I can re-purchase just about anything I may actually need for very little. 

Upscale merchandise I donate to a wonderful thrift shop---that supports families in need. 

oldnewgreenredo

My worst horde is fabric---antique linens, antique fabric, decor, display fabrics I used for my shop. Lots of rugs, pillows, bits and pieces for projects. Somewhere I have maybe ten vintage needlepoint stockings all backed in velvet. 

Containers for floral designs is another category I have to let go. I've already sent lots of brass--gone! Usable flower pots went to the greenhouse for planting. 
Then there are the wood projects---I really do need to get at those. I see some serious redo's in the future, maybe even some creative craft painting.

ANYWAY, 
with nice weather now, we are going outside and working on yard projects, the greenhouse, and planting, eventually some fishing.

But, rainy days will be spent here in the Dungeon

Do you have a  DUNGEON?

Thank you for any and all comments.
Finally I am able to reply to comments by using Chrome. So all you Mac users who have upgraded to Catalina---this might help the glitches on Safari  and Blogger!


Thursday, September 22, 2016

Gurgling, Ceilings and Floors.

We started the cabinet end of the kitchen remodel on July 6th.  And on one weekend installed the 
sink cabinetry, HERE.

BUT,  what is that Gurgling?

Once the plumbing was installed in the kitchen we had gurgling---and for some reason---water backed up, sometimes violently into the sink on the porch. 
Icky, stinky, garbage disposal water everywhere. 


It was determined that not enough air was behind the porch sink system...my husband installed a new 4" stack pipe!going through the roof and walls, 


The stack pipe is to the right--where the refrigerator was. Eventually we will put a narrow cabinet there that can be pulled out for access to the pipe. That will be great for bottles. 


The plan had been to use the porch to cook, eat meals and entertain while the rest of the kitchen was gutted.


Running water is definitely necessary for living and eating. 


This side of the kitchen is functional...but....the next stage of demolition, involves, dirt, dust, and saw dust.


Up go the plastic barriers and down with the soffits. All that wasted space. Also huge areas of no insulation and builder electrical shortcuts. You can see the new bead-board ceiling to the right of the old soffit frame

Husband and Buddy work well, both used masks as 42 years worth of bugs and dust were up there.


The metal scaffolding makes easy access to all the ceiling work. The boys, are taking small pieces down one at a time.


This is crazy---the kitchen plumbing vent goes somewhere other than straight up? Turns out it went west 54 feet to vent with the bathrooms? ? ? Why? This will kinda present a problem with our to the ceiling cabinets. DANG!


Above the refrigerator---another surprise. Conduit sticking out and not run in the walls. 
Good grief...a few feet of conduit, builder was that really a savings???


Here is the area where the pantry will be- hopefully the switches won't have to be moved far. 


At this point, I'm so excited, the space carved from our old pantry and a bit from the front closet, will give me a 30" built-in pantry. Plans are pasted on the old cabinets for measurements. We have about 6" play on this wall. 


Wallboard is placed over the new holes for behind the built-in pantry cabinet that goes floor to ceiling.After removing all the soffits and carving the new pantry hole, Hubby and Buddy begin finishing the bead-board ceiling. The panels have been primed and painted one coat. 


Each slotted panel is glued and nail gunned in place. Here is the stack of panel boards ready to go.
Here is the stack of panel boards ready to go.


Our poor island has become a work station, but it has to disappear soon for the floors to be finished.
 A Box frame for the pendant lights laid out for over the island. We really don't have this figured out yet, but are working the exact measurements and finishing as we go along.


Once they get going the ceiling goes up without a hitch


Every piece is glued and nail-gunned up.

Hubby shooting the very last pieces in, around my roaster collection. That shelf on the right will be gone. We will be keeping the pegboard wall by the stairs and a shelf above it. Old roasters are too big and too cool to hide.


It looks great! Finishing trims will be put up later.

Here is the pendant light box for over the island, temporary fixtures are up as this is the main source of lighting for the kitchen during construction, and pendant lights would never survive all the moving, boards, heads, etc.

]
We decided on Beadboard behind the Refrigerators, we are still waffling (I am) on the treatment on the backsplashes of the cupboards. I'm wary of all the white? 


Temporary cover up for the ducting for the stove. The existing ducting simply went into the attic. Another builder short-cut causing hot and cold condensation in our poor attic. Hubby will do it properly with a vent.


Okay new ceiling, soffits gone, and new floor. The island has been removed. This was week 6-7 from our start on July 6th.


Keeping my eye on there prize. Cabinets, hardware, and countertops are all ordered! We are attempting to live in this kitchen, but other than coffee very little is prepared. The weather is in the 90's everyday, so the porch isn't an option either. At this point we are eating out, or carrying food in, and giving away all our garden produce. But, I am freezing tomatoes and shredded zucchini for baking. 

Next coming soon, the IKEA cabinets ARE due to arrive the 19th of August. 

Thanks always for visiting. 
I will try and respond to every comment and answer every question.

All the opinions and photographs in this blog are my own, I have not been paid or reimbursed in anyway for my opinions or posts. Please do not use photos without linking back to this blog without my permission. Thank you for your cooperation, Sandi Magle


oldnewgreenredo

Tuesday, July 26, 2016

Whole House Remodel: Kitchen--Finally!

For those of you who have commiserated on remodels, here is where we are: the front half of the NEW kitchen floor went in pretty much without a hitch. LOVE, love, love our vinyl plank floor. The interlocking pieces look and feel like real wood, are waterproof and easily replaceable. We chose a plain wood that looks like oak and blends with our existing door frames and trim.

More on installing this type of floating flooring at this post, Vinyl Plank Floors.


oldnewgreenredo


oldnewgreenredo
First step in the kitchen after the floor is the ceiling and tearing down the sofits. The blinds are drawn because of the heatwave. I removed all my decor, and items from all the walls, counters and shelves. Then everything was washed and stored on the table. Then I began to pack.


Add caption

and pack

oldnewgreenredo

and pack

oldnewgreenredo

and packed it all, from my Grandma's Monk cookie jar to the bitty bunny. 

oldnewgreenredo

I can't believe I had this much on the shelves and walls.

oldnewgreenredo

I had no idea what of my OLD treasured decor I will be able to use, since the soffits and shelves held so many of these items. Rather than make the decisions now---I washed everything and packed it up to wait for their REDO.

oldnewgreenredo

These are the totes of all the kitchenwares plus 2 cardboard boxes and two heavy tubs under the dining table removed from the kitchen. 

oldnewgreenredo


The table is in the living room now with chairs on top and storage below.

oldnewgreenredo


Here, hubby removes  OLD shelf brackets. The molly-bolts were stripped, so he basically yanked them through the dry wall. I sorted through the OLD blue Mason jars, dumped some of the herbs and washed the jars. They are in cardboard boxes now and a huge tub.  


oldnewgreenredo

We had a wasps' nest in the attic a few years back that had been patched. 
Here you can see the painted cardboard patch disguised behind lots of fake and real greenery.


oldnewgreenredo

This room originally had Mediterranean beams on the ceiling at one time, but it chopped up the room and rough cedar caught more than it's share of ceiling cobwebs. 

oldnewgreenredo

Since we are in our late sixties and do everything ourselves, we opted for lightweight bead board to cover all the existing ceiling issues instead of huge pieces of heavy drywall.  This bead board came in long strips-two boards wide and unpainted. Hubby gave the boards one coat of primer and one coat of  enamel. A final coat will be rolled on when all the installations, electrical, and moldings are on.


oldnewgreenredo

Here hubby and buddy push the boards into position after gluing and then they pneumatic nailed them. This way no missed nails and hammer damage. It is very rustic though. Very country kitchen, which is what we are going for. 

oldnewgreenredo

Two $69.00 scaffold units made it safe and easy to walk across for the correct height for installation of the beadboard. (We figured the right equipment was still cheaper than someone walking through the door to do the work.)

oldnewgreenredo

The boys pieced around the fan-light. I'm keeping the fan because of the eating area being in the kitchen and when fourteen people are around the table, it gets hot.


oldnewgreenredo

I love how the ceiling ridges echoe the fluted trim around our windows and doors. So the floor and ceiling are done to the center soffit. Eventually the wallpaper will have to go, but probably not immediately, since I have to get a feel for an all white kitchen.

oldnewgreenredo

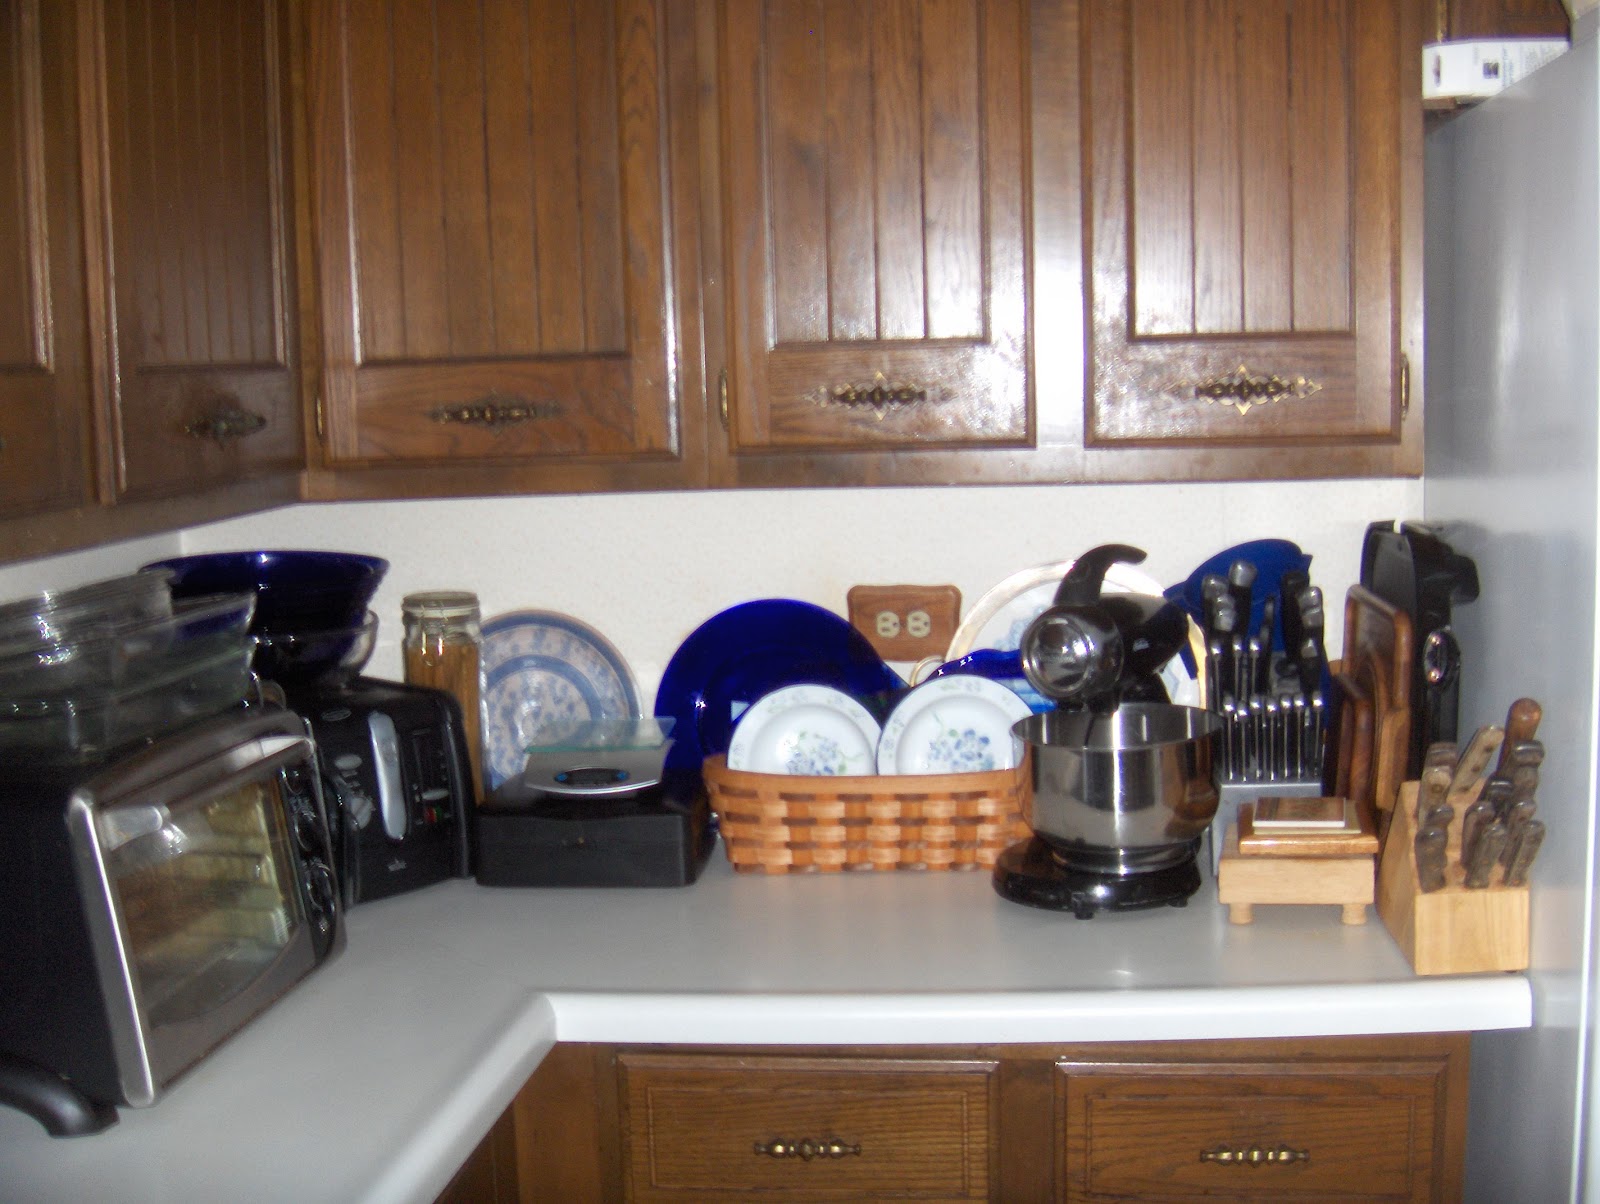
Here are some old pictures of our existing kitchen cabinets---builder-plywood grade, circa 1973 with the original Mediterranean hardware. At one time I had bought all new hardware to use but the holes were different. We did not opt to paint the cabinetry---because it's falling apart and some cleaning product in the past had messed with the finish, it's cratered, gooey and really banged up.  

That corner is a dead space...no cabinetry and wasted space. All of what is on the countertop will be able to be stored in the new swing-out corner cabinet. I will have a carousel in the upper in the corner.

oldnewgreenredo

I'm hoping for some more interesting shelving for the coffee station---and some hooks for cups.
 Also looking forward to almost all drawers in the NEW cabinetry. No more standing on my head and dislocating a shoulder reaching for something.


oldnewgreenredo

I'm still not settled on colors for the walls as there will be very little surface. I do like this combo here, Red, blue (of course) and a bit of yellow from the vintage towel. 


oldnewgreenredo

Here's the white cabinet that fits under the windows we purchased last summer. Stock cabinetry was all too high to put under the windows as built-ins.

oldnewgreenredo

We put the island in a few years back by chopping off a peninsula counter and adding butcher block countertop which I love. I have arthritic hand issues and drop things all the time, and the non-slip surface is great for someone who is klutzy, and super for baking and canning. 

My mixed stools will all get a REDO coat of some color and new seats.

oldnewgreenredo


We had upgraded our appliances within the last five years, so we will stick with those. I can't live without the extra oven. Too many people eat here for just one oven. The microwave will be on a shelf in the same location with a shorter cabinet above.

oldnewgreenredo

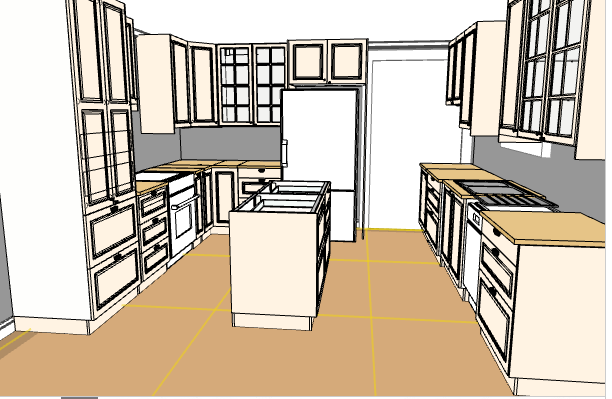
Our cabinetry is being planned to the ceiling with a crown molding at the top. The added storage space will be wonderful. The cabinet above the fridge will be full size out to the edge and perfect for trays and large baking sheets. But, where-oh-where will all my bowls go? 


oldnewgreenredo

Here's the cabinetry plan. A 30"built-in pantry on the left. A hood will go over the double ovens. The plan at this time is the counters will be butcher block, and that's not shown on the island or over the dishwasher on the right. Two double glass door cabinets will hold glassware and entertaining next to the fridge, and my everyday--un-matched blue and white dishes and serving pieces on the right above the dishwasher. These will be lit and have glass shelves, and all the other cabinets will have lighting underneath.

The stainless sink on the right will have a built-in drainboard. I'm not sure what sort of light I will have above the sink, as I have to wait and see the space with the soffit gone. We have chosen school house pendant lights for over the island with maybe a hook in the middle for hanging a rack or something interesting.

So tomorrow the plumbing's getting gutted, the dishwasher moved, and the sink plumbing and a new air stack vent installed on the porch.

oldnewgreenredo


This is our cabinet/sink on the back screen porch set up for a party---the sink did not have water at the time. When hubby installed a new drain and running water last week...we discovered a problem that ruined the whole works.


oldnewgreenredo

Water from our sump pumps were shooting out of the sink and up into the kitchen sinks. What a mess. Ground water everywhere---and here's the aftermath. Since we need the porch for eating and cooking while the kitchen is gutted, this plumbing is the major issue right now. Hopefully in a couple days everything will be resolved.

Meanwhile my best friend from my school years is coming on August 3rd for a week for our
50th High School Reunion! That's in 7 days, good grief!

OMG, please will the Plumbing Fairy be kind. Luckily my BF and I will be gone for three days, and leaving all this mess for hubby and his buddy to deal with.

Thanks always for stopping by and I will be happy to answer any comments or questions.


All the opinions and photographs in this blog are my own, I have not been paid or reimbursed in anyway for my opinions or posts. Please do not use photos without linking back to this blog without my permission. Thank you for your cooperation, Sandi Magle

I will be posting at these great parties:

WowUsWednesdays
Moonlight and Mason Jars


Sandi