Saturday, July 18, 2015

From the GARAGE: OLD and REDO!

Junking with my Grannys in the Garage 

I think blogging is a way to share some of my family treasures, my own JUNKING illness, and what to do with it all. 

Thought I would be honest here, and show you just part of this month's unearthing of our families' hoards. Just as many Baby-Boomers are having to do, we sadly had to deal with my parents' passing and their leavings. I fondly look at it as an archaeological dig at times, as my mother never dealt with her parents items, nor my grandmother with hers or my grandfather's, plus both being collectors of many, many SOMETHINGS: OLD or unusual. 

As an only child, in the end there was no quibbling over any of it, other than my husband shaking his head as we filled a huge dumpster with real garbage, while driving truck after truck to Goodwill and Salvation Army, and then packing tote after tote into our truck and car from my parent's garage, basement, and packed wall-to-wall, post-war house. 

NOW, all I have to do is walk to our packed garage or basement and pick a tote, box, bag, or stack and unearth--who knows what? I have promised myself not to leave it all---for MY KIDS to deal with. So come and go junking with me in my garage.

Antique French enameled Fish Poacher


I was so happy to find this, Mom picked this up in the 1980s in an antique shop in N. Illinois. It is a medium-sized fish poacher with some chipped enamel, but complete with the lifting tray and a snug fitting lid. It has  lovely dark blue mottling in the thick white enamel. A French kitchen necessity, the poacher goes across two burners on a standard stove. I will keep this to use, as we eat fish 2-3 times a week, and next time I have a whole fish for poaching, I will share the experience, and the recipe.

SMALL CEDAR CHEST circa 1930s

This was my mom's OLD cedar chest from her teens in the 1930's. 
I commandeered this as a child for my Sweet Sue doll 
and the doll's antique homemade clothing, (circa 1840's to 1870's-I did a school project on this).
Sweet Sue had many small antique accessories and items packed in here. 
I plan to repack the trunk with those antique doll items later for my granddaughter to play with.


The chest is hand built, with brass hardware and brass stripping with hammered nails to hold the pieces of cedar together. It is scribbled inside and on the bottom, $3.89--a bargain for a fine, handcrafted trunk.

Australian Souvenir Punched Pillow cover WWII. 1943-5


This is from my Grandpa and Grandma's items. My dad was a Technical Sargent in a Surgical Hospital unit stationed in the South Pacific and eventually in Australia during WWII. This was sent home to MOM and says, "To Dear Mother from Australia". 
The Koalas are skiing and very three-dimensional in punched wool. This was stored in another cedar chest for 65 years before I found them, apparently never used.


CAMP SHELBY souvenir pillow, acetate and pink fringe 1941


This is a real step back in time also. A Mother and Dad silky pillow from Camp Shelby, Mississippi.
My dad's unit did their maneuvers training there in 1941, before the war broke out. 

Inscription reads 

MOTHER and DAD
In all the years I've known 
you both 
You planned and strived 
for me
Thru sacrifice of everything 
That could a pleasure be
This token of love I'm sending 
to you 
Just as a thought from me.

What to do with these pillow covers, I'm not sure, as my one son is taking my Dad's war items. Now, can a PINK SATIN pillow with long silky PINK FRINGE fall into the WAR category,
 I'm not sure, LOL.


Tin Ash bucket and two Railroad Lanterns


I think these are from my paternal grandfather.
 I vaguely remember the OLD ash can full of sand and oil in his shed for keeping his garden and workbench tools clean and polished. His tools were never rusted, 
because of the dipping in the oily sand. The can still smells like oil 54 years later.
He was a nightwatchman in his later years (pre-1960s) for J.I.Case Mfg. These lanterns were found buried in the back corner of Dad's garage-where no one had been for 40 years. I will do more research on the lanterns, after I clean and bring up the colors and impressions, and also clean the glass. 
One can always use another oil lantern for power outages, maybe even a red one.


Orange coffeepot circa 1960s
Porcelain Pumpkin cup and saucer 1940-50s?


Nice enameled orange teapot probably a 4-cup size, I know this is from the 1960s. This will land in my Etsy shop, BarberryLane https://www.etsy.com/shop/BarberryLane soon.

The porcelain enameled tea cup and saucer are unmarked, and a bit sloppy in execution, so not Bavarian. Probably from China or Japan, circa pre-1960, because I found it wrapped in 1964 newspaper. One of my mom's treasures stashed and forgotten. This will end up in the shop, or in a vintage collage for Halloween. We will see, REDO?

WOOL Carding PADDLES circa 1890s or older


These are 19th century farm equipment, from my husband's side, and used by his great-grandmother for carding wool to smooth, clean, and align the fibers. This made the wool ready for quilts or spinning in the 19th century and date before 1898. The black ink imprinting on the back of the wooden paddles: 

The Only Genuine
Old Whittemore Patent 
improved
No.8 
WOOL 
L.S. Watson & Co.
Leicester, Mass.

The Watson company was founded in 1842 and when the owner died the company was passed to the son and the name changed to the L.S. Watson Manufacturing Company in 1898. 
These are keepers because we have very few items from my husband's side, Bohemian farmers in 
NE Wisconsin since the 1850's. 


Blue Enameled Drip CoffeePot


This was my grandmother's from Denmark (circa 1930-40s) A Scandinavian blue, enameled three-piece, drip-coffee pot. (cover is currently missing on this one). A cotton fabric grounds bag was tied around the ring section, then you poured boiling water (patiently) into it and the rich, strong coffee dripped into the pot. Then, the grounds bag and ring were removed, and the lid placed on the pot for serving. 

My grandmother was notorious for leaving her gas stove burners on, and burning, 
yes, literally melting holes in the bottoms of her teapots and coffeepots. I have several I use for planters.
She flamed many a towel, potholder and an occasional apron, too. 
So, I have two of these pots. This one, with melt holes has a simple mason jar inside for use as a REDO vase. Hopefully maybe the cover will show up in another tote. I will keep this, just because, I can smell her delicious coffee and cardamon baking, just by looking at it. 

Walnut Pillar for Table? or REDO?


I can't blame my ancestors for this one, I bought this or dug it out of the trash---honestly I don't remember---in the 1970's or 80's near my parent's cottage in the middle of Wisconsin. It's pieced, but  all walnut and machine turned. A chunk of the base is AWOL after all these years, but that doesn't mean it will not surface in the future. Either way---it's a fantastic hunk of wood, and I'm seriously going to do something with it now, I promise, Hubby! 
REDO!
I'm really tired of my grandmother's lamp in the living room, 
maybe this could be a huge HUGE REDO lamp?

UH-OH! I'm not doing very well with this batch of goodies, as most are falling into the keep pile. But honestly, so many of the smaller items found with this stash, have already landed
 in my Etsy shop, BarberryLanehttps://www.etsy.com/shop/BarberryLane

Hope you enjoyed this trip into my garage, and as always, Thanks for stopping by!

Sandi


Wednesday, June 24, 2015

Green and Shabby Shopping

(A 2015 post revisit...I just need an Antique show right now!)

ANTIQUE GARDEN SHOW ~ Northwind Perennial Farm, Wisconsin

Fabulous shopping at the Northwind Perennial Farms Antique Garden Show  

Nestled between Burlington and Lake Geneva in southern Wisconsin was this wonderful shabby chic garden show on the weekend of June 10--12, 2015 We arrived about 2pm on Saturday to cars and pickups lining the sides of the country road and the anticipation only grew as we watched people loading their cars with GREAT STUFF!

The perennial farm itself was gorgeous--in full late spring bloom with iris, campanula, and flowering trees and bushes. Winter was hideous in the midwest and this Spring, she dragged her cold wet feet into early June. Everything was at least 2-3 weeks behind in blooming.


ANTIQUE GARDEN SHOW ~ Northwind Perennial Farm, Burlington, Wisconsin

Each of the farm buildings displayed unique country farm and garden antiques, as well as vintage and new gift items. These are available all the time. Vignettes were accented with plantings and pots filled with their huge varieties of perennial plants. 

Here, two vintage concrete chickens share the front of the coop with real chickens, while real ducks wandered here and there, sometimes beneath your feet or hiding under the huge hostas. Cats, goats, and a goose here and there added to the authentic OLD FARM atmosphere. 


 Down winding paths of crushed rock or laid brick were magnificent perrenial plantings mixed with vintage accents such as this lovely maiden calmly feeding imaginary, or maybe not, chickens!

 We lost track of how many ponds and pools dotted the landscaped grounds. The paths went on forever and were landscaped to show Northwind's fabulous design skills as well as their plants. Every peek around a corner was breath-taking and natural. Careful selections showed these perennials thrive in the hard midwest winters and almost all were mature with not a bare spot to be seen.
 
This dry river bed lined with rocks went on forever laced with three foot tall Iris and clumps of blooming chives, along its path edged exhibitors of shabby, garden and farm antiques and collectibles.  

Here is the link  The Northwind Perennial Farm website:

One of the many great booths was Diane Passi -Floral Designs and Antiques. Here is here simple display of Porch Pole Candle holders or simply artifacts. Nestled between them are Northwind's rosemary plants and a potted succulent. Simply staged in front of old shutters, the candles and original paint on the posts was most inviting. I snagged my shelf here.


You can reach her at https://www.facebook.com/diane.passi and she has some great pictures of this show posted.

My original source for this fabulous show was this exhibitor, Jeanine with more wonderful pictures of the show. HER booth was fabulous as were all the booths. 

Check out her blog with pics http://chippyshabby.blogspot.com/2010/06/antique-garden-show-northwind-perennial.html

My finds: a unique wire basket, a really kitschy three tiered metal shelf from the 50's, a heavy grain scoop. Sorry nothing that will land in my shop, https://www.etsy.com/shop/BarberryLane

E found several items, including a mounted horse head plaque and more. A successful and wonderful day in the country---worth the 150 miles round-trip wandering the Midwest Wisconsin roads. There are rumblings of another show in fall…sign up at Northwinds for an event calendar or visit them The Northwind Perennial Farm website:

Thanks for looking 
Thanks always for visiting. 
I will try and respond to every comment and answer every question.

All the opinions and photographs in this blog are my own, I have not been paid or reimbursed in anyway for my opinions, posts or any products shown or anywhere I shop.
 Please do not use photos without linking back to this blog without my permission. 
Thank you for your cooperation, Sandi Magle

I will be sharing at these fine Parties!


Sandi


Saturday, June 20, 2015

Somethings Old, New, Green, Redo!

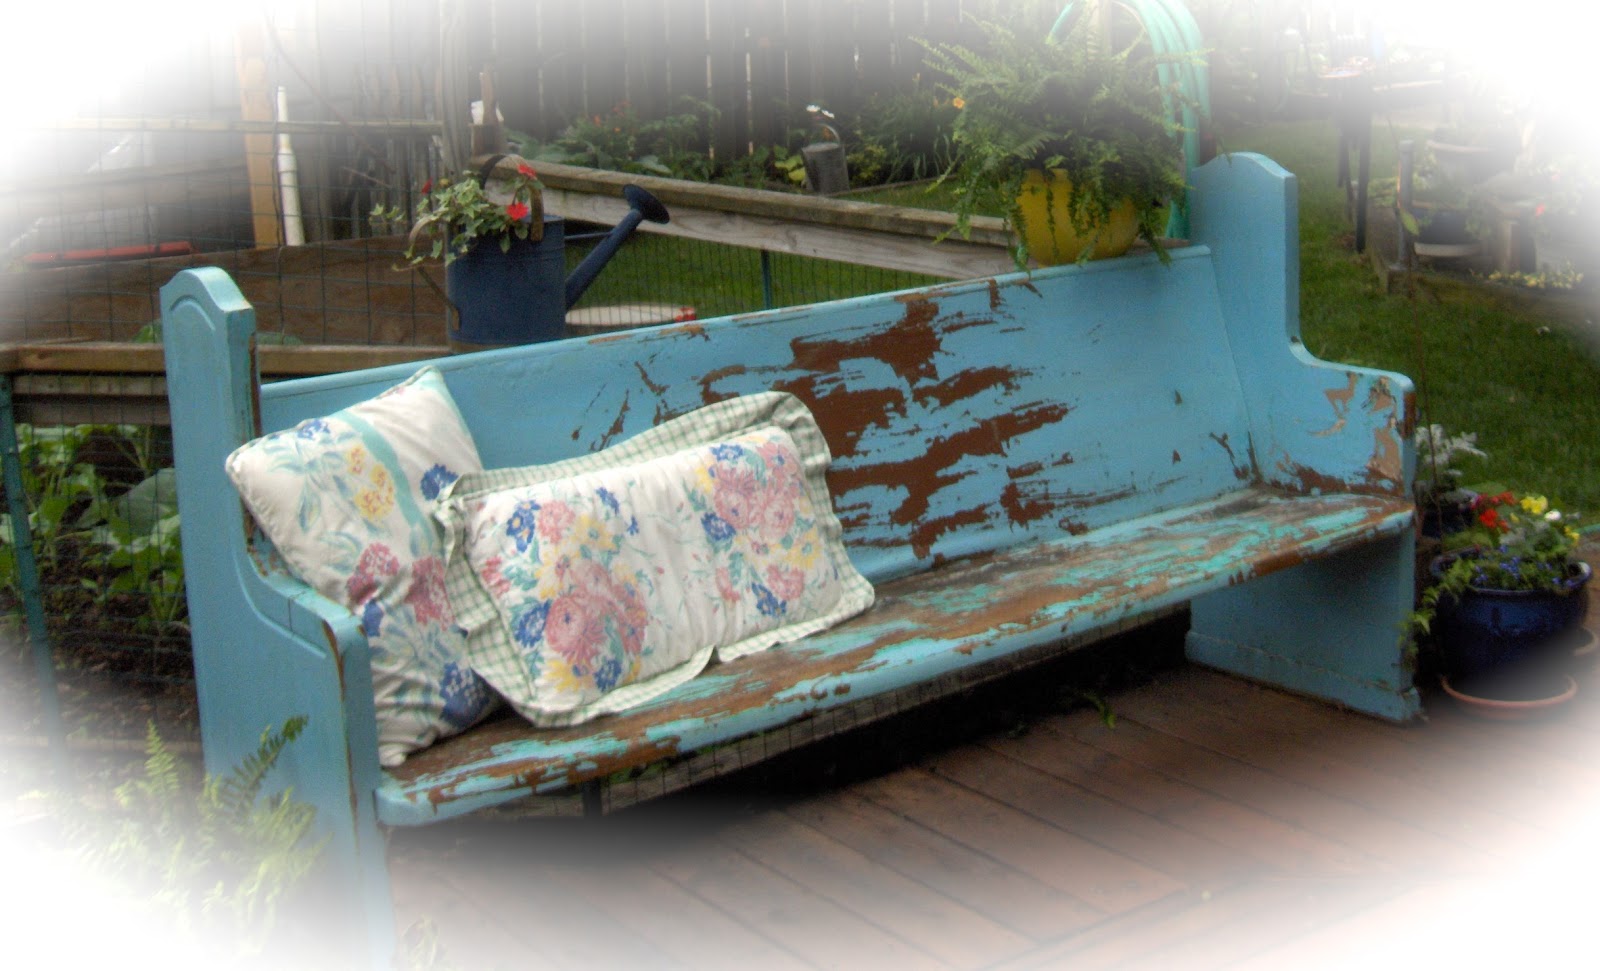
Church Pew Redo

I found this wonderful church pew with at least five coats of paint at the Lake County Fairgrounds Antique Fair. The seven-foot length will be perfect extra seating on the backyard deck. I just loved the funky layers, two shades of brown-tan, the varnished oak, a cream, a turquoise and the country blue.


oldnewgreenredo

Let's get started on the redo. DIY Ladies, this will be totally doable on your own, except for moving the pew, as oak anything weighs a ton. 

The pew was sound, but I reinforced the legs by pre-drilling holes and inserting deck screws and wood glue from the inside out to keep the wood from splitting at the seams. I drilled a series of holes for drainage in the rear of the seat.
oldnewgreenredo


It's wise to use a mask and gloves when working on old finishes, many before the seventies contained lead and other harmful substances. Chipping paint, while a romantic 'shabby chic'
look, is a true hazard to a curious toddler. 

After a vigorous scrubbing with Murphy's wood soap and hot water, I scraped and then I orbital sanded with 60 grit to remove all the loose paint layers and even out the finish. The  shop vac and a damp cloth removed all traces of dust and debris. The surface is  finally ready. Tip: remember to wear a mask when emptying your vac and change the filter before using it again.

I applied two sparse coats of Minwax Helmsman Spar Urethane-clear semi-gloss (indoor/outdoor) varnish. We intend to use this on the back deck for extra seating--so much nicer than tripping over folding chair legs.


oldnewgreenredo
Ready for sealing.


oldnewgreenredo
Church pew seat and Helmsman Varnish with sponge brush


The Helmsman varnish is very runny, and needs to applied quickly in thin coats. I used sponge brushes (not recommended on the label) to avoid carrying too much varnish on the tilted surfaces. Sponge brushes help to soak up excesses instead of pushing it around. I had no significant deterioration of the sponges, other than normal wear from an irregular surface. I used two sponge brushes for the two coats. They don't last long, but I save the handles to use as dowels for other projects. 

Some drips occurred, but this can be brushed out in the next coat. I only waited two hours between coats, as it was a very warm and low humidity. After curing the two coats for a week, the finish is very tight and very shiny. 


oldnewgreenredo

Waterproofing the legs
Tip: Weather proof the legs by submerging the wood into large oil drain pans of  Cabot's Wood Toned Deck and Siding Stain, 19200 Natural. This soaked in nicely and used almost a full quart of stain/sealer. This project will be on a raised deck, but this step is absolutely necessary for furniture in contact with dirt or grass.

My husband and I have a difference of opinion on the 'look' of vintage furniture. While I'm thrilled with the existing patina, he would like to see this pew solid country red to match the doors on the shed. Temporary compromise; the existing finish has to be stabilized, so he has agreed to give it a chance as is and it can always be painted in the future.

This is just one of a history of marriage challenges between a pocket-protector husband and an artist wife, LOL.
oldnewgreenredo

PS: After a month the finish has mellowed and the shine has gone way down. 
I can't wait to use it every day, come join me for a cup of your favorite!
Thanks for stopping by!
Sandi

My shop is at https://www.etsy.com/shop/BarberryLane

Thanks for stopping by, I love all your comments and questions and will try and answer them all.

All the opinions and photographs in this blog are my own, I have not been paid or reimbursed in anyway for my opinions or posts. Please do not use photos without linking back to this blog without my permission. Thank you for your cooperation, Sandi Magle

 I'll be sharing at these fine blog parties:


Sandi


Revamping Wicker!

Revamping Wicker! 


Good Morning! I thought I would share my favorite place, my spot in my house…on my back enclosed porch.

My Mom was a bit of a nut in the 1960s and collected wicker --just about anything. I followed suit and picked up many pieces, some which I have left go and some I have kept.

I picked up this lounge chair (the last piece~~I swear on my 'junker bible') to finish off the back porch which is full of inherited, scrounged and resale finds. One of the reasons wicker is so enduring and stays popular is it is light and airy, and so comfortable in summer.

REDO~~~Wicker is an easy and low cost fix, just a bit of elbow grease and endurance.

All my wicker has been wire brushed to remove the loose dirt and paint, extensively soap/washed and hosed down, then dried completely.

To paint: Use a spray gun or a heavy bristle brush with a good quality white latex indoor/outdoor paint to completely cover every nook and cranny. A final spray of white acrylic enamel will give the surfaces a tight finish for cleaning, this can be canned or spray-gunned. This technique saves on the amount of aerosol paint needed for a good finish.

This paint combo has stood up to years of wear and had to be refreshed only after forty years on my older pieces. Some yellowing may occur on older pieces.


The cushion cover is a heavy triple-weave, all cotton table cloth.


The pillows are: ticking covered, the plaid is two summer napkins with fringed edges. The blue tablecloth on the round wicker table is a family piece of Hardanger embroidery from Denmark. I use a sister piece of this as a backdrop for pictures in my shop.


A silk fern is used in the lamp because the lamp is too top heavy with a pot. The rewired lamp is from the early 20th century and small IKEA bulbs cast a soft glow. I have resisted re-adding the six inch fringe that was on this lamp when my mom found it, as it really makes it ~~~just too much.

This is a Sweet spot to read, blog, list times in my shop, https://www.etsy.com/shop/BarberryLane or cuddle a grand-baby and read a book.

 LOVE IT~~~THIS IS MY SPOT!


All the opinions and photographs in this blog are my own, I have not been paid or reimbursed in anyway for my opinions or posts. Please do not use photos without linking back to this blog without my permission. Thank you for your cooperation, Sandi Magle