
Ad-free Blog
This are the materials for the Clay Pendants and Beads from the free Mather art kit for Wearable Arts.
 |
| oldnewgreenredo |
I've used Model Magic before for kid's crafts, but this small package was enough to do lots of jewelry pieces.
Since the classes are for seniors...the clay is non-toxic and very easy on the hands and to work with. We were encouraged to pick up things in the kitchen for impressing into the clay.
 |
| oldnewgreenredo |
I had letter stamps, a cookie press(teapot) and some old clay stamps from my Pottery days and lots of this and that for textures. The Model Magic has a fluff texture and tends to bounce back after impressing and loosing some of the texture. I left the heavy clay cookie press sit on the clay for quite a time...and that gave the cleanest image
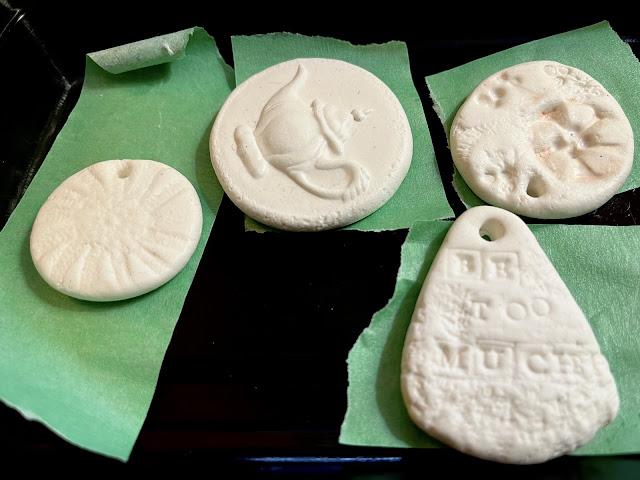
Pendants were made simply by flattening a ball of clay and pressing images into the clay. The pendant was trimmed and I used rubber letter stamps and some lace to texture it.
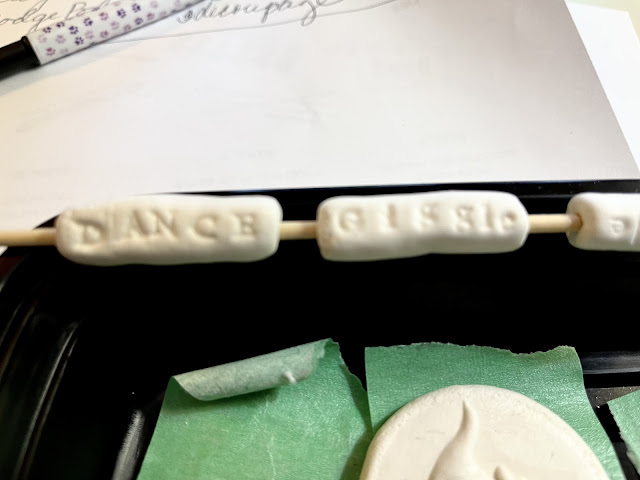
We used ka-bob sticks to make holes and string our beads on to dry.
 |
| oldnewgreenredo |
The beads that once were perfectly round were squishy when impressing and got a lumpy shape. The more I pressed the messier they became...so I just went with it.
An hour class really cuts into your FUSSING time, which is probably a good thing, LOL.
I knew enough to spin/twist my beads on the stick to keep them loose. As clays dry, they shrink, and so will your holes.
The second week!
 |
| oldnewgreenredo |
After drying for an entire week, it was time to paint and decorate. I sealed my pieces with modge podge before I painted. Here you can see how I stained the words on my beads, DANCE, Giggle, Create, LIVE.
|
| oldnewgreenredo |
You can see the textured edges, you can lightly sand those off or go with it. The holes need to be opened more as the puff of the clay closed these up a bit.
 |
| oldnewgreenredo |
Painting was fun and annoying....lol. filling crevices that are so soft means you have to accentuate the actual desired shape. I definitely fussed with this for the full hour class. I used the class acrylics, and then went in with a Micro-point marker to enhance and define the designs a bit.
 |
| oldnewgreenredo |
I used some glass beads from a cut up bracelet to add spacers...we used the enclosed embroidery floss encluded in the kit. I will probably switch the floss out for something more substantial, hemp or rayon cord.
 |
| oldnewgreenredo |
BE TOO MUCH! As an old lady---I've learned THAT, to enjoy life.
I won't wear this piece but will use it in an imspirational multimedia construction for my Grand Girl.
The pendant on the right...was too indistinct ...and eh...
I like the sunflower piece...and may use that with some of my other beads in a piece for myself
 |
| oldnewgreenredo |
That was simple and the marking pen added the details.
 |
| oldnewgreenredo |
This will end up on the wall in my 1:6 scale diorama Bakery Coffee shop. the blue was quite transparent in the colors....and this was three coats and then I gave up.
All the pieces were sealed with Modge-Podge gloss....that was included in the class box. I would consider a spray sealer if you really want to use them as in Chicagoland humidity Modge-Podge can be a bit sticky.
|
| oldnewgreenredo |
Will I do this again. Maybe not...but I will drag out some Sculpey or Polymer clays and play a bit...the harder finished product will give cleaner imprints...and who knows where that will go.
Thanks to Mather and Ruth Guerry for a fun two classes.
Mather Communtiy Information for Free Classes is HERE.
So many different types of online FREE classes for those over 55.
Remember
DANCE* Create* Giggle *LIVE
Thanks always for visiting,
All the opinions and photographs in this blog are my own, I have not been paid or reimbursed in anyway for my opinions, posts or any products shown.
Thank you for your cooperation,
Sandi
Sandi
 |
You could put tie-tack pins on the backs of those round disks if you didn't want to make it as a bead. I love the teapot and your painting is terrific. I should do this with the kids sometime though I think the week dry time might be frustrating for them!
ReplyDeleteYea, the week is a long time, and they were still a bit squishy...maybe poly clays which go in the oven and can be ready in an say an hour...I use sculpey white in the big pack for making my food stuffs for the dolls. Takes paint pretty well and is easy to use. Apparently there is a soft sculpey out there that is easier to work with?
DeleteThis is truly a masterpiece, Sandi, what a great idea you had, and what a creative skill you showed in realizing it, I'm far sure your Grand Girl will be enthusiastic, congrats!
ReplyDeleteMay your Sunday be a blessed one.
Hi, Daniela. The classes are fun and it is always nice to try new things. I confess I made a ton of beads back in the Macrame days, beads out of stoneware and fired them. Hugs and thanks for the visit! Sandi
Delete