STILL AD-Free
Tuesday: It's finally a no GARDEN day---because of rain and wind, thankfully it's pretty mild so far. After almost 2 full weeks of straight gardening, greenhouse growing-daily, yard clean up, yard projects, planting perennials and flower starts-- I'm getting a break to sit on my butt and catch up with the computer.
Life isn't all work and no play. This month I decided to join another Mather class for the-Illinois Elderly We started this Monday, with a simple introduction to materials for Drawing and simple techniques. It's only an hour once a week, but to make myself participate daily in sketching/drawing ---I also am doing the May DoodleWash which is Drawing or Watercolor with a daily prompt,
Today was a PEN.
PAGE ONE
 |
| oldnewgreenredo free to use |
For this PEN sketch, I used a 2B pencils, Zebra pink and purple gel pens and a extra Fine Sharpie for the darkest details. Just a sketch of a PEN to get my feet/fingers moving.
I began on Monday after the Mather class to work on my first prompt for Doodlewash for that day---PEN. Not very sophisticated but at least recognizable. Despite my art background, I haven't seriously drawn/sketched anything for quite awhile, years even. Occasionally I would sketch fashions from the awards shows, or last night's Met Gala, or draw plans for a new structure for dolls' diorama. I always layout the garden plans on paper, mostly so I have a record...but beyond that, the last time I did any serious drawing was nearly 20 years ago...sadly.
First thing I did was dig through all my art supplies and pulled out all the drawing pencils, pens, I had. I sorted and laid all my pencils, pens, colored pencils, water color pencils, some I had been gifted and never used...and found three old sketchbooks that were basically EMPTY.
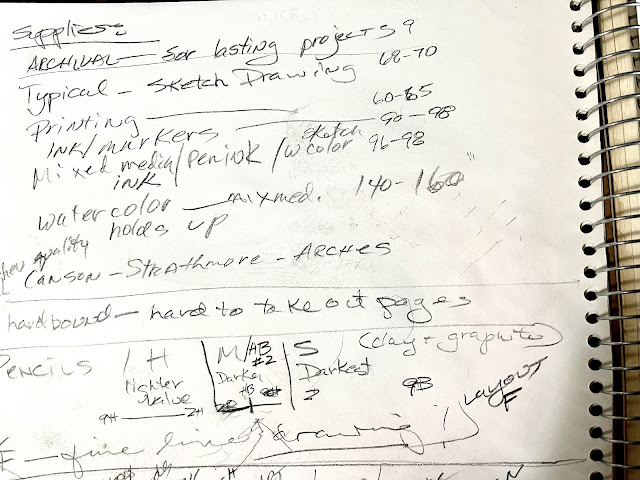
Here are my notes/scribbles on the information from the Mather instruction.
Materials and Tools are always the best way to start.
PAGE TWO
 |
| oldnewgreenredo. free to use |
I'll type the scratchings out for you...LOL. I will mention I have bad arthritis in my hands, but try and use them as much as possible. Another reason to resurrect my drawing skills.
SUPPLIES: Basic list that Mather suggested, and my notes on that.
Sketchbook or PAPER: descriptions of types of paper for drawing/sketching.
Papers: Archival quality is for permanent artwork $$$
Typical sketching paper/sketchbook quality smooth 68-70# paper is fine for sketching
Drawing/printing paper smooth 60-85# paper is fine for sketch work.
Drawing inks or marker paper (to avoid bleed through) use 96-98# papers
Watercolor, washes, smooth or textured use 140-160# papers.
There are a many types of paper finishes in the watercolor range. If you are starting out, I would suggest buying a pad of assorted papers to find out which type of paper you like for your style of artwork or projects. (Descriptions will be smooth to rough, Hot Press, Cold Press, and more.)
Excellent brands of papers are Canson, Strathmore and Arches which are readily available in local stores. Storebrand products are usually aimed at grade/jrhighschool. But, they all have different grades within their selections. For hobby drawing, better quality printer paper is okay for pencil work. I do like a sketchbook or pad, to keep my messes collected.
Types of sketchbooks:
Spiral, easily removable pages, comes in many styles and sizes.
Hardcover bound sketchbooks, hardy and portable for traveling in smaller sizes. but, difficult to remove pages easily.
Also, pads that are glued together on one end are the least expensive and easily removed from the pad.
Personally I'm working in an old spiral Strathmore #60 Sketchbook for Drawing, it has a soft finish, meaning there is a bit of texture instead of extremely smooth. I will be doing some water color or ink washes or using inks pens, and will add an extra piece beneath to prevent bleed through when doing so. This will be a working sketchbook, not for finished artwork. In other words a PRACTICE BOOK! Even DaVinci sketched ink to paper on scraps of old papers.
Fixatives:
I'm also going to be using a workable fixative to protect my finished sketches. Pencil is not permanent and can smudge, as will charcoal.
I've used aerosol Grumbacher and Krylon spray fixatives, specifically for this type of drawing artwork. I would not recommend using any fixative unless you try it on a sample of your paper and the drawing utensil/medium you are using. Some pens/inks/colored pencils/gel pens, sticks, etc will react with the different fixatives.
Be sure to read your labels on usages and allergies.
Workable fixatives will secure your artwork from rubbing off or smudging. Workable means you can work again on top of what has been preserved. No change will occur to what has already been done! This can be done several times.
There are many brands on the market that are probably great. A can lasts forever as they are fine mist.
Pump/non-aerosol fixative sprays have very mixed reviews. Since I often work with multiple media at the same time, I won't be using those as they don't work on everything.
(Permanent) aerosol Fixatives come in different finishes, some even have UV protection to prevent fading for finished ART work. Definitely worth it, for preserving completed artwork. $$ cost is a bit more for these products.
Next step was Mather's description of Drawing pencils/pens. I took this a bit further and tested each of the pencils and brands I had to access which materials I might want to use for my new drawing projects.
PAGE 3
 |
| oldnewgreenredo. free to use |
Pencils are graded by the hardness of their graphite content with the hardest 9H through H to soft B or F-2B through 9B as softest, and all the numbers in between.
I really don't have all the types of pencils, with an H being my hardest and my softest a 4B. You really don't need ALL the pencils, as pressure also produces different types of lines. (The top row of scratches is my brand tests of what I have, ( left to right)
I apparently I bought a couple of small sets of pencils in the past. Artist Loft is the Michael's store (student quality) brand.
First box:
H (Artist Loft Necessities) Hard graphite for fine lines
H (Artist Loft charcoal) which is much softer than graphite and smudges and leaves a different soft but darker look.
Second box:
No.2 or HB) yellow unbranded -your typical school pencil
Artist Loft M (HB) charcoal
Roseart HB (smoothest line in this grouping)
Artist Loft Necessities HB also a nice clear smooth line
Osco no.2 also smoother than the actual art pencils-(this is a local Chicago area grocery store brand) again a school pencil.
There really isn't that much difference between the graphite HB's or no.2's
Third box:
Artist Loft Necessities 2B nice and dense color on this one
Artist Loft Necessities 4B not much different from the 2B
There is an F pencil out there that is also called a Layout pencil---very fine for detailed work which I don't have. But I work very loose and seldom detailed.
Mechanical(Drafting) Pencils and Leads are a metal pen with removable leads.
An easy way to have all the different lead sizes of graphite is a mechanical pencil that you fill with the varying type of leads. I personally like using all sides of a pencil not just the point, and I wouldn't want to be changing leads, or have multiple pencils since they are $$$, so I don't use mechanical pencils except for fine detail or lettering, where you will want complete consistency in your lines. I do have two somewhere, and have used them in the past for drafting plans for building projects.
In my Mather notes they spoke about a shield for drawing to protect you drawn areas from smudging. Michael's no longer carries these instore, but basically it is a raised bar that spans over your work for your hand to rest on so it doesn't come in contact with the paper. (These were used to be used for architectual/mechanical drawings before CAD/computer machines)
A piece of clean paper will work underneath your hand, long as it stays still, removeable painters tape will do that, or removable poster tacky stuff.
 |
| oldnewgreenredo free to use |
Erasers and Stumps:
Erasers aren't just used for mistakes, but to highlight and general clean up of your drawings.
Several ART erasers:
Old type are gum(gold/brown) sometimes crumbles or leaves oil
Kneaded(gray) erasers kneaded eraser can be bent to create sharp edges for details, excellent at remove smudges, your basic art eraser.
White Vinyl: Harder and has sharp edges, takes smudges and soft lines away, harder pressed lines not so much. I'm just getting used to this one.
Pink: school erasers, mine is hard as a rock and useless at this point, but they are probably great at removing no.2 pencils for which they were designed for. I tried lifting some mess off the cup image on the next page, and it just turned the paper pink.
Nothing I had really worked on the colored pencils I have. Vinyl left a faint line, perhaps good for highlighting, the gray Kneaded not much came up at all.
Moving on, the Mather instructor suggested a holder/eraser with the name brand of Xeno Tri, which I will try and find because as it it cleanly pulled off all of the pencil graphite in a straight fine line in her demonstration. So, it would be nice for highlighting as well as a broad stroke on the side of the triangle shape and easy to hold with the ergonomic holder.
Stumps: Paper blending sticks, sometimes can be used to highlight---they just pick/scrape up the graphite or charcoal. These are often peeled to continue using. Other ways: paper, tissue, bare fingers or q-tips.
(I haven't found stumps close to home, but will keep looking as I remember them excellent for charcoal.
PAGE 4
 |
| oldnewgreenredo. free to use |
We went over types of shading techniques. I used a medium and Artist Loft Necessities 2B pencil for the samples.
The cup image was just me playing..yes I have a mug with a dressed Jack A on it. I'm a bit weird. I used hatching and cross hatching with charcoal and graphite pencils on this scribble, which needs to be cleaned up.
Scribbles: Basically any repetitive motion, here I used circles, but it could be any pattern to shade the paper where the lines are continuous.
Hatching: A series of lines at an angle, straight or side to side. Darker was achieved by pressing harder or placing the lines closer together. Closer together gives darker values to your shading.
Cross Hatching: Second layer of straight lines over and opposite of the hatched lines. Sometimes these lines can be curved to indicate shape.
Dots: Think Pointillism, or multiple dots placed as shading, less dots-for light, many dots for darker. I don't have the patience for this with a pencil, but maybe with a marker.
Blending: Basically rubbing out any of the other shading techniques chosen to grade the shading. This is why the smudging was on the previous page from the charcoal examples I did at the bottom of this page.
PAGE 5
free to use
 |
| oldnewgreenredo free to use |
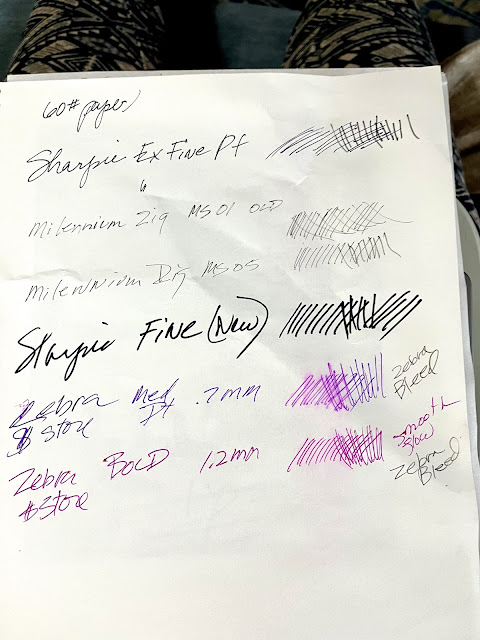
I really don't have a large selection of markers right now. I have inexpensive gel pens which I didn't test, but a few new drawing pens from the $ store
Top to bottom on the 60# Strathmore drawing paper.
Sharpie Ex Fine Pt: Probably my go to scribble pen, reasonable in multi packs. Last for awhile if you are gentle. Tips will mash and sometimes the cap isn't closed completely and dries out. Alcohol based ink which is permanent. You can fix a drying up pen by dipping in alcohol.
Millenium Zig pens: First the .01 A higher end quality pen with the soft tip, also permanent, this one is pretty much done...gives tight fine line.
The next size Zig I have is a .05...which doesn't seem much thicker, but was in better shape.
(There are many pens on the market some very expensive, others reasonable, you have to see what you like.)
Sharpie Fine Pt. This was a new pen and the flow was strong and the tip was fresh and clean. Great overall pen, the tips get wider as they are used. You basically can have a variety of lines by the age of your pens. Permanent and alcohol based.
I had two pens I purchased from the $$ Store just last week for a doll project:
Zebra Medium-Pt .7mm in a purple color I cross hatched those. It said permanent but a one-stroke, but a water wash down all the samples on this page showed slight bleeding of the Zig pens. The tip was nice and tight and the lines clear and even, just not water-proof permanent.
Zebra Bold-Pt 1.2mm. this was a Hot Pink color which was a little redder than the purple. (This also bled from water) Not water-proof permanent.
(I think the reason these were in the $ store is they are mislabeled, the .7mm should be thinner than the 1.2mm so they are both mislabeled. These pens are moderately priced everywhere. I may try more where I'm not going to use water or in multi-medium projects.
Thinking ahead, I dug out the colored pencils I had without tearing the entire house apart. Two basic sets.
PAGE 6
 |
| oldnewgreenredo free to use |
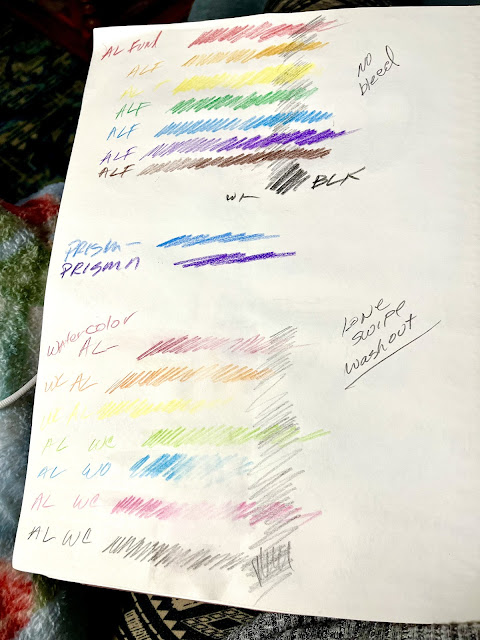
Top series:
Artist Loft Fundamental colored pencils. Medium grade not the best or the worst, clear colors.. (I think they are better than Roseart or General brands). I worked the white pencil over the top of the colors and the black over the top...then I stroked water over all the lines top to bottom...no smearing or bleed. A good value for the money.
The two in the middle are Prisma Color $$$ and they are quite expensive as sets. My kids/grand have stolen most of what I had. Wait for a sale or coupon and buy the largest set you can afford. Prismas are heavy on pigment and permanent, for me, these have the best color depth and selection. No bleed with water. You can also work on top of each of them. The more expensive colored pencils are often sold singly, so you can test them, (Grumbacher, Derwent, and Prismacolor all $$$)
The Artist Loft Watercolor pencils are next.
I'm Not impressed with the depth of any of the colors, also they did not bleed with water how they should, but basically erased with the water strokes. I had a Derwent set which worked better, but I have no idea where those ended up but they are at least 2 1/2 times the cost $$$ of the Artist Lofts? I will just use the AL's for colored pencils, but won't bother trying to make them work as watercolor pencils.
That's it for today. I'd be happy to answer any questions, or you can just follow along on this journey of rediscovering my drawing skills, if they want to be rediscovered.
If I ever find my pen holder and nibs, we could do that---but first you must crawl to walk, so pencils/pens it is. By all means copy my pages here, or make your own with your own sketching tools. It always helps to a reference when you forget which pencil...you just LOVE!
HAPPY DRAWING!
I have not been paid or reimbursed in anyway for my opinions, posts or any products shown.
If you enjoyed this post, please follow this blog by blogger or
FOLLOW IT which you will find in the upper right hand corner of this page.
Thanks always for visiting.
I will try and respond to every comment and answer every question.
I will be sharing at these fine Parties!
The photos in this blog are my own or I have permission to use them from family. Any others will be attributed to source if possible
Sandi
 |